MusicCast & Disklavier ENSPIRE Setup Manual & Connection 1 Connect the Disklavier, WXA-50 and WXC-50 in the same network. 2 Connect the OUTPUT on the Disklavier to the AUX input on the WXA-50. - Speakers can be connected to and driven by the WXA-50. * You can also play the sounds of the WXA-50 by using the Disklavier's included speakers. 3 Connect the OMNI OUT from the Disklavier to the AUX input on the WXC-50. - Speakers cannot be connected to the WXC-50.
MusicCast & Disklavier ENSPIRE Setup Manual MusicCast CONTROLLER 1 CONNECT all MusicCast devices. - Add New Device in Settings, then follow instructions on the App. 2 WXA-50 (device wired to OUTPUT) - [Settings] 1 2 [Select room] “WXA-50” Set the Room Name to “Piano Room.” Set the Room Photo to the Piano Room photo.
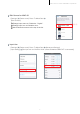
MusicCast & Disklavier ENSPIRE Setup Manual 4 Edit Source - [Settings] [select a room] “Piano Room” [Edit Sources] - [select input where Disklavier output is connected] “AUX” 1 Change input name to “Disklavier - Backing.” 2 Change input icon to Disklavier icon. Move Disklavier source to the top of the list. 3 5 Input trim - [Settings] [select a room] “Piano Room” [Advanced Settings] - [Input setting] [Set the input trim to a maximum of 6.
MusicCast & Disklavier ENSPIRE Setup Manual 6 WXC-50 (device wired to OMNI OUT) - Settings 1 2 [select a room] “WXC-50” Set the Room Name to “Piano To MusicCast.” Set the Room Photo to the Piano To MusicCast ① ② room photo. 7 Disklavier Settings - Settings [select a room] “Piano To MusicCast” Add App Shortcuts [select input where Disklavier OMNI OUT is connected] ”AUX” Disklavier Disklavier IP Address - Select the Disklavier IP Address. This should automatically be detected and shown.
MusicCast & Disklavier ENSPIRE Setup Manual 8 Edit Source for WXC-50 - [Settings] [Select room] Piano To MusicCast [Edit Sources] 1 Change input name to “Disklavier - Digital.” 2 Change input icon to Disklavier icon. Move Disklavier source to the top of the list. 3 ①②③ 9 Input trim - [Settings] - [Input setting] [Select room] Piano To MusicCast [Advanced Settings] [Set input trim to 6.
MusicCast & Disklavier ENSPIRE Setup Manual Disklavier Setting 1 Check that “Auto OFF MODE” (hardware switch) is set to Off (disable). Otherwise, once the Disklavier is turned off, it cannot be turned on from the app. 2 [Settings] 1 2 [Connection] [Audio I/O] Check that OMNI OUT is set [“OUTPUT + PianoTG”] (optional) [Link OMNI OUT Vol to Main Vol] - When this is set to “On,” the main volume control of the Piano controls all volume settings (OUTPUT + OMNI OUT) together.
MusicCast & Disklavier ENSPIRE Setup Manual 4 Static IP - Set the Disklavier to static IP. If the Disklavier’s IP is changed, MusicCast will not be able to control the instrument. Although the DHCP IP setting normally changes when the router is turned off / on, the IP may sometimes change, even without a power off / on cycle. - Settings Network Wired / Wireless Network - Change “Use DHCP” from DHCP to Manual. - (Optional) If your router has a static IP feature, this will work as well.
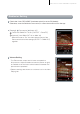
MusicCast & Disklavier ENSPIRE Setup Manual Operation 1 Select room: “Piano To MusicCast” 3 Now playing Here you can perform basic operations, including piano volume, and playback control. 2 Select input: “Digital” Disklavier controller This lets you jump to the Disklavier app.
MusicCast & Disklavier ENSPIRE Setup Manual Playing the sound in other rooms 4 Press the Link button. Settings can also be made from the Rooms list. 5 Select the desired room. 6 Multi-room playback You can also simultaneously play the sound in other rooms.