
User Manual


41
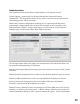
The Manage group screen shows a list of the groups defined for this system on
the left, and the currently active group on the right side.
Pressing the “+” sign (1) in the top left of the right column will create a new
group. A group name needs to be entered to create the group. Each Executive
Elite Base DSP unit can have up to 10 mute groups.
To manage and change a group, the group needs to be the active group on the
right side of your screen. The group name of the active group is shown in the
Group field (2). To select a different group as the active group either select it
from the drop-down in the Group field in the right column, or click on the
“Edit” button (3) of that group in the left column. The group will now be
opened on the right side of the screen.
To delete the active group click on the trash can symbol (4). The only group
which cannot be deleted or renamed is the “Default” group.
To change the name of the active group click on the pen symbol (5) and enter
the new name.
Once a group is active for management microphones can be added to it. Select
any microphone currently in another group listed in the left column, and drag
it over to the right column to add it to the active group.
To remove a microphone you can mouse over the microphone you want to
remove, and click the “x” symbol on the top right, automatically adding that
microphone to the “Default” group.
To define the mute behavior for the active group select the mute behavior from
the Mute Type drop down list(6), see page 87 for information on the different
mute group options.
1
2
3
4
5
6
7