
User Manual


78
show any activity on the channel LED and front panel LCD, and will be shown
as “Not Paired” on the web interfaces.
During pairing, the microphone LEDs and the channel LED on the front of the
Base DSP Unit will stay solid red.
Only one microphone can be paired to any single Base DSP channel at a time.
Any Base DSP Unit will protect against several channels pairing at the same
time. However, if pairing is started from several Base DSP Units and
microphones in parallel, microphones might pair to any of the Base DSP Units
currently in paring mode.
Both the front panel interface and the web interface support a pairing wizard,
managing pairing of several microphones in succession. This supports setup of
new systems with multiple microphones to be paired.
To pair an individual microphone to the Base DSP Station and the Remote
Antenna:
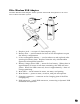
1. Turn the microphone off (no LED activity). If the microphone is ON, touch
and hold the Mute area or press the mute button for about 10 seconds until
the LED turns solid red. If the microphone’s mute LED behavior is set to
Solid Green/Red please note that the LED will be constant red while holding
the mute area or pressing the mute button. Ensure that the button is helt
for 10 seconds. Afterwards, release the touch area or mute button to turn
the unit off, the LED will turn off. Note that the microphone beeps once
after about 5 seconds while holding the mute button. This does not indicate
that the microphone is switched off.
2. Place the microphone into pairing mode by touching the Mute area or
holding the mute button for several seconds until the LED turns solid red
and then release the touch area or button. The LED first turns green; do not
release the touch area at that time. Once the LED is constant red, the
microphone is in pairing mode.
3. Within one minute put the desired channel of the Base DSP Station into
pairing mode using either of the management interfaces of the Elite Base
DSP Station. See page 32 on how to put a microphone channel into pairing
mode using the front panel, or go to the monitor or microphone audio page
of the local web UI and press the pair button on the channel you want to
pair the microphone to. The LED on the front panel for that channel will
turn solid red. Once the LEDs on the front panel and on the microphone
start flashing either red (muted) or green (unmuted) pairing is complete.
4. If pairing fails, the microphone LEDs will start blinking red-green if it was
not paired before. If the microphone was paired to a different channel on
the same Base DSP Station or to a different Base DSP Station before, it will
try to link back to that channel. Previous pairing information is not deleted
on the microphone during a failed pairing attempt.