Owner’s Manual EN
SPECIAL MESSAGE SECTION This product utilizes batteries or an external power supply (adapter). DO NOT connect this product to any power supply or adapter other than one described in the manual, on the name plate, or specifically recommended by Yamaha. This product may also use “household” type batteries. Some of these may be rechargeable. Make sure that the battery being charged is a rechargeable type and that the charger is intended for the battery being charged.
FCC INFORMATION (U.S.A.) 1. IMPORTANT NOTICE: DO NOT MODIFY THIS UNIT! This product, when installed as indicated in the instructions contained in this manual, meets FCC requirements. Modifications not expressly approved by Yamaha may void your authority, granted by the FCC, to use the product. 2. IMPORTANT: When connecting this product to accessories and/or another product use only high quality shielded cables. Cable/s supplied with this product MUST be used. Follow all installation instructions.
PRECAUTIONS PLEASE READ CAREFULLY BEFORE PROCEEDING * Please keep this manual in a safe place for future reference. WARNING Always follow the basic precautions listed below to avoid the possibility of serious injur y or even death from electrical shock, short-circuiting, damages, fire or other hazards. These precautions include, but are not limited to, the following: Power supply/AC power adaptor Water warning • Only use the voltage specified as correct for the instrument.
• Before moving the instrument, remove all connected adaptor and other cables. • When setting up the product, make sure that the AC outlet you are using is easily accessible. If some trouble or malfunction occurs, immediately turn off the power switch and disconnect the plug from the outlet. Even when the power switch is turned off, electricity is still flowing to the product at the minimum level. When you are not using the product for a long time, make sure to unplug the power cord from the wall AC outlet.
Congratulations and thank you for purchasing the Yamaha EZ-200 PortaTone! Please read this owner’s manual carefully before using the instrument in order to take full advantage of its various features. Make sure to keep this manual in a safe and handy place even after you finish reading, and refer to it often when you need to better understand an operation or function. Main features The EZ-200 is a sophisticated yet easy-to–use keyboard with the following features and functions.
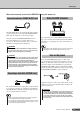
Contents Main features ............................................................. 6 Supplied accessories ................................................. 6 Setting Up 8 Power Requirements ................................................. 8 Connecting headphones (PHONES/OUTPUT Jack) . 9 Connecting a footswitch (SUSTAIN Jack) ................. 9 Using the MIDI Terminals .......................................... 9 Turn on the power......................................................
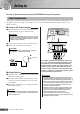
Setting Up Be sure to do the following operations BEFORE turning on the power. Power Requirements Although the instrument will run either from an optional AC adaptor or batteries, Yamaha recommends use of an AC adaptor whenever possible. An AC adaptor is more environmentally friendly than batteries and does not deplete resources. ■ Using an AC Power Adaptor q Make sure that the power of the instrument is off (display is blank, except for notation staff).
Setting Up Make all necessary connections BEFORE turning the power on. Using the MIDI Terminals Connecting headphones (PHONES/OUTPUT Jack) other MIDI instrument The EZ-200 speakers are automatically shut off when a plug is inserted into this jack. The PHONES/OUTPUT jack also functions as an external output. You can connect the PHONES/OUTPUT jack to a keyboard amplifier, stereo system, mixer, tape recorder, or other line-level audio device to send the instrument’s output signal to that device.
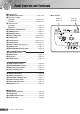
Panel Controls and Terminals ■ Front Panel q [STANDBY/ON] switch ....................................page 9, 26 w MASTER VOLUME [+] button ....................................................... pages 9, 26 [-] button ........................................................ pages 9, 26 e LESSON PART [L] button .............................................................page 30 [R] button.............................................................page 30 r [LISTEN & LEARN] button..........................
Panel Controls and Terminals Display (page 28) Voice List (page 58) u r 001 t GrandPno -03 !1 !0 y !8 !2 i o !3 @1 @0 !9 001 @2 GrandPno -03 @3 ■ Rear Panel @4 @5 @6 @7 CAUTION • Playing while looking at the lights for a long period of time may cause eyestrain or stiffness in your neck and shoulders. For your health and comfort, we recommend that you take a ten-minute break after every hour of playing.
Step 1 — Quick Guide — Playing the Songs Turn the power on and adjust the volume Turning the power on Press the [STANDBY/ON] switch to turn on the power. Press the [STANDBY/ON] switch again to turn the power off. Adjust the volume When turning the power on, bars appear at the left side in the display to indicate the value of the master volume. 001 GrandPno -03 Displays the current volume.
Listen to the Demo Songs Quick Guide This instrument has 100 built-in Demo Songs. To listen to the Songs, press the [DEMO] button. The Songs play back in the Song number order. Step 1 Playing the Songs Press the [DEMO] or [START/STOP] button again to stop the Song. or Selecting and listening to a specific Song Select the desired song number and play it. 1 Press the [SONG] button. The Song number and name are displayed. Appears when the Song mode is active.
2 Select the desired Song by using the number buttons [0]–[9], [+], [-]. 3 Press the [START/STOP] button. Refer to the Song List on page 15. The Song will begin playing. You can stop playback at any time by pressing the [START/ STOP] button. ● Other Operations [REW] button .......... Fast-reverses through the Song if pressed during playback (no sound is heard during fast reverse). Decreases the measure number if pressed while playback is stopped. [FF] button...............
Song Name Favorite No. Song Name 035 Londonderry Air (Traditional) 001 Bad Day (Daniel Powter) 036 002 Dancing Queen (Benny Andersson, Bjorn Ulvaeus, Sig Anderson) When Irish Eyes Are Smiling (E.R. Ball) 037 Muss I Denn (F. Silcher) 003 Daughters (John Mayer) 038 America The Beautiful (S.A. Ward) 004 Fallin’ (Alicia Keys) 039 005 Hey Jude (John Lennon, Paul McCartney) 006 Linus And Lucy (Vince Guaraldi) 007 Since U Been Gone (Martin Sandberg, Lukasz Gottwald) 040 041 042 043 No.
Step — Quick Guide — 2 Changing the Voices Try playing a variety of instrument Voices In addition to the piano Voice, a wide variety of other instrument Voices can be selected and played, including guitar, trumpet and flute. The Voice selected here becomes the Main Voice. 1 Press the [VOICE] button. The Voice number and name are displayed. Voice number Appears when the Voice mode. 001 Voice name GrandPno -03 2 Select a Voice.
Play the keyboard. Quick Guide 3 Try selecting and playing different Voices. Step 2 Changing the Voices Playing the Grand Piano Voice When you simply want to play a piano Voice, all you have to do is press one convenient button. Press the [PORTABLE GRAND] button. The Voice “001 Grand Piano” will automatically be selected as the Main Voice.
h us Br q h C us lic k H S Ta wir l p Sn Sw irl a r Sn e Ba are Rol ss H l Ba Dr Sof ss um t So D ru m ft Ba Ha ss rd D ru m Sn Sna ar re e M H Fl H oo ar d r Fl Tom oo rT L om Lo H w M To id m T M om id L To C H mH hi ig n h R ese To id C m e C ym y Sp mb bal la al C C sh C up ra sh ym ba C y R id mb l e C al 2 ym ba C Bo l 2 on ng ga o H H M C ute on Ti ga m L ba l Ag e H og o Sa C H m ba ab Sa W asa h m ba istl W eH h G istle W uiro L oo L d on W Blo g oo ck d B H C loc ui ca k L Tr O ia ng
Quick Guide Try out each key. You’ll hear bongo drums, congas, maracas, and more—a comprehensive variety of drum and percussion sounds. Details on the instruments and key assignments of each drum kit can be found in the Drum Kit List on page 63.
Step — Quick Guide — 3 Play with the metronome Start the metronome The instrument includes a metronome with adjustable tempo and time signature. Play and set the tempo that is most comfortable for you. Starting the metronome Turn the metronome on and start it by pressing the [METRONOME ON/ OFF] button. To stop the metronome, press the [METRONOME ON/OFF] button again. 001 GrandPno 1 1 Displays the current beat.
Setting the numerator of the metronome time signature Press and hold the [METRONOME ON/OFF] button for longer than a second. Current numerator appears. Time signature numerator 04 TimeSigN Hold longer than a second 2 Set the time signature numerator (0–60) by using the number buttons [0]–[9], [+], [-]. The first beat is accented with a bell sound and the rest with clicks. When set to 00, the metronome sounds all beats with a click sound (no accent).
Setting the metronome volume 1 Press the [FUNCTION] button a number of times until “MetroVol” appears. Metronome volume 100 2 22 MetroVol Set the metronome volume (000–127) by using the number buttons [0]–[9], [+], [-].
Step — Quick Guide — 4 Play with a Style Quick Guide Selecting a rhythm of a Style The Style feature provides backing and rhythm parts in a wide variety of musical categories, including rock, blues, disco and much more. Here’s how to play a rhythm of a Style. The rhythm sound consists of percussion instruments. Press the [STYLE] button. The Style number and name are displayed. Style number Step 4 Play with a Style 1 Appears when Style Style name mode is active. 001 8BtModrn 001 2 Select a Style.
Playing with a Style On the previous page, you’ve learned how to select your favorite rhythm of a Style. Here, you’ll learn how to expand on that rhythm with bass and chord backing, and use all of it as your accompaniment as you play. 1 2 Press the [STYLE] button and then select a Style. Refer to the “Selecting a rhythm of a Style” on page 23. Turn auto accompaniment on. Press the [ACMP ON/OFF] button. Press the [ACMP ON/OFF] button again to turn the auto accompaniment off.
4 The Style will begin playing as soon as you play a chord in the accompaniment range of the keyboard. Quick Guide Not sure how to play chords? No problem! This instrument is capable of playing chords even if you only play one key. Try playing one, two or three keys (any notes will do) in the auto accompaniment range of the keyboard. Different keys will produce different results. Refer to page 48 for detailed instructions for playing chords.
Basic Operation and Displays Basic Operation Turning the power on Adjusting the volume Press the [STANDBY/ON] switch to turn on the power. Press the [STANDBY/ON] switch again to turn the power OFF. Pressing the MASTER VOLUME [+] and [-] buttons. Press the [+] button to increase the volume. Press the [-] button to lower the volume.
Play with a Style Press a button to select a basic function Press the [SONG] button to select a Song. Press the [STYLE] button to select a Style. When you select a basic function, the name and number of the currently selected Song, Style and Voice is shown. Also, the icon(s) of the currently selected Song, Style or Voice appears at the top on the display. Press the [VOICE] button to select a Voice.
Play with a Style Display The Main display shows all of the current basic settings for Song, Style and Voice. Notation Measure Indicates the current measure during playback of a Song or Style. Displays the melody and chord notes of a Song when the Song is playing, or the notes of chords you specify when the Dictionary function is in use. At other times the notes you play on the keyboard are displayed. 003 Beat Display Indicates the beat of the current Style or Song with flashing arrows.
Song Lesson Yamaha Education Suite 5 You can select any Song you like and use it for a left-hand, right-hand, or both-hands lesson. Song Lesson teaches you how to play Songs in three separate steps. ■ The practice methods: Lesson 1 (Listen & Learn) ....... Listen and learn the melody or rhythm of a selected Song. Lesson 2 (Timing) ..................... Learn to play the notes at the correct timing along with the Song. Lesson 3 (Waiting) .................... Learn to play the correct notes.
Song Lesson Lesson 1 (Listen & Learn) There’s no need to play the keyboard in Lesson 1. The model melody/chords (in other words, the musical material you should learn) of the part you selected will sound and the appropriate keys will automatically light. Listen to it carefully and learn it well. 1 Select the desired Song for your lesson. Press the [SONG] button, and then select a Song (referring to the Song list on page 15) by using the number buttons [0]–[9], [+] and [-].
Song Lesson 3 Start Lesson 1. Press the [LISTEN & LEARN] button to start Lesson 1. The melody of the part you selected in Step 2 will sound. Listen to it carefully and learn it well. r1 NOTE • Even after Lesson 1 has started and the Song is playing, you can still select the part. LISTEN • When the melody Voice of the Song is changed, the key position shown in the display may be shifted (in octave units), depending on the Voice selected.
Song Lesson Grade When the lesson Song has played all the way through in Lesson 2 or 3, your performance will be evaluated in four levels: OK, Good, Very Good, or Excellent. OK Good Very Good Excellent Lesson 3 (Waiting) In this mode, try playing the correct notes. The notes you should play will appear in the score and the notes on the keyboard will light. The Song pauses until you play the right note. 1 Select the desired Song for your lesson. 2 Select the part you want to practice.
Song settings Changing the Melody Voice You can change a Song’s melody Voice to any other Voice you prefer. 1 Select the Song and play it. Refer to the section “Playing the Songs” on page 12. 2 Select the voice. Press the [VOICE] button, and then select a desired Voice by using the number buttons [0]–[9], [+], [-]. 003 BritePno 001 The selected Voice sounds when you play the keyboard.
Song settings 2 Press the [FUNCTION] button a number of times until “SongVol” appears. Current Song Volume 100 3 SongVol Set the Song Volume by pressing the number buttons [0]–[9], [+], [-]. The range is from 0–127. Mute The Song is made up by several tracks. You can mute Track 1 or Track 2 during Song playback. • Track 1 can be muted by pressing the [R] button during Song playback. • Track 2 can be muted by pressing the [L] button during Song playback.
Song settings Practice Makes Perfect You can repeatedly practice a section you find difficult. This function lets you specify a section of a Song you want to practice—“A” is the start point and “B” is the end point—for repeat playback. A B Repeat playback of this section 1 Play the Song and press the [A-B REPEAT] button at the beginning of the section you want to repeat (the “A” point). “A-REPEAT” will be displayed.
Handy Performance Features Setting the Split Point The Split Point setting can be changed as desired. Split Point—default setting: 54 (F#2) 36 48 60 72 84 96 The initial default Split Point is key number 54 (the F#2 key), but you can change it to another key. When you change the Split Point, the auto accompaniment range also changes. 1 Press the [FUNCTION] button a number of times until “SplitPnt” appears.
Handy Performance Features Transpose The overall pitch of the instrument can be shifted up or down by a maximum of 1 octave in semitone increments. 1 Press the [FUNCTION] button a number of times until the “Transpos” appears. Current transpose value 00 2 Transpos Use the number buttons [0]–[9], [+], [-] to set the Transpose value between -12 and +12 as required. NOTE • The pitch of the Drum Kits Voices (Voice numbers 130–142) cannot be changed.
Handy Performance Features One Touch Setting Sometimes selecting the ideal Voice to play with a Song or Style can be confusing. The One Touch Setting feature automatically selects the most suitable Voice for you when you select a Style or Song. Simply select Voice number “000” to activate this feature. 1 Press the [VOICE] button, and then select Voice number “000” by using the number buttons [0]–[9], [+], [-]. Appears when One Touch Setting is on.
Handy Performance Features Touch Response Touch Response On/Off Keyboard touch response can be turned on by pressing the [TOUCH ON/ OFF] button. When touch response is on you can control the volume of notes according to how hard you play the keys. 001 GrandPno Indicates that touch response is on -03 Press the [TOUCH] button a second time to turn touch response off. When touch response is off the same volume will be produced no matter how hard you play the keys.
Handy Performance Features Adjusting the Main Voice Parameters The volume and octave (the pitch of the instrument can be shifted by up or down in octaves) for the main voice can be adjusted. ● Main Voice Parameters (page 53) • Main Voice Volume • Main Voice Octave You can adjust each of the parameters above in the Function settings (page 52).
Play With a Variety of Effects Adding Reverb Reverb adds the ambience of a room or concert hall to the sound that you play on the keyboard. Reverb On/Off Press the [FUNCTION] button a number of times until “on Reverb” or “oFF Reverb” appears. Default setting is on. Set this to on or off by using the [+] and [-] buttons. Reverb on Current setting Selecting a Reverb type The ideal type is automatically selected whenever you select a Song or Style, but you can select any of the available Reverb Types.
Play With a Variety of Effects Adjusting the Reverb depth 1 Press the [FUNCTION] button a number of times until “RevLevel” appears. 064 RevLevel Current Reverb depth value 2 Set the desired Reverb depth by using the number buttons [0]–[9], [+], [-]. The range is from 0–127. Adding Panel Sustain This function adds a fixed sustain to the keyboard Voices. 1 Press the [FUNCTION] button a number of times until the “Sustain” item appears.
Style (Auto Accompaniment) Functions Various ways to start and stop Style playback Starting Style playback The following three methods can be used to start Style playback. In all cases you will need to press the [ACMP ON/OFF] button to turn auto accompaniment on before actually starting Style playback. Whichever method you choose, you can press the [INTRO/ENDING/rit.] before starting playback.
Style (Auto Accompaniment) Functions Stopping Style playback The following three methods can be used to stop Style playback. ■ Immediate Stop Playback will stop as soon as you press the [START/STOP] button. Immediate Stop ■ Stop and Enter Sync Start Mode If you press the [SYNC START] button during Style playback, playback will stop immediately and the Sync Start standby mode will be engaged (beat arrows will flash).
Style (Auto Accompaniment) Functions Pattern Variation (Sections) The instrument features a wide variety of Style “sections” (patterns) that allow you to vary the arrangement of the accompaniment to match the Song you are playing. Intro Main A/B Ending Auto fill ● INTRO section This is used for the beginning of the Song When the intro finishes playing, accompaniment shifts to the main section. The length of the intro (in measures) differs depending on the selected Style.
Style (Auto Accompaniment) Functions 4 Press the [MAIN/AUTO FILL] button. MAIN A The name of the selected section— MAIN A or MAIN B—will be displayed 5 Press the [INTRO/ENDING/rit.] button. INTRO≥A 6 As soon as you play a chord with your left hand, the Intro of the selected Style starts. For this example, play a C major chord (as shown below). For information on how to enter chords, see “Playing Auto Accompaniment Chords” on page 48. Accompaniment range 7 Press the [MAIN/AUTO FILL] button.
Style (Auto Accompaniment) Functions Adjusting the Style Volume This procedure allows you to adjust the balance between Style playback and the notes you play on the keyboard by setting the volume of the playback sound. 1 Press the [STYLE] button. 2 Press the [FUNCTION] button a number of times until the “StyleVol” appears. Current Style volume setting 100 3 StyleVol Set the Style volume by using the number buttons [0]– [9], [+], [-]. The range is from 0–127.
Playing Auto Accompaniment Chords You’ve learned in the section “Play with a Style (Accompaniment)” on page 23 that the “feel” of the Style changes every time you play a chord on the left-hand side of the keyboard. Here, you’ll learn the types of the chords and how to play them in greater detail. The examples of chords are given here in the key of C.
Playing Auto Accompaniment Chords ● Recognized Standard Chords Chart Chord Name/[Abbreviation] Normal Voicing Major [M] 1-3-5 Chord (C) C Display C Add ninth [(9)] 1-2-3-5 C(9) C(9) Sixth [6] 1 - (3) - 5 - 6 C6 C6 Sixth ninth [6(9)] 1 - 2 - 3 - (5) - 6 C6(9) C6(9) * Major seventh [M7] 1 - 3 - (5) - 7 or 1 - (3) - 5 - 7 CM7 CM7 Major seventh ninth [M7(9)] 1 - 2 - 3 - (5) - 7 CM7(9) CM7(9) * CM7(#11) CM7(#11)* 1 - (2) - 3 - #4 - 5 - 7 or Major seventh add sharp eleventh [M7(#11)]
Playing Auto Accompaniment Chords Looking up Chords Using the Chord Dictionary The Dictionary function is essentially a built-in “chord dictionary” that shows you the individual notes of chords. It is ideal when you know the name of a certain chord and want to quickly learn how to play it. 1 Press and hold the [WAITING] button for longer than a second. “Dict.” will appear in the display. DICTIONA Dict. Hold for longer than a second.
Playing Auto Accompaniment Chords ■ About chords Playing two or more notes together simultaneously creates a “chord.” Playing a note together with two other notes spaced three notes (steps) apart—such as the notes C, E and G—creates a harmonious sound. Chords like these are called “triads” and they play an important role in most music. 3rd Root 3rd Taking the chord above as an example, the lowest note of this triad is called the “root note.
Function Settings The [FUNCTION] button gives you access to a variety of operations related to adjusting or enhancing the sound and making settings for connection to external devices. Select the item and change the value There are 19 different items that can be set. 1 Press the [FUNCTION] button a number of times until desired item appears. Each time the [FUNCTION] button is pressed 19 function items are displayed in sequence.
Function Settings ● Function Setting List Item Display Style Volume StyleVol Song Volume Range/settings Description 000–127 Determines the volume of the Style. SongVol 000–127 Determines the volume of the Song. Transpose TransPos -12–00–12 Determines the pitch of the instrument by semitone increments. Tuning Tuning -100–000–100 Sets the pitch of the instrument’s sound in 1-cent increments.
About MIDI The instrument features a MIDI terminals that can be connected to other MIDI instruments and devices for expanded musical functionality. What is MIDI? MIDI (Musical Instrument Digital Interface) is a world-standard interface for communication between electronic musical instruments and music devices.
About MIDI Transferring Performance Data To and From Another Instrument By connecting the EZ-200 to other MIDI devices or a computer, the performance data of the instrument can be used on those other MIDI devices or computer, and also the performance data from other MIDI devices and computer can be received and sounded with the EZ-200. ● When the instrument is connected with another MIDI device, it transmits/receives performance data.
About MIDI ■ MIDI settings These settings should be made when transmitting/receiving performance data to a connected MIDI device or computer. Local Settings Local Control determines whether or not notes played on the instrument are sounded by its internal tone generator system; the internal tone generator is active when local control is on, and inactive when local control is off. On ........
Troubleshooting Problem Possible Cause and Solution When the instrument is turned on or off, a popping sound is temporarily produced. This is normal and indicates that the instrument is receiving electrical power. When using a mobile phone, noise is produced. Using a mobile phone in close proximity to the instrument may produce interference. To prevent this, turn off the mobile phone or use it further away from the instrument.
Voice List ■ Maximum Polyphony • • • • • • • • • • • • • • • • • • • • • NOTE The instrument has 32-note maximum polyphony. This means that it can play a maximum of up to 32 notes at once, regardless of what functions are used. Auto accompaniment uses a number of the available notes, so when auto accompaniment is used the total number of available notes for playing on the keyboard is correspondingly reduced. The same applies to the Song functions.
Voice List MIDI Program MSB LSB Change# (0–127) (0–127) (1–128) Bank Select Voice No. 064 0 0 64 MIDI Program MSB LSB Change# (0–127) (0–127) (1–128) Bank Select Voice Name Synth Brass 2 FLUTE Voice No.
Voice List MIDI Program MSB LSB Change# (0–127) (0–127) (1–128) Bank Select Voice No. 60 MIDI Program MSB LSB Change# (0–127) (0–127) (1–128) Bank Select Voice Name Voice No.
Voice List MIDI Program MSB LSB Change# (0–127) (0–127) (1–128) Bank Select Voice No. MIDI Program MSB LSB Change# (0–127) (0–127) (1–128) Bank Select Voice Name Voice No.
Voice List MIDI Program MSB LSB Change# (0–127) (0–127) (1–128) Bank Select Voice No.
Drum Kit List • “ ” indicates that the drum sound is the same as “Standard Kit 1”. • Each percussion voice uses one note. • The MIDI Note # and Note are actually one octave lower than keyboard Note # and Note. For example, in “Standard Kit 1”, the “Seq Click H” (Note# 36/Note C1) corresponds to (Note# 24/Note C0). • Key Off: Keys marked “O” stop sounding the instant they are released. • Voices with the same Alternate Note Number (*1 … 4) cannot be played simultaneously.
Drum Kit List C1 C#1 D1 E1 F1 D#1 F#1 G1 G#1 A1 B1 C2 A#1 C#2 D2 E2 F2 D#2 F#2 G2 G#2 A2 B2 C3 A#2 C#3 D3 E3 F3 D#3 F#3 G3 G#3 A3 B3 C4 A#3 C#4 D4 E4 F4 D#4 F#4 G4 G#4 A4 B4 C5 A#4 C#5 D5 E5 F5 D#5 F#5 G5 G#5 A5 B5 C6 64 A#5 Voice No.
Drum Kit List C1 C#1 D1 E1 F1 D#1 F#1 G1 G#1 A1 B1 C2 A#1 C#2 D2 E2 F2 D#2 F#2 G2 G#2 A2 B2 C3 A#2 C#3 D3 E3 F3 D#3 F#3 G3 G#3 A3 B3 C4 A#3 C#4 D4 E4 F4 D#4 F#4 G4 G#4 A4 B4 C5 A#4 C#5 D5 E5 F5 D#5 F#5 G5 G#5 A5 B5 C6 A#5 Voice No.
Style List Style No. Style Name Style No. Style No.
Effect Type List ● Reverb Types No. Reverb Type Description 01–03 Hall 1–3 04–05 Room 1–2 Small room reverb. 06–07 Stage 1–2 Reverb for solo instruments. 08–09 10 Concert hall reverb. Plate 1–2 Simulated steel plate reverb. Off No effect.
EZ-200 Owner’s Manual Mode Change Control 0,32 1 6 38 7,10 11 64 71,73,74 Key's Ch's After Touch Pitch Bend Note ON Note OFF Velocity o x x x o x o x x x x o 9nH,v=1-127 x *1 *1 *1 *1 *1 0 - 127 : True voice ************** 3 x ************** Default Messages Altered Note Number 1 - 16 x Default Changed Transmitted o o o x o o o o o x x o 9nH,v=1-127 x 0 - 127 0 - 127 3 x x 1 - 16 x Recognized [ Portable Keyboard ] MIDI Implementation Chart Basic Channel Function...
: True # x x x x o x Mode 1 : OMNI ON , POLY Mode 3 : OMNI OFF, POLY *1 Refer to #2 on page 70. Aux :All Sound OFF :Reset All Cntrls :Local ON/OFF Mes- :All Notes OFF sages:Active Sense :Reset x x x o o o : Song Pos. : Song Sel.
MIDI Data Format NOTE: 1 By default (factory settings) the instrument ordinarily functions as a 16-channel multi-timbral tone generator, and incoming data does not affect the panel voices or panel settings. However, the MIDI messages listed below do affect the panel voices, auto accompaniment, and songs. • MIDI Master Tuning • System exclusive messages for changing the Reverb Type and Chorus Type. 2 Messages for these control change numbers cannot be transmitted from the instrument itself.
Specifications Keyboards • 61 standard-size keys (C1–C6), with Touch Response and Light Guide Dimensions (W x D x H) • 945 x 348 x 110 mm (37-1/4" x 13-2/3" x 4-1/3") Display • LCD display Weight • 4.7kg (10 lbs. 6 oz.) (not including batteries) Setup • STANDBY/ON • MASTER VOLUME: [+], [-] buttons Supplied Accessories • Music Rest • Owner’s Manual • Song Book Panel Controls • [L], [R], [LISTEN & LEARN], [TIMING], [WAITING], [A-B REPEAT]/[ACMP ON/OFF], [REW]/[INTRO/ENDING/rit.
Index Panel Controls and Terminals A-B REPEAT button ................................................. 35 ACMP ON/OFF button .............................................. 24 DEMO button ............................................................. 13 FF button .................................................................... 14 FUNCTION button .............................................. 27, 52 INTRO/ENDING/rit. button ...................................... 45 L button ................................
Index M T Main Octave ............................................................... 53 Main Volume ............................................................. 53 Main/Auto fill ...................................................... 45–46 MASTER VOLUME indication ................................ 28 Measure ...................................................................... 28 Melody Voice ............................................................. 33 Metronome ....................................
Limited Warranty 90 DAYS LABOR 1 YEAR PARTS Yamaha Corporation of America, hereafter referred to as Yamaha, warrants to the original consumer of a product included in the categories listed below, that the product will be free of defects in materials and/or workmanship for the periods indicated.
For details of products, please contact your nearest Yamaha representative or the authorized distributor listed below. Pour plus de détails sur les produits, veuillez-vous adresser à Yamaha ou au distributeur le plus proche de vous figurant dans la liste suivante. NORTH AMERICA CANADA Yamaha Canada Music Ltd. 135 Milner Avenue, Scarborough, Ontario, M1S 3R1, Canada Tel: 416-298-1311 U.S.A. Yamaha Corporation of America 6600 Orangethorpe Ave., Buena Park, Calif. 90620, U.S.A.
Yamaha Home Keyboards Home Page (English Only) http://music.yamaha.com/homekeyboard Yamaha Manual Library http://www.yamaha.co.jp/manual/ U.R.G., Pro Audio & Digital Musical Instrument Division, Yamaha Corporation © 2007 Yamaha Corporation WH74060 XXXPOXXX.