
User Manual

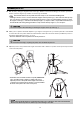
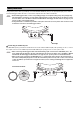
Table Of Contents

9
1. With the bolt u facing you, align the notch on the leg q with the notch on the mounting w as shown in e. Put the
washer t into the wing bolt r, and then secure the leg to the KP128.
Since the flat washers are very small and can be easily lost, be careful when handling them.
* If damage to the floor is not a concern, extend the stoppers at the tip of the legs q and connect the anti-slip stop-
pers y to the base so that the tip of the stoppers dig into the riser or floor. To prevent damage to the floor, retract
the stoppers at the legs q and remove the anti-slip stoppers y, and place a mat or carpet under the KP128 to pre-
vent the KP128 from moving during performance. Keep removed anti-slip stoppers y in a safe place.
2. Attach your foot pedal to the KP128. Adjust the leg’s length loosening the bolts u so that the pad surface of the KP128
is vertical when the foot pedal is attached, and the KP128 is stable when the beater hits the pad. After the position is
determined, firmly tighten the bolts u to secure.
* Place the underside of the foot pedal’s base directly to the floor.
3. Adjust the position of the pedal and the length of the beater shaft so that the foot pedal’s beater i hits the patch in the
center of the kick pad o.
*The KP128 can be used with a double foot pedal (YAMAHA DFP
series, etc). When using a double foot pedal, make sure to
adjust the position of the pedal and the length of the beater i
so that the space between the two beaters is positioned within
the inside of the patch at the center of the pad o.
Assembling the KP128
CAUTION
• Be careful of injuries when extending or retracting the stoppers at the tip of the legs q.
CAUTION
• Be careful when removing or replacing the pedal, since the KP128 may fall over.
• When storing the KP128 with the foot pedal detached, make sure to unplug the cable and set the KP128 flat.
Otherwise the KP128 may fall down, which may result in damage to the cable.
e
y
w
tr
q
u
u
o
o
i
o
i