
User Manual

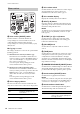


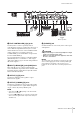
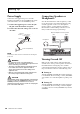
Table Of Contents

Controls and Functions
CP88/CP73 Owner’s Manual
14
& Voice section [ON/OFF] switch
Use these switches to determine whether the
corresponding Voice section is enabled (ON) or not
(OFF). When these indicator lamps are lit, the
corresponding Voice sound is produced when you play
the keyboard.
Copying a section
The settings of each Voice section can be copied with the
following operation.
1. Select the Voice section you wish to copy.
Select the Live Set Sound which contains the Voice
section you wish to copy. Press the [MENU] button →
“Job” → “Section Manager” → “Copy,” then select the
Voice section you wish to copy.
A “Section copied.” message will appear on the
screen, and then return to the Top screen.
2. Select a Voice section you wish to paste.
Select the Live Set Sound which contains the Voice
section you wish to paste the copied section. Press the
[MENU] button → “Job” → “Section Manager” →
“Paste,” then select the Voice section you wish to
paste.
A “Section pasted.” message will appear on the
screen, and then return to the Top screen.
* Voice category selector
The Voices in each Voice section are divided into four
categories. To select a Voice, select a Voice category first.
( Voice select switch
Use this switch to select one of the Voices of the category
selected with the Voice category selector. For
information about the Voices, refer to page 39.
A Voice number display
Displays the currently selected Voice numbers.
B SPLIT [L R] button
Press these buttons to alternate between the keyboard-
split settings of each Voice section. The area for which
the indicator lamp is lit will sound.
NOTE
The Split Point can be changed from the [SPLIT POINT] button
(page 13), also from the [SETTINGS] “Function” “Split
Point” (page 33).
C OCTAVE [-2 -1]/[+1 +2] buttons
Use these buttons to change the octave range of the
keyboard. To restore the normal octave setting, press
both buttons simultaneously.
D [VOLUME] knob
Use these knobs to adjust the volume of each Voice
section.
E [TONE] knob
Use these knobs to adjust the tone of each Voice section.
Setting the knob to the center position produces a flat,
evenly balanced sound. Turn the knob to the right
(clockwise) to boost the higher and lower ranges. Turn
the knob to the left (counter-clockwise) to cut the higher
range and the lower range.
F DAMPER RESONANCE [ON/OFF] button
Use this button to switch the damper resonance effect on
and off. This simulates the rich sound of open strings
produced when the damper pedal of a piano is pressed.
G Insertion effect [ON/OFF] button
Use this button to apply the insertion effects.
NOTE
To more easily confirm the setting value when the display light is
turned off, you can turn the light on from the [MENU] button
“Control Panel” “Display Lights” “Ins Effect” (page 30).
H Insertion effect switch button
Use this button to switch among the following effects.
The indicator lamp of the selected effect is lit.
Piano section
Voice section Voice category
Piano
Grand Piano, Upright Piano, CP,
Layered Piano
Electric Piano
Rd, Wr, Clv, DX
Sub
Pad/Strings, Organ, Chromatic Perc.,
Others
*
(
A
B
C
D
E
F
G
I
H
&
Effect Description
Compressor
Stereo compressor. To increase the
compressor effect, turn the [DEPTH] knob
to the right (clockwise).