
User Manual
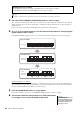
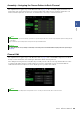

Table Of Contents
- Contents
- Function List
- Styles
- Style Types (Characteristics)
- Using the Chord Tutor Function
- Registering Files to the Favorite Tab
- Changing the Chord Fingering Type
- Turning Each Channel of the Style On/Off
- Style Playback Related Settings
- Adjusting the Tempo
- Recording and Playing Back a Chord Sequence—Chord Looper
- Recording a Chord Sequence when Style Playback is stopped (Chord Looper)
- Saving and Calling up Your Custom Chord Sequences (Chord Looper)
- Creating/Editing Styles (Style Creator)
- Voices
- Voice Part Setup Display
- Voice Selection Display-related Settings
- Voice Types (Characteristics)
- Registering Files to the Favorite Tab
- Metronome Settings
- Keyboard/Joystick-related Settings
- Keyboard Part-related Settings (Voice Setting)
- Transposing the Pitch in Semitones
- Fine Tuning the Pitch of the Entire Instrument (Master Tune)
- Selecting or Creating a Temperament (Scale Tune)
- Making Detailed Settings for Harmony/Arpeggio
- Editing Voices (Voice Edit)
- Editing Organ Flutes Voices (Voice Edit)
- Editing Ensemble Voices (Voice Edit)
- Multi Pads
- Song Playback
- Creating a Song List for Playback
- Using Repeat Playback Mode
- Editing Music Notation (Score) Settings
- Displaying Lyrics and Setting Up the Display
- Displaying Text and Setting Up the Display
- Using the Auto Accompaniment Features with MIDI Song Playback
- Turning Each Channel of a MIDI Song On/Off
- Song Playback Related Settings
- MIDI Song Recording/Editing
- Audio Multi Recording
- Registration Memory
- Playlist
- Microphone
- Mixer
- Controller Function Settings
- MIDI Settings
- Basic Procedure for MIDI Settings
- System—MIDI System Settings
- Transmit—MIDI Transmit Channel Settings
- Receive—MIDI Receive Channel Settings
- On Bass Note—Setting the Bass Note for Style Playback via MIDI
- Chord Detect—Settings the Chord for Style Playback via MIDI
- External Controller—MIDI Controller Setting
- Network Settings
- Utility
- Expansion Pack Related Operations
- Connections
- Index

22 Genos Reference Manual
3 Press the STYLE CONTROL [START/STOP] button to start recording.
Since already recorded data plays back, turn each channel on or off by touching the channel on the “Rec Channel”
display as desired. If you selected an Audio Style as starting data, turn the Audio part on or off by touching the
[Audio] channel.
If necessary, delete a channel by touching [Delete] located under the desired channel.
4 As soon as loop playback returns to the first beat in the first measure, start playing the
rhythm pattern to be recorded.
If the rhythm is difficult to play all at once, you can break it down into isolated parts, such as in this example:
Deleting mistakenly recorded notes
If you make a mistake or play any wrong notes, you can delete those specific notes. Touch [Clear Drum Inst] to
call up a message, then press the corresponding key on the keyboard while the message is shown. After deleting
the desired drum instrument, touch [Exit] to close the message.
5 Press the [START/STOP] button to stop playback.
If you want to add more notes, press the [START/STOP] button again to continue recording.
6 Touch and hold the Recording channel for a while (until the but-
ton changes color) to exit from the Recording mode.
Available Voices for recording
For the Rhythm 1 channel, any except Organ Flutes Voices can be used for recording.
For the Rhythm 2 channel, only Drum/SFX kits can be used for recording.
For information on which key to play for each Drum/SFX sound, refer to the “Drum/SFX Kit List” in the Data List on the website.
NOTE
Loop 1st round
Bass Drum
Loop 3rd round
Bass Drum
Snare Drum
Hi-Hat
Loop 2nd round
Bass Drum
Snare Drum
The edited Style will be lost if you
change to another Style or turn off
the power to the instrument with-
out carrying out the Save opera-
tion (step 7 on page 20).
NOTICE