Yamaha Expansion Manager Owner’s Manual Contents Overview of Yamaha Expansion Manager ........................................................... 2 Screen Items & Functions ..................................................................................... 4 Managing Pack Data ............................................................................................. 6 Installing Pack Data on a Digital Instrument ..................................................... 7 Creating Your Own Original Packs..
Overview of Yamaha Expansion Manager Expansion Manager is software that allows you to create and import Expansion Packs and install them on compatible digital instruments. You can also create your own original Voices and include them in your original Packs. File Types of Expansion Packs The term “Pack” is used to refer to a full set of Voice, Style, Song, and other data (collectively referred to as “content” below) for use on Yamaha digital instruments.
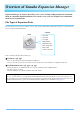
Overview of Yamaha Expansion Manager What you can do with Yamaha Expansion Manager Yamaha Expansion Manager can be used with Packs to perform the following: Management of Pack data (page 6) You can import multiple pack data and manage them on the app. Installation of Pack data on a digital instrument (page 7) You can create pack installation data by combining multiple pack data. Also, you can select specific contents for installation, according to the expansion capacity of the instrument.
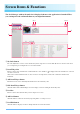
Screen Items & Functions The Pack Manager window shown below is displayed whenever the application is launched. Here, you can import Packs and install them on your digital instrument. yu !3 !4 q er t w i !0 !1 !2 o q My Packs button The term “My Packs” is used to refer to Packs that you have imported or created. Click My Packs to enter the mode where you can import/export existing Packs or create/edit new Packs.
Screen Items & Functions i Pack name This area shows the name of the currently selected Pack. o Content list This area shows all of the content included in the Pack currently selected in the Pack list. Each item of Pack content is identified using its name and the corresponding icon from the following table.
Managing Pack Data Importing Packs and managing your library 1. Click My Packs on the Pack Manager window. 2. Click the Add Pack button and then select Import Pack from the menu displayed. 3. When the file selector dialog is displayed, select the file containing the Pack you wish to install and click Open. 4. If a user verification dialog is then displayed, enter your User ID and password. Your Pack will now be imported.
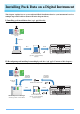
Installing Pack Data on a Digital Instrument This chapter explains how to create and install Pack Installation data for your instrument based on multiple imported Pack data (Pattern II in the diagram below). I) Installing pack installation data (.cpi, .ppi) directly: In this case, no Expansion Manager is required. Pack Installation file (.cpi/.ppi) Download Save Computer Install Pack Installation file (specific to your instrument) (.cpi/.
Installing Pack Data on a Digital Instrument First of all, ensure that your computer is connected to the correct network. NOTE Depending on the instrument to which the Pack is to be installed, the length of Waves that can be played back may be limited. 1. Add the digital instrument on which you wish to install Pack content to the Install Target list. As described below, this can be done in two different ways—using a USB flash drive or via wireless network. Adding using a USB flash drive 1-1.
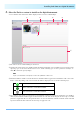
Installing Pack Data on a Digital Instrument 3. Select the Pack or content to install on the digital instrument. A screen similar to that shown below will be displayed when you select an Install Target. q w t y e r q The name of the selected Install Target is shown here. w Displays the amount of data to be installed and the maximum amount that can be installed.
Installing Pack Data on a Digital Instrument NOTE Content items may be displayed in gray or become unselectable if they are not supported by the instrument selected for installation. Click any Pack or content item you wish to install and verify that is displayed on its icon. 4. Install the selected Pack(s) and content on your digital instrument. As described below, this can be done in two different ways—using a USB flash drive or via wireless network. Installation using a USB flash drive 4-1.
Installing Pack Data on a Digital Instrument Installation via wireless network 4-1. Click Send to Instrument y in the Yamaha Expansion Manager application. 4-2. Click Yes when asked to confirm whether you wish to proceed. A user verification dialog may then be displayed. If so, enter the User ID and password you used when adding the Pack(s) to the My Packs page. 4-3. Click OK when asked to confirm whether you wish to install the Pack content.
Creating Your Own Original Packs 1. Create a new Pack on the My Packs page. 1-1. Click My Packs on the Pack Manager window. 1-2. Click the Add Pack button and then select Create Pack from the menu displayed. 2. If necessary, edit the newly created Pack. 2-1. Select the Pack by clicking its icon in the Pack list. 2-2. Click the Pack Edit button to display an edit menu, and then change the Pack’s icon or name. The items available for selection from the menu are as follows.
Creating Your Own Original Packs 4. Edit the content as required. NOTE Protected content cannot be edited. 4-1. Select the content you wish to edit by clicking it in the Content list. 4-2. Click the Content Edit button to display an edit menu, and then edit the content. The items available for selection from the menu are as follows. • Edit Voice Used to create your own original Voice by editing the selected Normal Voice or Drum Voice (page 14).
Creating Your Own Original Voices Two different types of original Voice can be created—Normal Voices and Drum Voices. A Normal Voice comprises Common settings and a number of Elements; a Drum Voice comprises Common settings and a number of Drum Keys. By assigning Wave files (i.e., WAV or AIFF audio data) to each of these Elements or Drum Keys, you can create your own original Normal Voice or Drum Voice. These new Voices are then stored as Pack content.
Creating Your Own Original Voices q w r ty u e o i q The name of the Pack containing the Voice currently being edited. w The name of the Voice currently being edited. e Click to open the Common window. r Click to stop the sound being played. t Click to open the Device Setting window. On this window, you can make the settings required to listen to the Voice currently being edited using an audio interface, MIDI keyboard, or other similar devices. y Click to save the Voice currently being edited.
Creating Your Own Original Voices 4. Configure the Common settings, which apply to all Elements or Drum Keys, as required. Refer to Configuring Common Settings (below) for more details. 5. Edit the Elements or Drum Keys to create your own original Voice. For details, refer to either Creating a Normal Voice (page 21) or Creating a Drum Voice (page 25) as appropriate. 6. Listen to the Voice you have created, and if necessary, repeat Step 4 and Step 5 to edit further. 7.
Creating Your Own Original Voices Portamento Time * Sets the portamento time (pitch transition time) when the edited Voice is set to Mono above. NOTE The Portamento Time determines the pitch transition time. Portamento is a function that creates a smooth transition in pitch from the first note played on the keyboard to the next. * Mono/Poly and Portamento Time are not available for Drum Keys.
Creating Your Own Original Voices Vel. Used for Xfade Portamento Determines which velocity takes priority for the 2nd and later notes (when one note is held and others are played) while Crossfade Portamento is in effect. Latest Note: The velocity of the most recently played note takes priority. In other words, the overall velocity of the sound is determined by the most recently played note. First Note: The velocity of the first note played takes priority.
Creating Your Own Original Voices Sound Filter Brightness Determines the cutoff frequency or effective frequency range of the filter (see diagram). Higher values result in a brighter sound. Volume Cutoff Frequency These frequencies are “passed” by the filter. Filter Harmonic Cont. Frequency (pitch) Cutoff range Determines the emphasis given to the cutoff frequency (resonance), set in Filter Brightness above (see diagram). Higher values result in a more pronounced effect.
Creating Your Own Original Voices EQ Low Frequency Sets the frequency of the equalizer’s low-frequency band. Low Gain Sets the volume boost for the equalizer’s low-frequency band. High Frequency Sets the frequency of the equalizer’s high-frequency band. High Gain Sets the volume boost for the equalizer’s high-frequency band. This completes the procedure for Step 4 on page 16. You should now proceed to Step 5.
Creating Your Own Original Voices Creating a Normal Voice This section describes in detail the procedure for Step 5 on page 16 when you are creating an original Normal Voice. This involves assigning Wave files to each of the Elements that make up the Voice. You can either start from an empty Normal Voice or modify an existing one by adding Waves and/or changing its settings. Wave files (WAV or AIFF) Assign to Element(s) Element 8 Element 2 Element 1 Wave 1 Edit each Element and entire Voice Wave 2 1.
Creating Your Own Original Voices ging left and right; the range of velocities, up and down. You can drag a playing zone to move it as is, or you can move individual corners to resize it. You can also perform these tasks by pressing an arrow key (, , , or ) or by pressing one of these keys with CTRL or Command held down. If necessary, click the on-screen keyboard to play the corresponding note. The closer to the top you click, the smaller the velocity value. 2-4.
Creating Your Own Original Voices Amplitude Amplitude EG By dragging the Attack, Decay1, Decay2, and Release points within the graph, you can define how the amplitude will change over time between pressing a key and the sound fading away completely.
Creating Your Own Original Voices Filter Filter EG By dragging the Initial, 1st, 2nd, 3rd, and Release points within the graph, you can set how the cutoff frequency will change over time between pressing a key and the sound fading away completely. 1st Filter 2nd Initial Release 3rd Time Filter Touch Sense By dragging the Cutoff Sense and Resonance Sense points up and down within the graph, you can set the sensitivity of the filter’s cutoff frequency and the resonance to velocities.
Creating Your Own Original Voices Creating a Drum Voice This section describes in detail the procedure for Step 5 on page 16 when you are creating an original Drum Voice. This involves assigning Wave files to each of the Drum Keys that make up the Voice. You can either start from an empty Drum Voice or modify an existing one by adding Waves and/or changing its settings. Wave files (WAV or AIFF) Assign to specific Drum Key Edit each Drum Key and the entire Drum Voice Drum Voice 1.
Creating Your Own Original Voices 2-4. Make any additional settings for the selected Wave as required. Volume Sets the volume. Pan Sets the stereo panning position. Coarse Tune Sets the key in semitone units. Fine Tune Finely adjusts the pitch. This completes the procedure for assigning Waves to a Drum Key. 3. Configure the Drum Key settings as required. General Volume Sets the volume. Pan Sets the stereo panning position. Reverb Send Sets the depth of the Drum Key’s reverb effect (i.e.
Creating Your Own Original Voices 4. Repeat Step 1 through Step 3 to edit the other Drum Keys. Using the Drum Key Edit button (page 15, o) on the Voice Editor window, you can also copy the settings from an edited Drum Key to another. This completes the Drum Voice procedure for Step 5 on page 16. You should now proceed to Step 6.
Special Features for Tyros5 and Genos series Special features for the Tyros5 and Genos series are described below. Creating original Voices by using preset Voices When creating a Voice by editing one of your instrument’s preset Voices, you can check the sound by using the instrument itself. Preset sounds cannot be played on the computer. Before proceeding to the next step, connect your instrument and computer by using a USB cable. Expansion Manager USB cable Digital instrument Computer 1.
Special Features for Tyros5 and Genos series 3. Click the Add Content button on the Pack Manager window, select one of the following on the menu displayed, and add content. • Create Normal Voice: Used to assign Waves to Elements and create a new Normal Voice. The lowest available Program Change number will be assigned to the new Voice, but you can change this later. • Create Custom Normal Voice: Used to create a Normal Voice by editing a preset Voice from the indicated instrument.
Special Features for Tyros5 and Genos series t Click to open the Device Setting window. On this window, you can make the settings required to listen to the Voice currently being edited using a MIDI keyboard, or other similar devices. y Click to save the Voice currently being edited. u Click to end Voice editing and return to the Pack Manager window. i If editing a Normal Voice: Click any of Elements 1 through 8 to display its detailed settings on the right of the window.