
User Manual
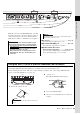
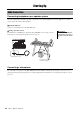


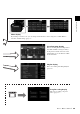

Table Of Contents
- PRECAUTIONS
- Included Accessories
- About the Manuals
- Main Features
- Contents
- Using Genos—A Broad Overview
- Main Functions
- Panel Controls and Terminals
- Starting Up
- Display Structure
- Basic Operations
- Quick Guide—For Performing on Genos
- 1 Playing with Styles—Setups
- Setting up Styles
- Optimum Panel Settings for the Current Style (One Touch Setting)
- Setting up Keyboard Parts
- Selecting a Voice for Each Keyboard Part
- Creating Original Organ Flutes Voices
- Using Ensemble Voices
- Setting up Keyboard Harmony/Arpeggio
- Setting up Multi Pads
- Memorizing Original Panel Settings to One Touch Setting
- Changing the Pitch of the Keyboard
- Setting up Assignable Controllers
- 2 Playing with Styles—Operations While Performing
- 3 Singing with Song Playback—Setting Up
- 4 Singing with Song Playback—Operations While Performing
- 5 Adjusting the Parameters of Each Part— Mixer
- 6 Song Recording
- 7 Storing and Calling up Custom Panel Setups—Registration Memory, Playlist
- 8 Customizing for Optimum Performance
- 9 System Settings
- Connections—Using Your Instrument with Other Devices
- Connecting a Microphone ([MIC INPUT] jack)
- Connecting the Optional Yamaha GNS-MS01 Speaker
- Connecting Audio Devices (LINE OUT jacks, AUX IN jacks, [DIGITAL OUT] jack)
- Connecting Footswitches/Foot Controllers (ASSIGNABLE FOOT PEDAL jacks)
- Connecting USB Devices ([USB TO DEVICE] terminal)
- Connecting to an iPhone/iPad (Wireless LAN function, [USB TO HOST], or MIDI terminals)
- Connecting to a Computer ([USB TO HOST] terminal)
- Connecting External MIDI Devices (MIDI terminals)
- Viewing the Instrument’s Display on an External Monitor
- Function List
- Appendix

Genos Owner’s Manual 23
Starting Up
1 Connect the supplied power cord to the [AC IN] jack on the
instrument’s rear panel.
2 Connect the other end of the power cord to an AC outlet.
1 Turn down the [MASTER VOLUME] dial to “MIN.”
2 Press the [ ] (Standby/On) switch to turn the power on.
The Home display (page 30) appears. Adjust the volume as desired while playing
the keyboard.
3 After you finish using the instrument, turn off the power by
pressing and holding the [ ] (Standby/On) switch for about a
second.
Power Supply
Use only the supplied power cord.
When setting up the product,
make sure that the AC outlet you
are using is easily accessible. If
some trouble or malfunction
occurs, immediately turn off the
power switch and disconnect the
plug from the outlet.
WARNING
CAUTION
When disconnecting the power cord,
first turn off the power, then follow this
procedure in reverse order.
NOTE
Turning the Power On/Off
Until the Home display appears, no
operations can be carried out, including
power-off and keyboard performance.
Even when the power switch is
turned off, electricity is still flow-
ing to the product at the minimum
level. When you are not using the
product for a long time, make
sure to unplug the power cord
from the wall AC outlet.
When recording or editing, or
while a message is displayed, the
power cannot be turned off even if
you press the [ ] (Standby/On)
switch. If you want to turn off the
power, press the [ ] (Standby/
On) switch only after recording,
editing, or after the message has
disappeared. If you need to force-
quit the instrument, hold down
the [ ] (Standby/On) switch for
longer than three seconds. Note
that the force-quit operation
might cause data loss and dam-
age to the instrument.
NOTE
CAUTION
NOTICE
2