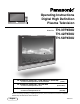
POWER SAP LIGHT TV DTV VCR DVD RCVR DBS/CBL PECT AS FAVORI T SLEEP OK VOL MU CH 1 2 4 5 7 8 EXIT RE CH VOL MENU AUX E E LL CA T TV/VIDEO R-TUNE RETURN 3 6 9 PROG 0 REW PLAY FF PAUSE STOP REC TV/VCR DVD/VCR CH OPEN/CLOSE TV Operating Instructions Digital High Definition Plasma Television Model No. TH-37PX50U TH-42PX50U TH-50PX50U For assistance, please call : 1-888-VIEW-PTV (843-9788) or visit us at www.panasonic.com/contactinfo (U.S.A.
CAUTION RISK OF ELECTRIC SHOCK DO NOT OPEN WARNING: To reduce the risk of electric shock, do not remove cover or back. No user-serviceable parts inside. Refer servicing to qualified service personnel. The lightning flash with arrow-head within a triangle is intended to tell the user that parts inside the product are a risk of electric shock to persons.
Important Safety Instructions 1) Read these instructions. 2) Keep these instructions. 3) Heed all warnings. 4) Follow all instructions. 5) Do not use this apparatus near water. 6) Clean only with dry cloth. 7) Do not block any ventilation openings. Install in accordance with the manufacturer’s instructions. 8) Do not install near any heat sources such as radiators, heat registers, stoves, or other apparatus (including amplifiers) that produce heat.
Dear Panasonic Customer Welcome to the Panasonic family of customers. We hope that you will have many years of enjoyment from your new Plasma TV. To obtain maximum benefit from your set, please read these Instructions before making any adjustments, and retain them for future reference. Retain your purchase receipt also, and record the model number and serial number of your set in the space provided on the back cover of these instructions. Visit our Panasonic Web Site: www.panasonic.
FCC STATEMENT FCC STATEMENT This equipment has been tested and found to comply with the limits for an Other Class B digital device, pursuant to Part 15 of the FCC Rules. These limits are designed to provide reasonable protection against harmful interference in a residential installation. This equipment generates, uses and can radiate radio frequency energy and, if not installed and used in accordance with the instructions, may cause harmful interference to radio communications.
Safety Precautions WARNING KEEP UNNEEDED SMALL PARTS AND OTHER OBJECTS OUT OF THE REACH OF SMALL CHILDREN. THESE OBJECTS CAN BE ACCIDENTALLY SWALLOWED. ALSO, BE CAREFUL ABOUT PACKAGING MATERIALS AND PLASTIC SHEETS. Set up Do not place the Plasma TV on sloped or unstable surfaces. • The Plasma TV may fall off or tip over. Do not place any objects on top of the Plasma TV.
Safety Precautions CAUTION This Plasma TV is for use only with the following optional accessories. Use with any other type of optional accessories may cause instability which could result in the possibility of injury. (All of the following accessories are manufactured by Matsushita Electric Industrial Co., Ltd.) • Pedestal (included) ............................................. TY-ST42PX5W (TH-37PX50U, TH-42PX50U) TY-ST50PX5W (TH-50PX50U) • Wall-hanging bracket (Vertical) ...........................
Installation Receiver Location This unit is intended to be used with the stand or bracket. Consult your dealer for available options. Position for comfortable viewing. Avoid placing where sunlight or other bright light (including reflections) will fall on the screen. Use of some types of fluorescent lighting can reduce remote control transmitter range. Adequate ventilation is essential to prevent internal component failure. Keep away from areas of excessive heat or moisture.
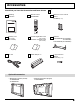
Accessories Check that you have the Accessories and items shown Operating Instruction Remote control EUR7627Z60 Batteries for the remote control (AA Battery × 2) CH - VOL OK VOL + CH 1 2 3 4 5 6 7 8 9 0 TV Warranty card (for U.S.A.) (for Canada) Product Registration Card (for U.S.A.) Customer Care Plan Card (for U.S.A.
Cable Connection DIGITAL AUDIO OUT terminal (see page 14) HDMI terminal (see page 12) AV IN R CableCARD TM Y Y PB PB PR PR L AUDIO IN ANTENNA Cable In D I G I T A L SERVICE AUDIO OUT O N LY S VIDEO VIDEO VIDEO L AV IN R L AUDIO IN Y Y PB PB PR PR S VIDEO VIDEO L L AUDIO IN R 1 2 COMPONENT VIDEO INPUT INPUT 1 INPUT 2 OUTPUT AUDIO R Antenna terminals (see page 11) R 1 2 COMPONENT VIDEO INPUT COMPONENT Input terminals (see page13) INPUT 1 INPUT 2 TO AUDIO AMP PROGOUT AV ter
Cable Connection Note: Cables and connectors are not supplied with this set. Antenna Connection The RF input mode must be set to Antenna (see pages 19, 30).
Cable Connection HDMI Connection HDMI∗1 (High Definition Multi media Interface) is the first all digital consumer electronics A/V interface that supports uncompressed standard. The HDMI terminal supports both video and audio information. To the HDMI∗1 input terminal, you can connect an EIA/CEA-861/861B∗2 compliant consumer electronic device, such as a Set-Top Box or DVD player with HDMI or DVI output terminal.
Cable Connection Digital TV - Set-Top Box (DTV-STB) or DVD Connection This TV is capable of displaying 1080i, 720p, 480p and 480i DTV signals when connected to a DTV Tuner Set-Top Box (STB). This TV also utilizes a progressive scan doubler, which de-interlaces the NTSC signal and progressively scans the image. • To view DTV programs, connect the STB to the component video input terminals (Y, PB, PR) of the TV. Component color inputs provide luminance and separate color signal.
Cable Connection Amplifier Connection (TO AUDIO AMP) For a full Home Theater sound experience, an external Dolby Digital* decoder and a multichannel amplifier must be connected to the DIGITAL AUDIO OUT terminal on the TV. ∗ Dolby Digital 5.1 channel surround sound delivers digital-quality sound. Dolby Digital provides five discrete fullbandwidth channels for front left, front right, center, surround left and surround right, plus a LFE (Low Frequency Effect) subwoofer channel.
Power ON / OFF 1 Connect the AC cord plug to the Plasma TV. • Fix the power cord plug securely with the clamper (see page 10). 2 Connect the plug to the wall outlet. 3 Press POWER button on front of this unit. First time setup is displayed on screen.
Location of Controls The Illuminated Remote Control POWER Turn the TV ON or OFF. Mode Selection buttons (see page 39) TV: TV VCR: VCR DVD: DVD DTV: Digital TV RCVR:Receiver/Amplifier DBS: Digital Broadcast System CBL: Cable TV AUX: Aux POWER SAP LIGHT TV VCR DVD DTV RCVR DBS/CBL AUX SLEEP EXIT TV/VIDEO TV/VIDEO Change the input mode. • Press to display the Input selection menu. MU T E RE CH - VOL • Press corresponding number key on the remote control to select the input of your choice.
Location of Controls SAP • Digital channel Select the audio track (if available). Audio Track 1 of 1 (English) • Analog channel Cycle through different audio modes. Stereo SAP Mono LIGHT Illuminate the remote control buttons. The selected button blinks when lit. 30 0 SLEEP timer (minutes) 60 90 EXIT menus Normal viewing, from each menu. MUTE Mute the sound. Press again to cancel the mute. FAVORITE Channel numbers registered in Favorite are displayed on the favorite tune screen.
First time setup For your convenience, First time setup menu will be displayed on screen when the set is turned on for the first time. If needed, follow the menus and procedures displayed on-screen for setting up the features. You can also adjust the settings in Setup menu (see pages 29, 30). Language POWER SAP LIGHT TV VCR DVD DTV RCVR DBS/CBL AUX SLEEP EXIT Allows you to select the language used for On Screen Displays. Press to select “Language”.
First time setup Time Valid when Mode is set to manual. Press to select “Time”. CH - VOL OK VOL + Clock Mode Manual Date 4 / 1 / 2005 Time 9 : 43 AM Time zone EST Press to adjust “Time”. If the button is held, the speed of change increases. DST CH On Time zone Valid when Mode is set to “Auto”. Press to select “Time zone”. Clock Mode CH Press to select your zone. - VOL OK VOL + AST EST CST MST PST AKST HST NST CH Daylight saving Valid when Mode is set to “Auto”.
Watching TV programs 1 TV Press to operate the TV set with the remote control. POWER SAP LIGHT TV VCR DVD DTV RCVR DBS/CBL AUX SLEEP EXIT TV/VIDEO FAVORI TE E RE LL CA MU T PECT AS CH 2 POWER Press to turn the TV on. 3 Press to select desired channel. • You can also use the direct program number selection buttons and PROG–button (see page 17).
Aspect Controls Let you choose the aspect depending on the format of the received signal and your preference. Press to change the aspect mode. PECT AS POWER SAP Note: The available aspect modes depend on the receiving signal.
On-Screen Menu Displays for Navigation Picture adjust (See page 24) Press to select picture menu. OK SAP LIGHT CH - VOL POWER VOL + Press to select or adjust picture items. CH TV VCR DVD DTV RCVR DBS/CBL AUX SLEEP EXIT TV/VIDEO Picture 1/2 Picture 2/2 No Pic. mode Standard +30 0 Color 0 Tint 0 Sharpness Cool Color Mng. PECT AS Off Zoom Adjust Other Adjust RE CH - VOL +10 FAVORI TE E MENU Press to select.
On-Screen Menu Displays for Navigation 1 2 3 4 5 6 7 8 9 Press to select. CH - VOL 0 OK VOL + Press to go to each setting screen. CH Enter a 4-digit password. Lock settings (See page 35) Channel lock Create password. - - - - Lock Mode Off Channel Program Channel lock CH 1 3-0 CH 2 CH 3 Program lock MPAA U.S.TV C.E.L.R. CH 4 CH 5 CH 6 CH 7 C.F.L.R. Monitor out Change password Enter password. Change password - - - - Enter new password. Enter new password, again.
Sub-Menu Navigation Picture Press the MENU button to display the Main menu. Press to select “Picture”. CH - VOL OK Press to enter sub-menu. VOL + CH Picture Audio Timer Lock Setup Picture 1/2 Normal Pic. mode No Standard Picture Brightness +30 0 Color Tint Sharpness 0 0 +10 Picture 2/2 Color Temp Color Mng. Cool Off Zoom Adjust Other Adjust Normal / Picture / Brightness / Color / Tint / Sharpness / Color Temp / Color Mng. Press to select the sub-menu.
Sub-Menu Navigation Zoom Adjust Adjust the Zoom position. It works when Aspect mode is Zoom. CH - VOL OK VOL + Press to select Zoom Adjust menu. Press to display the Zoom Adjust screen. CH Picture 1/2 Normal Pic. mode No Standard Picture Brightness +30 0 Color Tint Sharpness 0 0 +10 Picture 2/2 Color Temp Color Mng. Cool Off Zoom Adjust Other Adjust Press to adjust V-Position. CH - VOL OK VOL + CH Press to adjust Size. • V-Position : Adjust the vertical position.
Sub-Menu Navigation Audio Press the MENU button to display the Main menu. Press to select “Audio”. CH - VOL OK Press to enter sub-menu. Audio Normal Bass Set +7 Timer Treble Balance +7 0 Lock Other Adjust Picture Audio VOL + CH Setup Normal / Bass / Treble / Balance Press to select “Normal”, “Bass”, “Treble” or “Balance”. CH - VOL OK VOL + Press to select or adjust the sub-menu.
Sub-Menu Navigation Surround Enhances audio response when listening to stereo. Press to select “Surround”. CH - VOL OK VOL + CH Press to select “On” or “Off”. • On : For stereo audio. • Off : For monaural audio. Other Adjust AI Sound Surround Speakers HDMI In Audio Leveler On Off On Auto 0 Note: Fixed to “Off” when “Speakers” is set to “Off”. Speakers This feature is used to turn TV speakers “On” or “Off” (see page 14, Amplifier Connection). Press to select “Speakers”.
Sub-Menu Navigation Timer Select Timer to turn the TV on and off at selected times and on selected days. Press the MENU button to display the Main menu. Press to select “Timer”. OK Audio Timer 1 Timer 2 Timer CH - VOL Timer Sleep Picture Press to enter the sub-menu. Timer 3 Timer 4 Timer 5 Lock VOL + Setup CH Sleep timer Press to select “Sleep”. CH CH - VOL OK VOL + CH Press to enter the Sleep set screen. - VOL OK Press to select off time (minutes).
Sub-Menu Navigation Set up Press the MENU button to display the Main menu. CH - VOL OK VOL + Press to select “Setup”. Press to enter the sub-menu. Picture Audio Timer CH Lock Setup Setup 1/2 CH scan Fav. Language Clock Program channel Setup 2/2 Other adjust About Reset Input labels CC CH scan Press to select “CH scan”. CH - VOL OK Press to select “Fav.” or “All”. VOL + CH Setup 1/2 CH scan Fav. Language Clock Program channel Input labels CC Language Press to select “Language”.
Sub-Menu Navigation Program CH 1 CH - VOL OK VOL + Press to select “Program channel”. Press to enter Program channel menu. Setup 1/2 CH scan CH Press to select sub-menus. 2 CH - VOL Manual Signal meter Fav. Input labels CC Auto program Automatically scans all available channels. “Auto program” is not available while the CableCARDTM is inserted. Press to select “ANT In”. “Auto” and “Signal meter” cannot be selected while the CableCARDTM is inserted.
Sub-Menu Navigation Edit (Caption) Edit (Add) Setting to register/delete in Program channel. Press to select “Preset”. 1 CH - VOL OK Press to select Yes or No. Press to select Broadcast st. CH VOL + Caption select Apply Preset CH - VOL ---- OK VOL + CH Caption detail Press to select “Caption detail”. 2 CH - VOL OK VOL + Press to display the Caption input screen. CH Press to move cursor to “Caption”. 3 CH - VOL OK Press to enter input field.
Sub-Menu Navigation Input labels To label video input connections for on-screen display. 1 Press to select “Input labels”. CH - VOL OK Press to enter the sub-menu field. VOL + 2 Press to select the Video input. CH OK Fav. Language Clock Program channel Input labels CC CH - VOL Setup 1/2 CH scan VOL + CH Press to select the input label. • To skip the input, select ‘‘SKIP’’. The input will be skipped when you press [TV/VIDEO]. Input labels Comp. 1 Comp.
Sub-Menu Navigation Digital The Digital Closed Caption menu lets you configure the way you choose to view the digital captioning. Press to select “Digital”. CH - VOL OK VOL + CH Press to select the setting. • “Primary”, “Second.”, “Service 3”, “Service 4”, “Service 5”, “Service 6” CC Mode Analog Digital Off CC1 Primary Digital setting CC reset Digital setting Selecting digital broadcast service and viewing formats. 1 CH - VOL OK Press to select “Digital setting”.
Sub-Menu Navigation Other adjust (Setup) Setup 1/2 CH scan Fav. Language Clock Program channel Setup 2/2 Other adjust Other Adjust Auto Power On About Reset Side Bar Off Off Input labels CC Auto Power On CH - VOL OK VOL + CH Press to select “Auto Power On”. Other Adjust Press to select “Set” or “Off”. Select “Set” to power the TV on at the same time as the cable box or other connected components are powered on.
Sub-Menu Navigation Lock Press the MENU button to display the Main menu. CH - VOL OK VOL + CH Press to select “Lock”. Press to display the Input password screen. Picture Audio Timer 1 2 3 4 5 6 7 8 9 Enter your password by pressing 0 ~ 9 keys. 0 Enter password. Lock Lock Mode - - - - Off Channel Program Setup Change password Create a 4-digit password to enter the Lock menu. 1 2 3 4 5 6 7 8 9 Enter a 4-digit password. Create password.
Sub-Menu Navigation Block program This television incorporates V-Chip technology to block the viewing of movies and television programs according to the rating category. There are four (4) Content Advisory Categories: MPAA (Motion Picture Association of America), U.S.TV Program, Canadian English ratings and Canadian French ratings. These categories are used as guidelines for blocking programs. • The default mode for the Lock category is the Unlocked state. Press to select “Program”.
Sub-Menu Navigation U.S. MOVIES RATINGS CHART NR G PG PG-13 R NC-17 X NO RATING (NOT RATED) AND NA (NOT APPLICABLE) PROGRAMS. Movie has not been rated or rating does not apply. GENERAL AUDIENCES. All ages admitted. PARENTAL GUIDANCE SUGGESTED. Some material may not be suitable for children. PARENTS STRONGLY CAUTIONED. Some material may be inappropriate for children under 13. RESTRICTED. Under 17 requires accompanying parent or adult guardian. NO ONE 17 AND UNDER ADMITTED. ADULTS ONLY. U.S.
Sub-Menu Navigation CANADIAN FRENCH RATINGS CHART E Exempt - Exempt programming. General - Programming intended for audience of all ages. Contains no violence, or the violence content is minimal or is depicted appropriately. 8+ General - Not recommended for young children. Programming intended for a broad audience but contains light or occasional violence. Adult supervision recommended.
Operating peripheral equipment Programming the remote control code You can operate other manufacturers’ components using this TV’s remote control. Preparations: • Connect the power cord of the external component to the wall outlet. • Make sure the component is turned off. 1 CH POWER + POWER - VOL OK VOL + CH SAP Press and hold POWER and OK together, for at least 5 seconds. • The mode selection buttons flashes, and then release POWER and OK.
Operating peripheral equipment Infrared Code Index The remote control is capable of operating many brands of peripheral equipment. Refer to page 39 for programming procedures. Notes: • The remote control memory is limited and therefore some models may not be operated. The remote control is not designed to control all features available in all models. • After entering the proper infrared code, press the desired Mode Selection buttons (see page 16).
Operating peripheral equipment Codes for DVD DVD Brand Denon Ferguson JVC Mitsubishi Nordmende Panasonic Philips Pioneer RCA Code 100 101 109 105 101 100 103 102 101 Brand Saba Samsung Sharp Sony Technics Thomson Toshiba Yamaha Zenith 101 110 108 104 100 101 103 100 107 Code Brand Optimus Panasonic Philips Pioneer Quasar RCA Sansui Sanyo Scott Sharp Sherwood Sony Soundesign Teac Technics Victor Yamaha Code 208, 218, 220, 222 224, 225, 227 229, 230 208 224, 225, 227 231, 237, 238, 247 210, 246 205 210
Operating peripheral equipment Codes for Receivers RCVR Brand Admiral Aiwa Denon Fisher Garrard Harman Kardon Jensen JVC Kenwood Magnavox Marantz Mclntosh Nakamichi Onkyo Code 120 125, 126 134, 135, 136 104 113 115, 123 129 132, 133 100, 108 127 124 116 106 109, 114 Brand Optimus Panasonic Philips Pioneer Quasar RCA Sansui Sharp Sony Soundesign Teac Technics Victor Yamaha Code 103, 127, 130, 131 118, 119, 121 123 105, 107 118, 119, 121 103, 105, 127, 130, 131 103, 111, 139 134, 137 122 138 111, 112, 113
Operating peripheral equipment Mode Operational Key Chart This chart defines which keys are operational after programming (if needed), while in the selected remote control mode, DTV, CABLE, DBS, VCR, DVD ...etc. KEY NAME DTV MODE CABLE MODE DBS MODE POWER POWER POWER NAVIGATION UP/DOWN CABLE CHANNEL UP/DOWN DBS NAVIGATION UP/DOWN OK - DBS MENU NAVIGATION RIGHT/LEFT - DBS NAVIGATION RIGHT/LEFT DTV MENU - - PROGRAM INFO. - DBS PROGRAM INFO.
Operating peripheral equipment KEY NAME VCR MODE DVD/CD MODE (DVD) (CD) (PVR) AUX MODE (VCR2) (TAPE) RCVR MODE MU T POWER E TV/VIDEO LIGHT POWER POWER POWER POWER POWER POWER POWER TV MUTE TV MUTE RCVR MUTE TV MUTE RCVR MUTE RCVR MUTE RCVR MUTE TV INPUT SW - - - TV INPUT SW - RCVR INPUT SW - - - - - - REMOTE BUTTONS - NAVIGATION UP/DOWN NEXT/PREVIOUS TRACK NAVIGATION UP/DOWN - - TUNER +/- - - - - - - - VOLUME -/+ NAVIGATION RIGHT/LEFT RCVR VOLUME -/+ N
VIDEO/COMPONENT/HDMI input signals HDMI input VIDEO input signal name 1 NTSC Applicable input signals (∗ mark) horizontal frequency(kHz) 15.73 vertical frequency(Hz) 59.94 AV IN R Y PB PB PR PR S VIDEO VIDEO horizontal vertical signal name frequency(kHz) frequency(Hz) COMPONENT HDMI 1 525 (480) /60i 15.73 59.94 ∗ ∗ 2 525 (480) /60p 31.47 59.94 ∗ ∗ 3 750 (720) /60p 45.00 59.94 ∗ ∗ 4 1,125 (1,080) /60i 33.75 59.94 ∗ ∗ Note: Signals without above specification may not be displayed properly.
Troubleshooting Chart Before calling for service, determine the symptoms and follow suggested solutions. Symptoms VIDEO AUDIO Page Snowy Video Noisy Audio • Adjust the antenna location and connection. 11 Multiple Image Noisy Audio • Adjust the antenna location and connection. • Check the antenna lead-in cable. 11 11 Interference Noisy Audio • Move the television away from electrical appliances, lights, vehicles and medical equipment. - Normal Video No Audio • Increase volume • Check Mute.
Troubleshooting Chart Plasma Display panel Symptoms Some parts of the screen do not light up. An after-image appears. Whirring sounds can be heard from the display unit. Check • The plasma display panel is manufactured using an extremely high level of precision technology; however, sometimes some parts of the screen may be missing picture elements or have luminous spots. This is not a malfunction.
Customer’s Record The model number and serial number of this product can be found on its back cover. You should note this serial number in the space provided below and retain this book, plus your purchase receipt, as a permanent record of your purchase to aid in identification in the event of theft or loss, and for Warranty Service purposes. Model Number Panasonic Consumer Electronics Company, Division of Panasonic Corporation of North America One Panasonic Way, Secaucus New Jersey 07094 U.S.A.