
User manual

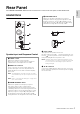

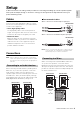
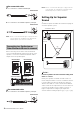
Table Of Contents

HS8/HS7/HS5/HS8S Owner’s Manual
8
HS8S (Subwoofer)
Subwoofer Connections
Connecting the Subwoofer to the
HS8/HS7/HS5 Speakers
Subwoofer Response Control
8 Power switch
Turns power to the subwoofer ON or OFF.
Rock the switch to the right [ ] to turn the power ON, or to
the left [ ] to turn the power OFF. The Yamaha logo on the
front panel will light when the power is ON.
NOTE Turning the power switch ON and OFF in rapid succession
can cause the device’s electronics to malfunction. Please wait
for 3 seconds or more after turning the power OFF before
turning it ON again.
9 AC IN connector
Connect the supplied power cable here. First connect the
power cord to the subwoofer, then insert the power cord
plug into the AC outlet.
63
12457
8
9
1 INPUT L/R connector
These connectors receive the input signal to the
subwoofer. Balanced XLR and balanced phone jack
connectors are provided for both the L and R inputs.
The L and R inputs can be used simultaneously.
Signals supplied to both the L and R inputs are mixed
internally.
NOTE The XLR and phone jack input connectors can not be
used simultaneously. Use only one input connector at a
time.
NOTE Refer to “Connection and Cable Types” on page 14 for
more connector details.
2 OUTPUT L/R connectors
These are the subwoofer’s output connectors.
The input signals received at the INPUT L and R
connectors are output via the OUTPUT L and R
connectors, respectively. Low frequency reproduction
characteristics can be adjusted via the LOW CUT
switch and LOW CUT control.
3 LOW CUT switch
When this switch is ON, the low frequencies are
attenuated prior to output via the OUTPUT L and R
connectors at the frequency set by the LOW CUT
control. The low-frequency attenuation cutoff
frequency can be adjusted via the LOW CUT control.
4 LOW CUT control
Adjusts the low-frequency attenuation cutoff
frequency between 80 Hz and 120 Hz when the LOW
CUT switch is ON.
5 HIGH CUT control
Sets the cutoff frequency for subwoofer output high-
frequency attenuation from 80 Hz to 120 Hz.
6 PHASE switch
Switches the phase of the subwoofer output.
This switch should be set to [NORM.] in most
situations, but in combination with some speakers
and in some speaker layouts switching to the [REV.]
setting may improve low-frequency response. Select
the setting that provides the best bass response in
your system.
7 LEVEL control
Adjusts the subwoofer output level.
1
5 6 7
234
HS8S signal flow