Gebruiksaanwijzing AV-Receiver Nederlands voor Europa
INHOUD INLEIDING Functies en mogelijkheden ................................................ 3 Over deze handleiding ...................................................... 4 Meegeleverde accessoires................................................. 4 Namen en functies van onderdelen................................... 5 Voorpaneel ........................................................................ 5 Achterpaneel..................................................................... 6 Display voorpaneel ....
INLEIDING Functies en mogelijkheden ■ Ingebouwde hoogkwalitatieve, zeer krachtige 5-kanaals versterker ■ Ingang/geluidsveldprogramma wisselen met 1 knop (SCENE-functie)...............26 ■ Luidsprekeraansluitingen voor 2- tot 5.1-kanaals configuraties – – – – Luidsprekerkanalen en functies .................................................................................................................9 Luidsprekerinstelling ....................................................................................
INLEIDING Functies en mogelijkheden Over deze handleiding • Deze handleiding is gedrukt voordat uw toestel werd geproduceerd. Ontwerp en specificaties zijn gedeeltelijk onderhevig aan wijzigingen als resultaat van verbeteringen enz. In het geval van verschillen tussen de handleiding en het product, heeft het product prioriteit. • "cHDMI1" (voorbeeld) geeft de naam van de onderdelen van de afstandsbediening aan. Raadpleeg "Afstandsbediening" (☞p.
INLEIDING Namen en functies van onderdelen g AM Voorpaneel h a A (aan/uit) b c d e f Hiermee schakelt u dit toestel tussen de modi Aan en Stand-by. YPAO MIC-aansluiting Hierop sluit u de meegeleverde YPAO-microfoon aan. De luidsprekerbalans wordt automatisch aangepast (☞p. 21). INFO Hiermee verandert u welke informatie wordt weergegeven op het voorpaneel van de display (☞p. 7). MEMORY Hiermee registreert u FM/AM-zenders als voorkeuzezenders (☞p. 31).
INLEIDING Namen en functies van onderdelen e COMPONENT VIDEO-aansluitingen Achterpaneel a DOCK-aansluiting b c d Voor het aansluiten van een optioneel Yamaha universeel iPod-dock (bijvoorbeeld YDS-12) (☞b. 35) of Bluetooth draadloze audioontvanger (YBA-10) (☞b. 37). HDMI OUT-aansluiting Voor het aansluiten van een HDMI-compatibele TV voor de weergave van audio-/videosignalen naar (☞p. 13).
INLEIDING Namen en functies van onderdelen g VOLUME-indicator Display voorpaneel a HDMI-indicator b c d e f ■ De display van het voorpaneel wijzigen Geeft het huidige volumeniveau aan. h Cursorindicators Gaat branden wanneer HDMI-signalen worden ingevoerd via de geselecteerde HDMI-signaalbron. CINEMA DSP-indicator Licht op als een geluidsveldeffect wordt geselecteerd dat CINEMA DSP-technologie gebruikt. Tuner-indicator Licht op bij het ontvangen van een FM/AM-uitzending.
INLEIDING Namen en functies van onderdelen a Signaalzender van afstandsbediening Afstandsbediening Verzendt infraroodsignalen. b TRANSMIT c Ingangselector b RECEIVER SLEEP l HDMI 1 2 1 2 3 4 3 4 k AV HDMI1-4 AV1-5 AUDIO1-2 V-AUX DOCK AUDIO c 5 1 2 TUNER DOCK V-AUX Hiermee bedient u de FM/AM-tuner. Deze toetsen worden gebruikt bij het gebruik van de tuneringang. d FM AM e INFO MEMORY MOVIE MUSIC PRESET FM AM MEMORY PRESET F / G TUNING H / I TUNING ENHANCER SUR.
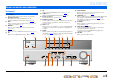
AANSLUITINGEN Luidsprekers aansluiten Dit toestel gebruikt akoestische veldeffecten en geluiddecoders om u het gevoel van een echt filmtheater of echte concerthal te geven. Deze effecten worden bereikt met de ideale luidsprekerplaatsing en aansluitingen in uw luisteromgeving. ■ Surroundluidsprekers links en rechts Luidsprekerkanalen en functies De surroundluidsprekers zijn voor effecten en vocale geluiden, waarbij de 5.1-kanaals luidsprekers zorgen voor geluiden op de achtergrond.
AANSLUITINGEN Luidsprekers aansluiten Luidsprekeropstelling Luidsprekers aansluiten 5.1-kanaals luidsprekeropstelling (5 luidsprekers + subwoofer) Sluit uw luidsprekers aan op de desbetreffende aansluitingen op het achterpaneel.
AANSLUITINGEN Luidsprekers aansluiten ■ Voorste luidsprekers aansluiten KE RS 2 FR ON T ■ Middelste luidsprekers/ surroundluidsprekers aansluiten 3 SU 4 EA KE NT ER Verwijder ongeveer 10 mm van de isolatie van het uiteinde van elk van de luidsprekerkabels en draai vervolgens de blootliggende draadjes netjes in elkaar zodat deze geen kortsluiting veroorzaken. Maak de luidsprekeraansluitingen los. Plaats het blootliggende draad van de luidsprekerkabel in het gat aan de kant van de aansluiting.
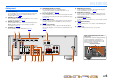
AANSLUITINGEN Externe apparaten aansluiten ■ Audio-aansluitingen Kabelstekkers en aansluitingen Het hoofdtoestel is uitgerust met de volgende ingang-/uitgangaansluitingen. Gebruik aansluitingen en kabels die geschikt zijn voor de componenten die u aansluit. ■ Audio-/video-aansluitingen HDMI-aansluitingen Digitale video en digitaal geluid worden verzonden door een enkele aansluiting. Gebruik alleen een HDMI-kabel.
AANSLUITINGEN Externe apparaten aansluiten ■ Een HDMI-videomonitor aansluiten Een televisiescherm aansluiten Sluit de HDMI-kabel aan op de HDMI OUT-aansluiting. Dit toestel is uitgerust met de volgende drie typen uitgangaansluitingen voor aansluiting op een TV. HDMI OUT, COMPONENT VIDEO of VIDEO. Selecteer de juiste aansluiting volgens de ingangsignaalindeling die door uw televisie wordt ondersteund.
AANSLUITINGEN Externe apparaten aansluiten ■ Een videomonitor aansluiten Bij gebruik van andere TV's Sluit de video-penkabel aan op de VIDEO-aansluiting (MONITOR OUT). Om geluid van de TV over te zetten naar dit toestel, dient u de AV1-5- of AUDIO1-2-aansluitingen van het toestel aan te sluiten op de audio-uitgangaansluitingen van de TV. Afhankelijk van de aansluiting op de TV sluit u de audio-ingang van de TV aan op de AV1-5 of AUDIO1-2.
AANSLUITINGEN Externe apparaten aansluiten TRANSMIT BD/DVD-spelers en andere toestellen aansluiten RECEIVER SLEEP HDMI 1 2 1 2 3 4 3 4 AUDIO 1 Dit toestel kan de AV1-5- of AUDIO1-2-ingangsaansluitingen gebruiken voor de ontvangst van audiosignalen van andere audiosignaalbronnen. Als een extern toestel geen audiosignalen kan weergeven vanaf een HDMIaansluiting, gebruik dan de volgende methode om de audio-ingang te wijzigen. Dit toestel heeft de volgende ingangsaansluitingen.
AANSLUITINGEN Externe apparaten aansluiten ■ BD/DVD-spelers en andere toestellen aansluiten met ■ Componentaansluitingen naar analoge audio-uitgangstoestellen componentkabels Sluit het toestel aan met een componentvideokabel op een van de AV1-2-ingangsaansluitingen. Componentvideo/-audio uitgang Optische digitale audio-uitgangsbronnen gebruiken Selecteer de AV1-ingang waarop het externe toestel is aangesloten voor weergave.
AANSLUITINGEN Externe apparaten aansluiten ■ BD/DVD-spelers en andere toestellen aansluiten met videokabels Sluit het externe toestel met behulp van een video-penkabel aan op een van de AV3-5-ingangsaansluitingen. Analoge stereo audio-uitgangsbronnen gebruiken Selecteer de AV5-ingang waarop het externe toestel is aangesloten voor weergave. Optische digitale audio-uitgangsbronnen gebruiken Selecteer de AV4-ingang waarop het externe toestel is aangesloten voor weergave.
AANSLUITINGEN Externe apparaten aansluiten ■ CD-spelers en andere audiotoestellen aansluiten Coaxiale digitale uitgangsbronnen gebruiken Selecteer de AV-ingang (AV2 of AV3) waarop het externe toestel is aangesloten voor weergave. Analoge stereo uitgangsbronnen gebruiken Selecteer de audio-ingang (AUDIO1-2) waar het externe toestel op is aangesloten voor weergave.
AANSLUITINGEN Externe apparaten aansluiten Videocamera's en draagbare audiospelers aansluiten A/V-invoer uitzenden naar externe toestellen Gebruik de VIDEO AUX-aansluitingen op het voorpaneel als u tijdelijk videocamera's, videoconsoles of draagbare audiotoestellen wilt aansluiten op de ontvanger. Selecteer de V-AUX-ingang om deze aangesloten toestellen te gebruiken.
AANSLUITINGEN De FM/AM-antennes aansluiten Bij deze ontvanger worden een FM-binnenantenne en een AM-ringantenne geleverd. Sluit deze antennes op de juiste wijze aan op de desbetreffende aansluitingen. AM-ringantenne Plaats de AM-ringantenne weg van de ontvanger. De draden van de AM-ringantenne hebben geen polariteit. U kunt beide draden aansluiten op de AM-aansluiting of de GND -aansluiting.
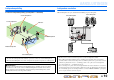
AANSLUITINGEN De luidsprekerparameters automatisch aanpassen (YPAO) Dit toestel is uitgerust met een YPAO (Yamaha Parametric Room Acoustic Optimizer) die de status, grootte en volumebalans van de luidsprekers afstelt om te zorgen voor een optimaal geluidsveld.
AANSLUITINGEN De luidsprekerparameters automatisch aanpassen (YPAO) TRANSMIT RECEIVER Dit voltooit de voorbereidingen. Let bij het meten op het volgende om nauwkeurigere resultaten te bereiken. SLEEP HDMI 2 3 A AV 2 3 • Meten duurt ongeveer drie minuten. Houd de ruimte zo stil mogelijk tijdens het meten. • Wacht in de hoek van de luisterruimte tijdens het meten of verlaat deze geheel om te voorkomen dat u een obstructie vormt tussen de luidsprekers en de YPAO-microfoon.
AANSLUITINGEN De luidsprekerparameters automatisch aanpassen (YPAO) TRANSMIT ■ Als er een foutmelding verschijnt RECEIVER SLEEP 2 3 Controleer de inhoud van het bericht in de lijst met berichten (☞p. 24) om het probleem op te lossen en voer het metingsproces opnieuw uit. A AV 2 3 AUDIO 1 V UX V-A DOCK YPAO TUNER VOL. E-9:CANCEL AM PRESET TUNING MEMORY ENHANCER SUR.
AANSLUITINGEN De luidsprekerparameters automatisch aanpassen (YPAO) ■ Berichtenlijst E-7:NO MIC OPMERKING Als de volgende berichten verschijnen, los dan de problemen op die zijn opgetreden en voer het metingsproces opnieuw uit. E-8:NO SIGNAL ■ Wanneer een waarschuwingsmelding verschijnt voor de meting Connect MIC! De YPAO-microfoon is niet aangesloten. De YPAO-microfoon kon geen testgeluid onderscheiden. De hoofdtelefoon is aangesloten. Maak de hoofdtelefoon los.
WEERGAVE TRANSMIT Basisweergaveprocedure RECEIVER SLEEP HDMI 1 2 3 4 3 4 AV 1 2 AUDIO 5 1 V-AUX 2 c DOCK TUNER AM PRESET 1 2 TUNING MEMORY Zet de externe componenten aan (TV, DVDspeler enz.) die zijn aangesloten op dit toestel. Zet het toestel aan en selecteer de signaalbron met cIngangselector. Hoge/lage tonenweergave afstemmen (toonregeling) De naam van de geselecteerde ingangsbron verschijnt gedurende een paar seconden.
WEERGAVE De ingangsinstellingen met een enkele toets wijzigen (SCENE-functie) TRANSMIT RECEIVER SLEEP Dit toestel heeft een SCENE-functie waarmee u het toestel kunt aanzetten en de signaalbronnen en de geluidsveldprogramma's met één toets kunt veranderen. HDMI 1 2 3 4 3 4 AV 1 2 AUDIO 5 1 2 DOCK V-AUX TUNER FM AM PRESET INFO Er zijn vier scènes beschikbaar voor verschillende c gebruiken, zoals het afspelen van films of muziek.
WEERGAVE Genieten van de geluidsveldprogramma's TRANSMIT RECEIVER SLEEP 2 3 A AV 2 3 AUDIO 1 DOCK V UX V-A TUNER FM AM PRESET INFO MEMORY MOVIE MUSIC ■ Genieten van onverwerkte ■ Genieten van stereoweergave Gebruik de gewone decodeermodus als u geluid wilt weergeven zonder geluidsveldverwerking. U kunt als volgt afspelen in de gewone decodeermodus.
WEERGAVE Genieten van de geluidsveldprogramma's Geluidsveldprogramma's in de tabel geeft het geluidsveldprogramma voor CINEMA DSP aan. Action Game Dit geluidsveld is geschikt voor actiespellen zoals racespelletjes, vechtspelletjes en FPS-games. De realiteit en de nadruk op diverse effecten geeft de speler het gevoel dat hij midden in de actie staat, wat een nog grotere concentratie mogelijk maakt. Roleplaying Game Dit geluidsveld is geschikt voor rollenspellen en avonturengames.
WEERGAVE Genieten van de geluidsveldprogramma's ■ Categorie: STEREO Geschikt voor het luisteren naar stereobronnen. 2ch Stereo Gebruik dit programma om multikanaals materiaal terug te brengen naar 2 kanalen. Wanneer er multikanaals signalen binnenkomen, worden deze teruggemengd naar 2 kanalen en weergegeven via de voorste luidsprekers links en rechts. 5ch Stereo Gebruik dit programma om geluid te laten weergeven door alle luidsprekers.
WEERGAVE FM/AM afstemmen TRANSMIT RECEIVER SLEEP HDMI 2 3 A AV 2 3 AUDIO 1 V UX V-A c De FM/AM-tuner van dit toestel kan op de volgende twee manieren worden afgestemd. AM PRESET TUNING Normaal afstemmen MEMORY ENHANCER SUR. DECODE MUSIC STEREO STRAIGHT SCENE BD DVD Een ontvangstfrequentie selecteren (normaal afstemmen) DOCK TUNER FM Als u de FM/AM-tuner gebruikt, kunt u de richting van de FM/AM-antenne die is aangesloten op dit toestel, afstellen voor de beste ontvangst.
WEERGAVE FM/AM afstemmen TRANSMIT Een frequentie registreren en oproepen (automatisch afstemmen) RECEIVER SLEEP HDMI 2 3 A AV 2 3 AUDIO 1 DOCK V UX V-A TUNER AM PRESET TUNING U kunt tot 40 FM/AM-zenders registreren als voorkeuzezenders. Er zijn twee methoden om zenders voor te programmeren, "Auto Preset" en "Manual c Preset". Gebruik een van deze methoden om zenders te registreren. MEMORY ENHANCER SUR.
WEERGAVE FM/AM afstemmen TRANSMIT ■ Een voorkeuzenummer voor registratie toewijzen RECEIVER SLEEP HDMI 2 3 Druk één keer op dMEMORY om "Manual Preset" op de display van het voorpaneel weer te geven. Na een korte tijd verschijnt het voorkeuzenummer waarop het station is geregistreerd. A AV 2 3 AUDIO 1 V UX V-A DOCK c TUNER AM PRESET TUNING Wissen van voorkeuzezenders d Voorkeuzenummer De nieuw geregistreerde frequentie MEMORY 9850 ENHANCER SUR. DECODE MUSIC STEREO VOL.
WEERGAVE FM/AM afstemmen TRANSMIT RECEIVER SLEEP 2 HDMI 2 3 A AV 2 Display van het voorpaneel (wanneer "Program Type" is geselecteerd) AUDIO 1 DOCK Program Service Program Type PRESET (Frequentieweergave) Clock Time STEREO STRAIGHT Audio Decoder SETUP R SR READY VOL. TrafficProgram L SL SW C R SR Programmatype DSP Program SCENE TV SW C e ENHANCER SUR. DECODE BD DVD L SL Radio Text TUNING MEMORY MUSIC VOL.
WEERGAVE FM/AM afstemmen TRANSMIT ■ De videosignalen combineren met RECEIVER SLEEP de audiosignalen van de radio HDMI 2 3 A AV 2 3 AUDIO 1 V UX V-A DOCK TUNER Selecteer het videosignaal dat u wilt uitvoeren vanaf de video-uitgangsaansluiting op dit toestel wanneer TUNER als signaalbron is geselecteerd. Als u bijvoorbeeld naar een sportuitzending op TV kijkt, c kunt u alleen het geluid op de radio inschakelen.
WEERGAVE Nummers afspelen vanaf uw iPod™/iPhone™ TRANSMIT RECEIVER SLEEP Wanneer u een universeel dock voor uw Yamaha iPod (zoals de YDS-12, afzonderlijk verkrijgbaar) op dit toestel hebt aangesloten, kunt u genieten van het afspelen van uw iPod/iPhone met behulp van de bij dit toestel meegeleverde afstandsbediening. Tijdens het afspelen vanaf een iPod/iPhone kunt u ook gebruikmaken van de gecomprimeerde muziekverbeterende geluidsveldprogramma's (☞p.
WEERGAVE Nummers afspelen vanaf uw iPod™/iPhone™ TRANSMIT ■ Het opladen van de iPod/iPhone wanneer dit toestel in de stand-bystand staat RECEIVER SLEEP HDMI 2 3 A AV 2 3 AUDIO 1 V UX V-A DOCK c TUNER AM PRESET TUNING MEMORY ENHANCER SUR.
WEERGAVE Afspelen van nummers vanaf Bluetooth™-componenten TRANSMIT RECEIVER SLEEP U kunt een Yamaha Bluetooth draadloze geluidsontvanger (zoals de YBA-10, afzonderlijk verkrijgbaar) aansluiten op dit toestel en genieten van draadloos afspelen vanaf Bluetooth-compatibele draagbare muziekspelers. J1 HDMI 2 3 A AV 2 3 AUDIO 1 OPMERKING DOCK V UX V-A c TUNER Wanneer voor de eerste keer vanaf een Bluetooth-component wordt afgespeeld, moet u de componenten eerst paren (de Bluetooth registreren).
WEERGAVE Afspelen van nummers vanaf Bluetooth™-componenten TRANSMIT Bluetooth™-componenten gebruiken RECEIVER SLEEP HDMI 2 3 A AV 2 3 AUDIO 1 V UX V-A DOCK TUNER Voer na een geslaagde paring de volgende procedure uit om een draadloze verbinding tot stand te brengen tussen dit toestel en de Bluetooth-component. Wanneer de c draadloze verbinding tot stand is gebracht, kunt u afspelen vanaf Bluetooth-componenten. 3 Wanneer de draadloze verbinding tot stand is gebracht VOL.
INSTELLEN TRANSMIT De instellingen configureren die specifiek zijn voor elke signaalbron (menu Option) RECEIVER SLEEP HDMI 1 2 3 4 3 4 Deze ontvanger heeft een uniek optiemenu specifiek voor elk type signaalbron, zoals het snijden van volume voor compatibele signaalbronnen, audio/video-gegevensweergave voor signalen van externe toestellen en andere vaak gebruikte menu-items. AV 1 2 AUDIO 5 1 2 c Weergave en instelling van het menu Option DOCK V-AUX TUNER 3 AM PRESET ENHANCER SUR.
INSTELLEN De instellingen configureren die specifiek zijn voor elke signaalbron (menu Option) ■ Het volume afstellen tussen signaalbronnen Volume Trim Signaalbron: Alle Vermindert een wijziging in volume bij het wisselen van signaalbronnen door de verschillen in volume in elke signaalbron te corrigeren. U kunt deze parameter voor elke signaalbron afstellen.
INSTELLEN De instellingen configureren die specifiek zijn voor elke signaalbron (menu Option) ■ De FM-modus wisselen (Stereo/Mono) Video-informatie V IN Indeling en resolutie van het video-ingangsignaal. V OUT Indeling en resolutie van het video-uitgangsignaal. V.MSG (verschijnt alleen als een fout optreedt) Foutberichten over HDMI-signalen en -componenten. Foutmelding HDCP Error Device Over HDCP-verificatie mislukt. Het aantal aangesloten HDMIcomponenten is te hoog.
INSTELLEN Verschillende functies instellen (menu Setup) TRANSMIT RECEIVER SLEEP U kunt verschillende functie-instellingen configureren voor dit toestel via het menu Setup. HDMI 2 3 A AV 2 3 Weergave en instellingen van het menu Setup AUDIO 1 DOCK V UX V-A 3 TUNER AM PRESET 1 TUNING MEMORY Druk op hSETUP op de afstandsbediening.
INSTELLEN Verschillende functies instellen (menu Setup) Instellingen voor luidsprekers beheren ■ Handmatige luidsprekersetup Config SETUP Past de weergavekenmerken van de luidsprekers aan op basis van handmatig ingestelde parameters. VOL. Speaker Setup L SL SW C R SR Het submenu Speaker Setup Config Beheert handmatig luidsprekerconfiguratie, zoals een luidsprekergrootte (geluidproductiecapaciteit), en audioverwerking van lage tonen. Level Past handmatig het volume van elke luidspreker aan.
INSTELLEN Verschillende functies instellen (menu Setup) Crossover Stelt de onderlimiet van de weergave van de luidsprekers van de lagefrequentiecomponent in op "Small". Audio met een frequentie onder die limiet wordt geproduceerd vanaf de subwoofer of de voorste luidsprekers. J1 ■ Het volume van elke luidspreker regelen Level Past het volume van elke luidspreker apart aan. Gebruik de iCursor B / C om de gewenste luidspreker te selecteren en pas het volume aan met iCursor D / E.
INSTELLEN Verschillende functies instellen (menu Setup) ■ Geluidskwaliteit afstellen met de equalizer Equalizer Past de geluidskwaliteit van de toon van de luidspreker aan met een parametrische of grafische equalizer. ■ Genereert testtonen 3 Volume verhogen: Druk op iCursor E. Volume verlagen: Druk op iCursor D. EQ Select Selecteer een equalizertype. PEQ GEQ Gebruik de parametrische equalizer voor het afstellen van de geluidskwaliteit.
INSTELLEN Verschillende functies instellen (menu Setup) Sound Setup Lipsync Past de vertraging aan tussen audio- en videoweergave (lip-syncfunctie). VOL. L SL SW C R SR Het submenu Sound Setup Lipsync Past de vertraging aan tussen video- en audioweergave. Adaptive DRC Automatische aanpassing van het geluidsniveau om zelfs lage volumes beter hoorbaar te maken. D.Range Selecteert de aanpassingsmethode voor het dynamische bereik voor digitale audioweergave.
INSTELLEN Verschillende functies instellen (menu Setup) ■ Automatische afstelling van het dynamische bereik van Dolby Digital en DTS D.Range Selecteert de dynamische bereikaanpassingsmethoden voor audiobitstreamweergave (Dolby Digital en DTS). ■ Het opstartvolume instellen De HDMI-functies instellen Init.Volume Stelt het eerste volume in op het moment dat het toestel wordt ingeschakeld.
INSTELLEN Verschillende functies instellen (menu Setup) ■ Bediening van de ontvanger via TV (HDMI-bediening) Control Stel de HDMI-bedieningsfunctie op "On" om apparaten te bedienen die via HDMI aangesloten zijn. Als de TV of andere externe componenten HDMI-bediening ondersteunen (bijv. Panasonic VIERA Link), kunt u de afstandsbediening van die apparaten gebruiken voor de bediening van enkele functies van dit toestel, en om dit toestel met de werking van die apparaten te synchroniseren.
INSTELLEN Verschillende functies instellen (menu Setup) TRANSMIT De ontvanger makkelijk in gebruik maken RECEIVER SLEEP HDMI 2 3 A AV 2 3 3 AUDIO Gebruik iCursor D / E om een nieuwe naam te selecteren uit de volgende sjablonen. 3 Druk op iENTER. HDMI1 1 SETUP DOCK V UX V-A VOL. Func. Setup TUNER L SL SW C R SR Blu-ray Satelliet DVD VCR SetTopBox Tape Game MD TV PC DVR iPod CD HD DVD CD-R (leeg) HDMI1 AM PRESET TUNING Het submenu Func.
INSTELLEN Verschillende functies instellen (menu Setup) ■ Automatisch in de stand-bystand schakelen als u het toestel niet meer bedient Parameters voor geluidsveldprogramma instellen AutoPowerDown Als u dit toestel niet bedient of de afstandsbediening niet gebruikt voor langere periode, gaat het automatisch in de stand-bystand (Automatische uitfunctie). De standaardinstelling van deze functie is "8hours". U kunt wijzigen hoeveel tijd er verstrijkt voordat dit toestel in stand-bystand gaat.
INSTELLEN Parameters voor geluidsveldprogramma instellen TRANSMIT RECEIVER SLEEP Hoewel de geluidsveldprogramma's voldoen zoals ze zijn met de standaardparameters, kunt u effecten regelen door het instellen van de geluidsveldelementen (parameters). Ga als volgt te werk om de geluidseffecten aan te passen aan geschiktheid voor akoestische omstandigheden van audio-/videobronnen van ruimten.
INSTELLEN Parameters voor geluidsveldprogramma instellen ■ Parameters bruikbaar bij bepaalde geluidsveldprogramma's SR Level CT Width Past het volume van het surround R kanaal aan. J1 Alleen 2ch Stereo Direct Met deze optie worden het DSP-circuit en toonregelingscircuit automatisch gepasseerd, afhankelijk van de conditie van de toonregeling etc., als een analoge geluidsbron wordt weergegeven. U kunt genieten van een hogere kwaliteit geluid.
INSTELLEN Geavanceerde functies die naar behoefte kunnen worden geconfigureerd (Advanced Setup menu) TRANSMIT RECEIVER SLEEP Via het menu Advanced Setup kunt u het toestel initialiseren en andere handige functies activeren. Het Advanced Setup menu kan als volgt worden bediend. HDMI 2 3 A AV 2 3 Het Advanced Setup menu weergeven/instellen AUDIO 1 DOCK V UX V-A 4 5 TUNER AM PRESET TUNING MEMORY ENHANCER SUR.
INSTELLEN De HDMI-bedieningsfunctie gebruiken Dit toestel ondersteunt de HDMI-bedieningsfunctie, waarmee u externe componenten via HDMI kunt bedienen. Als u apparaten aansluit die HDMI-bediening ondersteunen (excl. Panasonic VIERA Link-compatibele TV's, dvd/blu-ray discrecorders, enz.
INSTELLEN De HDMI-bedieningsfunctie gebruiken TRANSMIT ■ Automatisch schakelen van de RECEIVER SLEEP 2 3 A AV 2 3 Wanneer de HDMI-bediening (☞p. 54) juist werkt, wijzigt de signaalbron van dit toestel automatisch om overeen te komen met de bedieningen die op de TV worden uitgevoerd. De standaard-ingangsaansluiting is AV4. Als de AV4 optische digitale aansluiting aangesloten is op de TV-aansluiting voor audio-uitgang, kunt u direct van het TV-geluid via dit toestel genieten.
INSTELLEN De HDMI-bedieningsfunctie gebruiken TRANSMIT ■ Invoer van één HDMI-kabel naar RECEIVER SLEEP TV-audio met Audio Return Channel-functie HDMI 2 3 A AV 2 3 Wanneer u een TV gebruikt die HDMI-functies en de Audio Return Channel-functie ondersteunt, kan audio/ videoweergave vanaf dit toestel naar de TV, of audioweergave van de TV naar dit toestel worden verzonden door één enkele HDMI-kabel (Audio Return Channel functie).
APPENDIX Problemen oplossen Raadpleeg de tabel hieronder wanneer het toestel niet naar behoren functioneert. Als het probleem niet hieronder vermeld staat, of als de aanwijzingen het probleem niet verhelpen, zet het toestel dan uit (stand-by), haal de stekker uit het stopcontact en neem contact op met uw dichtstbijzijnde Yamaha-dealer of -servicecentrum. Algemeen Probleem De stroom gaat niet aan. Het apparaat gaat in de stand-bystand nadat het toestel is aangezet.
APPENDIX Problemen oplossen Probleem Geen geluid. Geen beeld. Oorzaak Oplossing Zie pagina In- of uitgangskabels niet op de juiste manier aangesloten. Sluit de bedrading op de juiste manier aan. Als dit het probleem niet verhelpt, is het mogelijk dat er iets mis is met de kabels. 15 Als een DVI-HDMI-kabel is gebruikt om het toestel aan te sluiten op een externe component, is het nodig om een audioingangsaansluiting te gebruiken voor een andere ingang om audio weer te geven.
APPENDIX Problemen oplossen Probleem Oorzaak Oplossing Zie pagina Er wordt alleen substantieel geluid geproduceerd door de middelste luidspreker. Als een monobron geluidsveldprogramma wordt toegepast, wordt het geluid van alle kanalen via de middelste luidspreker weergegeven voor bepaalde surrounddecoders. Probeer een ander geluidsveldprogramma. 26 Er klinkt geen geluid uit de surroundluidsprekers. Dit toestel staat in de gewone decodeermodus en er wordt mono materiaal weergegeven.
APPENDIX Problemen oplossen HDMI™ Tuner (FM/AM) Probleem Oorzaak De HDMI-indicator op de display van het voorpaneel knippert. Er is een probleem opgetreden met de HDMI-verbinding. Oplossing Zie pagina FM Probleem Geen beeld of geluid. (Als u de HDMIregelfunctie gebruikt) Er wordt geen TVgeluid weergegeven vanaf dit toestel als u de afstandsbediening van de TV gebruikt. Sluit de HDMI-kabel opnieuw aan.
APPENDIX Problemen oplossen Afstandsbediening AM Probleem Oorzaak Er kan niet automatisch worden afgestemd op de gewenste zender. Het signaal is te zwak, of de antenne is los. Automatische zendervoorkeuze werkt niet. U hoort doorlopend gekraak en gesis. U hoort gezoem en gefluit. Oplossing Zie pagina Stem de richting af van de AMringantenne. 20 Gebruik de handmatige afstemmethode. 30 Automatische zenderafstemming is niet beschikbaar voor AMzenders. Gebruik de handmatige zenderafstemming.
APPENDIX Problemen oplossen iPod™/iPhone™ Display Loading... Connect error Bluetooth™ Oorzaak Oplossing Zie pagina Het toestel is bezig de verbinding met uw iPod/iPhone te herkennen. — Het toestel is bezig songlijsten over te nemen van uw iPod/ iPhone. — Er is een probleem met het signaalpad van uw iPod/iPhone naar het toestel. Zet het toestel uit en sluit uw universele Yamaha iPod-dock opnieuw aan op de DOCK-aansluiting van het toestel.
APPENDIX Woordenlijst Audio-informatie Audio en video synchronisatie (lip sync) Lip sync staat voor lipsynchronisatie en geeft in deze context zowel het probleem aan als een technische manier om beeldsignalen en geluidssignalen tijdens signaaloverdracht en weergave netjes met elkaar in de pas te laten lopen. Voor de complexe manier waarop beeld en geluid verwerkt worden, zijn ingewikkelde instellingen door de eindgebruiker nodig, maar HDMI versie 1.
APPENDIX Woordenlijst LFE 0.1-kanaal Compressed music enhancer Deep Color Dit kanaal reproduceert lage toonsignalen op een lage frequentie en heeft een frequentiebereik van 20 Hz tot 120 Hz. Dit kanaal wordt meestal als 0.1 geteld omdat niet het volledige frequentiebereik wordt weergegeven, zoals bij de andere 5 kanalen in een Dolby Digital- of DTS 5.1-kanaals systeem.
APPENDIX Informatie over HDMI™ ■ Voor HDMI geschikte signalen OPMERKINGEN Audiosignalen Audiosignaaltypen 2-kanaals Lineair PCM Audiosignaalindelingen 2ch, 32-192 kHz, 16-/20-/24-bits Compatibele media CD, DVD-Video, DVD-Audio enz. Multikanaals Lineair PCM 8-kanaals, 32-192 kHz, 16-/20-/24-bits DVD-Audio, Blu-ray Disc, HD DVD enz. DSD 2/5.1-kanaals, 2,8224 MHz, 1 bit SACD enz. Bitstream Dolby Digital, DTS DVD-Video enz.
APPENDIX Technische gegevens ■ INGANG/UITGANG Ingangsaansluitingen • HDMI ingang x 4 • AV ingang x 5 [Audio] Digitale ingang (optisch) x 2, digitale ingang (coaxiaal) x 2, analoge ingang x 1 [Video] Componentvideoaansluitingen x 2, videoaansluitingen x 3 • AUDIO ingang x 2 [Audio] analoge aansluiting x 2 • VIDEO AUX ingang x 1 [Audio] Analoog x 1, stereo mini-aansluiting x 1 [Video] videoaansluiting x 1 Uitgangaansluitingen • TV-uitgang (monitoruitgang) x 3 [Audio/Video] HDMI x 1 [Video] Componentvideoaans
APPENDIX ■ VIDEOGEDEELTE • Videosignaaltype [Modellen voor de V.S., Canada, Korea en Algemene modellen] ..............................................................................................NTSC [Overige modellen].....................................................................PAL • Signaalniveau Composiet......................................................................1 Vp-p/75 Ω Composiet........................ 1 Vp-p/75 Ω (Y), 0.
© 2011 Yamaha Corporation YD283A0/OMNL