
Setup guide


En 3
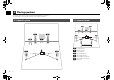
■ Connecting speaker cables
Speaker cables have two wires. One is for connecting
the negative (–) terminals of the unit and the speaker,
and the other is for the positive (+) terminals. If the wires
are colored to prevent confusion, connect the black wire
to the negative and the other wire to the positive
terminals.
a Remove approximately 10
mm (3/8”) of insulation
from the ends of the
speaker cable and twist
the bare wires of the cable
firmly together.
b Loosen the speaker terminal.
c Insert the bare wires of the cable into the gap on the side
(upper right or bottom left) of the terminal.
d Tighten the terminal.
Using a banana plug
(U.S.A. and Australia
models only)
a Tighten the speaker
terminal.
b Insert a banana plug into
the end of the terminal.
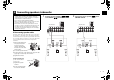
1
Connect the front speakers (1/2)
to the FRONT (//\) terminals.
2
Connect the center speaker (3) to the
CENTER terminal.
3 Connecting speakers/subwoofer
• Under its default settings, the unit is configured for 8-ohm
speakers. When connecting 6-ohm speakers, set the unit’s
speaker impedance to “6 Ω MIN”. For details, see “Setting the
speaker impedance” in “Owner’s Manual”.
• Use a subwoofer equipped with built-in amplifier.
• Before connecting the speakers, remove the unit’s power cable
from the AC wall outlet and turn off the subwoofer.
• Ensure that the core wires of the speaker cable do not touch
each other or come into contact with the unit’s metal areas. This
may damage the unit or the speakers. If the speaker cables
short circuit, “Check SP Wires” will appear on the front display
when the unit is turned on.
FRONT
aa
b
d
c
– (black)
+ (red)
FRONT
a
b
Banana plug
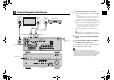
FRONT CENTER SURROUND
SINGLE
SURROUND BACK B -AMP
SPEAKERS
CLASS 2 WIRING CABLAGE CLASSE 2
SUBWOOFER
PRE OUT
ZONE2/F PRESENCE
EXTRA SP
12
3
45
9
The unit (rear)
FRONT CENTER SURROUND
SINGLE
SURROUND BACK B -AMP
SPEAKERS
CLASS 2 WIRING CABLAGE CLASSE 2
SUBWOOFER
PRE OUT
ZONE2/F PRESENCE
EXTRA SP
12
3
45
9
The unit (rear)