U HTR-6260 AV Receiver OWNER’S MANUAL
IMPORTANT SAFETY INSTRUCTIONS CAUTION RISK OF ELECTRIC SHOCK DO NOT OPEN CAUTION: TO REDUCE THE RISK OF ELECTRIC SHOCK, DO NOT REMOVE COVER (OR BACK). NO USER-SERVICEABLE PARTS INSIDE. REFER SERVICING TO QUALIFIED SERVICE PERSONNEL.
Caution: Read this before operating your unit. 1 To assure the finest performance, please read this manual carefully. Keep it in a safe place for future reference. 2 Install this sound system in a well ventilated, cool, dry, clean place – away from direct sunlight, heat sources, vibration, dust, moisture, and/or cold. Allow ventilation space of at least 30 cm on the top, 20 cm on the left and right, and 20 cm on the back of this unit.
Contents INTRODUCTION Front panel ................................................................. 4 Rear panel .................................................................. 5 Front panel display..................................................... 6 Remote control........................................................... 7 Quick start guide..................................................... 8 L Preparing remote control .......................................
INTRODUCTION Features ■ Built-in 7-channel power amplifier • Minimum RMS Output Power (1 kHz, 0.9% THD, 8 Ω) • FRONT L/R: 90 W + 90 W • CENTER: 90 W • SURROUND L/R: 90 W + 90 W • SURROUND BACK L/R: 90 W + 90 W ■ Speaker/Preout outputs • Speaker jacks (7-channel), preout output jacks (7.
About this manual Bluetooth™ Bluetooth is a registered trademark of Bluetooth SIG and is used by Yamaha in accordance with a license agreement. PREPARATION Manufactured under license from Dolby Laboratories. Dolby, Pro Logic and the double-D symbol are trademarks of Dolby Laboratories. “HDMI,” the “HDMI” logo and “High-Definition Multimedia Interface” are trademarks, or registered trademarks of HDMI Licensing LLC. x.v.Color™ “x.v.Color” is a trademark of Sony Corporation.
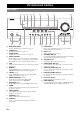
Part names and functions Front panel V U D E F G H I Q VOLUME HDMI THROUGH ZONE2 ON/OFF ZONE2 CONTROL INFO l MEMORY FM l h PRESET AM CATEGORY h l TUNING/CH h SCENE BD/DVD TV CD STRAIGHT PURE DIRECT RADIO MAIN ZONE PHONES TONE CONTROL PROGRAM l ON/OFF A VIDEO B C K L MAIN ZONE ON/OFF MN N Switches this unit between on and off (see page 18). B PHONES jack C ZONE2 ON/OFF For plugging headphones (see page 23). Switches the zone function on and off (see page 58).
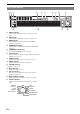
Part names and functions Rear panel b c e dg h f q SPEAKERS INTRODUCTION a EXTRA SP ZONE2/PRESENCE (BD/DVD) SIRIUS DOCK XM HDMI 2 HDMI 1 HDMI OUT HDMI 3 HDMI 4 ANTENNA COMPONENT VIDEO COMPONENT VIDEO REMOTE UNBAL. PR PR PB IN OUT GND AM PB VIDEO VIDEO Y 12V 0.1A MAX.
Part names and functions Front panel display cb a d e SIRIUS XM f STEREO 3 TUNED h g SLEEP ZONE 2 j i VOL. MUTE SW PL PR C L R SL SR SBL SB SBR k a l SIRIUS indicator Lights up when a SiriusConnect tuner is selected as an input source. b XM indicator c HDMI indicator Lights up when an XM tuner is selected as an input source. Lights up during normal communication when HDMI is selected as an input source.
Part names and functions Remote control a c ZONE2 e CODE SET TRANSMIT d POWER SOURCE POWER SLEEP f HDMI 1 2 3 4 3 4 Input selection keys HDMI 1-4 Selects HDMI inputs 1 through 4. Selects AV inputs 1 through 6. AV 1-6 AUDIO 1/2 Selects AUDIO inputs 1 and 2. Selects the V-AUX jack on the front panel of this V-AUX g [A]/[B] AV 1 AUDIO 5 6 1 2 V-AUX [ A ] [ B ] DOCK TUNER SIRIUS XM MULTI PRESET TUN.
Quick start guide When you use this product for the first time, perform setup following the steps below. See the related pages for details on operations and settings. Step 1: Prepare items for setup Step 2: Set up your speakers Prepare speakers, DVD player, cables, and other items necessary for setup. For example, prepare the following items for setting up a 5.1-channel sound system. Front right speaker Place your speakers in the room and connect them to this unit.
PREPARATION Preparing remote control 1 Using the remote control The remote control transmits a directional infrared ray. Be sure to aim the remote control directly at the remote control sensor on this unit during operation. 3 Remote control sensor window PREPARATION 2 30 2 Insert the two supplied batteries (AAA, R03, UM-4) according to the polarity markings (+ and –) on the inside of the battery compartment. Snap the battery compartment cover back into place.
Connections Placing speakers This unit supports up to 7.1-channel surround. We recommend the following speaker layout in order to obtain the optimum surround effect. 7.1-channel speaker layout Speaker channels C FR FL SW SW 30˚ SL SR 60˚ 80˚ SL SR SBL SBR 30 cm (12 in) or more 6.1-channel speaker layout C FR FL SW SW 30˚ ■ Front left and right speakers (FL and FR) The front speakers are used for the front channel sounds (stereo sound) and effect sounds.
Connections 0.5 to 1 m (1 to 3 ft) 0.5 to 1 m (1 to 3 ft) PL PR FL FR 1.8 m (6 ft) 1.8 m (6 ft) C INTRODUCTION ■ Presence left and right speakers (PL and PR) The presence speakers supplement the sound from the front speakers with extra ambient effects produced by the sound field programs (see page 25). We recommend that you use the presence speakers especially for the CINEMA DSP sound field programs.
Connections Connecting the speaker cable Caution • A speaker cable is a pair of insulated cables running side by side in general. One of the cables is colored differently or striped to indicate a polarity. Connect one end of the colored/striped cable to the “+” (red) terminal of this unit and the other end to that of your speaker, and connect one end of the other cable to the “–” (black) terminal of this unit and the other end to that of your speaker.
Connections Information on jacks and cable plugs ■ ■ Audio jacks Jack and cables AUDIO jacks (white) L Description R (red) To transmit coaxial digital audio signals. Use pin cables for digital audio signals. (orange) C O To transmit optical digital audio signals. Use optical fiber cables for optical digital audio signals.
Connections Connecting a TV monitor or projector Connect a video monitor such as a TV or projector to an output terminal of this unit. You can select one of the following three types according to the input signal format supported by the video monitor. Note • Make sure that this unit and video monitor are unplugged from the AC wall outlets.
Connections Connecting other components Note • Make sure that this unit and other components are unplugged from the AC wall outlets. Audio / video input (AV 1-6) Audio / video output (AV OUT) PREPARATION HDMI input (HDMI 1-4) (BD/DVD) SIRIUS DOCK XM HDMI 2 HDMI 1 HDMI OUT HDMI 3 HDMI 4 ANTENNA COMPONENT VIDEO COMPONENT VIDEO REMOTE UNBAL. PR PR FM PB GND AM INTRODUCTION This unit has input and output terminals for respective input and output sources.
Connections ■ Audio player Output jacks on the connected external component External components Input sources/jacks of this unit Output jacks External component with optical digital output Optical digital output External component with coaxial digital output Coaxial digital output External component with analog audio output Analog audio output AV 1 (TV) OPTICAL AV 4 OPTICAL AV 2 COAXIAL AV 3 (CD) COAXIAL AV 5 AUDIO AV 6 AUDIO AUDIO 1 AUDIO AUDIO 2 AUDIO y • We recommend connecting
Connections Using REMOTE IN/OUT jacks Use the VIDEO AUX jacks on the front panel to connect a game console or a video camera to this unit. Be sure to turn down the volume of this unit and other components before making connections. VOLUME INTRODUCTION When the components are the Yamaha products and have the capability of the transmission of the remote control signals, connect the REMOTE IN and REMOTE OUT jacks to the remote control input and output jack with the monaural analog mini cable as follows.
Connections Connecting the FM and AM antennas Connecting the power cable An indoor FM antenna and an AM loop antenna are supplied with this unit. Connect these antennas properly to the respective jacks. Indoor FM antenna After all connections are complete, plug the AC power cable of this unit into an AC wall outlet. AM loop antenna Outdoor AM antenna Connect a 5 to 10 m (16 to 33 ft) vinyl-covered wire, and extend it outdoors (use the AM loop antenna together with this antenna).
Optimizing the speaker setting for your listening room (YPAO) 1 Auto Setup EQ Type;;;;Natural . Start [ ]/[ ]:Up/Down [ENTER]:Start y • See page 51 for the “Manual Setup” procedure. • You can bring up the above menu screen from the setup menu (see page 51). Using Auto Setup 3 y • It is recommended that you use a tripod or something similar to fix the optimizer microphone at the same height as your ears would be when seated in your listening position.
Optimizing the speaker setting for your listening room (YPAO) 5 To select a sound character for adjustment, press oCursor n to select “EQ Type” and then press oCursor l / h. If this unit does not work when you press oCursor, press mSETUP once and then operate this unit. This unit has a parametric equalizer that adjusts the output levels for each frequency range. The equalizer is adjusted to produce a cohesive sound field based on automatically measured speaker characteristics.
Optimizing the speaker setting for your listening room (YPAO) When an error message is displayed during measurement If a problem occurs during measurement, “WARNING” is displayed on the result display screen. Check the error and solve the problems. WARNING ERROR >Retry Exit p [ [ ]/[ ]:Select [ENTER]:Return Retry Performs “Auto Setup” again. Exit Terminates the measurement and “Auto Setup.” y • See page 70 for details on warning messages.
BASIC OPERATION Playback Basic procedure Using the SCENE function 1 Turn on external components (TV, DVD player, etc.) connected to this unit. 2 Press OINPUT l / h (or hInput selection keys) to select an input source. The name of the selected input source is displayed for a few seconds. Input source name VOL. AV1 • You can change the input source name displayed on the front panel display or the OSD on the video monitor as necessary (see page 55).
Playback 2 Press rMUTE on the remote control to mute the audio output. The MUTE indicator on the front panel display flashes while audio output is muted. 2 Press rMUTE again to resume audio output. Adjusting high/low frequency sound (tone control) y • The tone control of the speakers or headphones can be set separately. Set the headphone tone control with the headphones connected. Plug your headphones in the BPHONES jack on the front panel.
Playback Displaying input signal information When HDMI1-4 or AV1-4 is selected as the input source, you can display audio/video signal information. y • Input signal information is displayed on both a video monitor and the front panel display. 1 Select the desired input source, and press nOPTION. The option menu for the selected input source is displayed (see page 43). 2 Press oCursor k / n to select “Signal Info,” and press oENTER. Information on input signals is displayed.
Enjoy the sound field programs This unit is also equipped with a Yamaha digital sound field processing (DSP) chip. You can enjoy multi-channel sounds for almost all input sources using various sound field programs stored on the chip and a variety of surround decoders. ■ Selecting a sound field program on the front panel Press LPROGRAM l / h repeatedly to select a desired sound field program.
Enjoy the sound field programs Program Descriptions Drama This sound field features stable reverberations that match a wide range of movie genres from serious dramas to musicals and comedies. The reverberations are modest but offer an optimum 3D feeling, reproducing effects tones and background music softly but cubically around clear words and center positioning in a way that does not fatigue the listener even after long hours of viewing.
Enjoy the sound field programs For Multi-channel stereo reproduction Program Use this program to output sound from all speakers. When you play back multi-channel sources, this unit downmixes the source to 2 channels, and then outputs the sound from all speakers. This program creates a larger sound field and is ideal for background music at parties, etc.
Enjoy the sound field programs Enjoying unprocessed input sources (Straight decoding mode) In straight decoding mode, sounds are reproduced without sound field effect. 2-channel stereo sources are output from only the front left and right speakers. Multi-channel input sources are decoded straight into the appropriate channels and multi-channel sounds are reproduced without a sound field effect. 1 2 To enable straight decoding mode, press MSTRAIGHT (or kSTRAIGHT).
FM/AM tuning The FM/AM tuner of this unit provides the following two modes for tuning. Frequency tuning mode (Auto tuning/Manual tuning) You can tune in to a desired FM/AM station by searching or specifying its frequency. • You can switch between stereo and monaural for FM broadcast in the option menu (see page 44). 4 Notes • When you press tNumeric keys during preset tuning, a preset number is selected. Set tuning mode to normal tuning mode using ITUNING/CH l / h (or iTUN.
FM/AM tuning Status Calling a preset station (Preset tuning) 01:FM 87.5 MHz Preset number Frequency During the automatic station preset, the upper area of the screen changes as follows: READY → SEARCH → MEMORY each time a station is registered. When registration is complete, “FINISH” appears and the option menu screen automatically reappears. When you press nOPTION on the remote control, the screen returns to the original state.
XM® Satellite Radio tuning (U.S.A. model only) Satellite Radio delivers a variety of commercial-free music from categories ranging from Pop, Rock, Country, R&B, Dance, Jazz, Classical and many more plus coverage of all the top professional and college sports including play by play games from select leagues and teams. Additional programming includes expert sports talk, uncensored entertainment, comedy, family programming, local traffic and weather and news from your most trusted sources.
XM® Satellite Radio tuning (U.S.A. model only) XM Satellite Radio® operations 1 ■ Category Search mode 1 Press HCATEGORY l / h (or iCATEGORY l / h) to select the channel category. “CAT” is displayed on the front panel display during the channel category selection. When you select the category, the first channel in the category is selected. Press the OINPUT l / h (or press hXM) to select “XM” as the input source.
XM® Satellite Radio tuning (U.S.A. model only) Registering XM Satellite Radio channels Prior to selecting a preset channel in the Preset Search mode, you must preset XM channels. For details, see “Registering preset channels” on this page. Preset channel number XM Registering preset channels Search a channel you want to set as a preset channel in one of the XM Satellite Radio search modes. For details, see “XM Satellite Radio operations” (see page 32).
XM® Satellite Radio tuning (U.S.A. model only) Displaying the XM Satellite Radio™ information Use this feature to display the XM Satellite Radio information on the front panel display or on the OSD. ■ Video monitor (OSD) Press qDISPLAY on the remote control to turn on or off the information display. The following information is displayed on the OSD.
SIRIUS Satellite Radio™ tuning (U.S.A. model only) Connecting the SiriusConnect™ tuner SiriusConnect Tuner and the antenna (sold separately) Press the OINPUT l / h (or press hSIRIUS) to select “SIRIUS” as the input source. 2 Press t0 and then tENT to display the Sirius ID of your SiriusConnect tuner. “000 Sirius ID” and “xxxxxxxxxxxx” (“xxxxxxxxxxxx” indicates the 12-digit Sirius ID of your SiriusConnect tuner) appears alternately on the front panel display. Write the Sirius ID below.
SIRIUS Satellite Radio™ tuning (U.S.A. model only) 2 Search for a channel by using one of the SIRIUS Satellite Radio search modes. • To select a channel from the all channel list, see “All Channel Search mode” on this page. • To select a channel by category, see “Category Search mode” on this page. • To select the desired channel directly by entering the channel number, see “Direct number access mode” on this page.
SIRIUS Satellite Radio™ tuning (U.S.A. model only) Registering the SIRIUS Satellite Radio™ channels Prior to selecting a preset channel in the Preset Search mode, you must preset SIRIUS channels. For details, see “Registering preset channels” on this page. SIRIUS 001 Hits 1 Registering preset channels Search a channel you want to set as a preset channel in one of the SIRIUS Satellite Radio search modes. For details, see “SIRIUS Satellite Radio operations” (see page 35).
SIRIUS Satellite Radio™ tuning (U.S.A. model only) Setting the Parental Lock You can use the Parental Lock feature to limit the access to the desired SIRIUS Satellite channels. This unit automatically skips the locked channels when this unit is in the All Channel Search mode or Category Search mode and you search a channel by pressing ITUNING/CH l / h (or iTUN./CH k / n). Notes • You can also select a channel by using iCATEGORY l / h or iTUN./CH k / n.
SIRIUS Satellite Radio™ tuning (U.S.A. model only) Displaying the SIRIUS Satellite Radio™ information Note • If a status message or an error message appears on the front panel display or video monitor, see “SIRIUS Satellite Radio” (see page 66). ■ Front panel display Channel Antenna y • If the SIRIUS Satellite Radio information contains a character that cannot be recognized by this unit, the character will be displayed with a space.
Using iPod™ Once you have stationed your iPod in a Yamaha iPod universal dock (such as the YDS-11, sold separately) connected to the DOCK terminal on the rear panel of this unit (see page 17), you can enjoy playback of your iPod using the supplied remote control or the menu displayed on the video monitor. You can also use the Compressed Music Enhancer mode of this unit to improve the sound quality of the compression artifacts (such as MP3 format) stored on your iPod (see page 27).
Using iPod™ 4 Press oCursor k / n / l / h to select a menu item and then oENTER to start playback. Shuffle/repeat playback Press qDISPLAY to switch to menu browse mode while “DOCK” is selected as the input source. The option menu can be displayed only in menu browse mode. Press qDISPLAY to switch to menu browse mode before starting shuffle or repeat playback. Menu items of “Videos” Menu items vary depending on the files stored on your iPod. 2 Press nOPTION. The option menu is displayed.
Using Bluetooth™ components You can connect a Yamaha Bluetooth wireless audio receiver (such as YBA-10, sold separately) to the DOCK terminal of this unit and enjoy the music contents stored in your Bluetooth component (such as a portable music player) without wiring between this unit and the Bluetooth component. You need to perform “Pairing” the connected Bluetooth wireless audio receiver and your Bluetooth component in advance.
ADVANCED OPERATION Setting the option menu for each input source (OPTION menu) Select an input source using OINPUT l / h (or hInput selection keys). 2 Press nOPTION on the remote control. The OPTION menu appears. The displayed OPTION menu items differ depending on the input source. For details, see the following section. OPTION menu items The following menu items are provided for each input source.
Setting the option menu for each input source (OPTION menu) ■ Decoder Mode Input source: HDMI1-4, AV1-4 Choices: Auto*/DTS Selects DTS digital audio signals for reproduction. Auto DTS ■ Automatically selects audio input signals. Selects DTS signals only. Other input signals are not reproduced. Extended Surround Input source: HDMI1-4, AV1-4 Choices: Auto*/PLIIxMovie/PLIIxMusic/EX/ES/ Off Selects whether to reproduce multi-channel input signals in 6.1- or 7.
Setting the option menu for each input source (OPTION menu) ■ Auto Preset Input source: TUNER ■ Clear Preset Input source: TUNER, XM, SIRIUS 1 Press OINPUT l / h (or hMULTI) to change the input source to “MULTI CH.” 2 Press nOPTION on the remote control. The OPTION menu appears. 3 Press oCursor k / n to display “Video,” and press oENTER. Parental Lock Input source: SIRIUS Shuffle Input source: iPod (DOCK) Choices: Off*/Songs/Albums Changes the shuffle playback style (see page 41).
Editing surround decoders/sound field programs Selecting a decoder used with a sound field program 5 When using sound field programs for movies or TV programs, you can select a surround decoder to be used with the sound field program after setting the parameters from the following decoders. To set the parameters for sound field programs, see the following section.
Editing surround decoders/sound field programs Dialog Lift Choices: 0* to 5 The ideal dialogue position INTRODUCTION Use this feature to adjust the vertical position of the dialogues in movies. The ideal position of the dialogues is at the center of the video monitor screen. Adjusts attenuation characteristics of early-reflected sound.
Editing surround decoders/sound field programs Source sound Level Level Early reflections Time Time Sound source Rev.Time parameter adjusts the attenuation time of the rear reverberant sound based on the time that about 1kHz reverberant sound takes for 60dB of attenuation. Reverberant sound attenuates faster as you decrease the value. Rev.
Editing surround decoders/sound field programs Rev.Level parameter adjusts the reverberation sound level. Increasing the value of Rev.Level makes the reverbration sound level higher, which allows you to create more echo. Decoder parameters Source sound Level When PLIIx Music/PLII Music is selected Panorama (dB) Choices: Off*/On Adjusts the soundscape of the front sound field. Sends stereo signals to the surround speakers as well as the front speakers for a wraparound effect. Rev.
Operating various settings for this unit (Setup menu) You can call the setup menu using the remote control and change the settings of various menus. You can change the following settings in the setup menu. For details, read “Basic operation of the setup menu” first, and see the respective pages. Menu/Submenu Function Page Sets items for speakers. 51 1 Auto Setup (YPAO) Automatically adjusts output characteristics of speakers. 51 2 Manual Setup Manually adjusts output characteristics of speakers.
Operating various settings for this unit (Setup menu) “A)Config” display (example) Basic operation of the setup menu A)Config The setup menu screen appears on both video display (OSD) and front panel display. Center SP INTRODUCTION Video display (OSD) Setup Menu . ;Speaker Setup ;Sound Setup ;Function Setup ;DSP Parameter ;Memory Guard y • You can change other items by repeating step 4. 5 To finish the setting, press mSETUP.
Operating various settings for this unit (Setup menu) LFE/Bass Out Choices: Center SP SWFR/Front/Both* Choices: None/Small*/Large Selects speaker(s) for outputting low-frequency components of the LFE (low-frequency effect sound) channel or other channels. The output status is as follows. Sets the size of center speaker.
Operating various settings for this unit (Setup menu) Crossover Freq. Choices: 40Hz/60Hz/80Hz*/90Hz/100Hz/110Hz/120Hz/ 160Hz/200Hz Subwoofer Phase Normal*/Reverse Normal Select this not to change the phase of your subwoofer. Reverse Select this to reverse the phase of your subwoofer. B)Level Adjustable range: -10.0dB to +10.0dB (0.5 dB step) Defaults: “FR.L/FR.R/SWFR” 0dB “CNTR/SUR.L/SUR.R/SBL/SBR” -1.0dB y • When only one surround back speaker is connected, “SB” appears instead of “SBL” and “SBR.
Operating various settings for this unit (Setup menu) Max Outputs sound without adjusting the dynamic range of the input signals. ■ 2 Lipsync Adjusts delay between video output and audio output. HDMI Auto Choices: Off*/On Automatically adjusts output timing of audio and video signals when a monitor that supports an automatic lipsync function is connected to this unit.
Operating various settings for this unit (Setup menu) ■ 2 Display You can set items for a monitor or the front panel display. Max Volume Adjustable range: -30.0dB to +15.0dB/+16.5dB* (5.0 dB step) Note ■ • The brightness of display does not become bright in Pure Direct mode even if the value is increased.
Operating various settings for this unit (Setup menu) 5 Zone2 Sets the maximum volume level and initial volume level of Zone2. y • This item is displayed only when “Extra SP Assign” is set to “Zone2.” ■ You can set parameters for the sound field programs. For details, see page 46. Memory Guard Max Volume Adjustable range: -30.0dB to +15.0dB / +16.5dB* (5.0 dB step) Sets the maximum volume level of Zone2, so that the volume will not be accidentally increased.
Using multi-zone configuration Only analog signal can be sent to Zone2. If you want to output the sound from Zone2, connect an external component to AV5-6 or AUDIO1-2 by analog connection. For example, if you want to output sound from an HDMI DVD player in Zone2, you must connect the component to this unit by both HDMI and analog connections.
Using multi-zone configuration Controlling Zone2 You can select and control Zone2 by using the control keys on the front panel or on the remote control. The available operations are as follows: • Selecting the input source (AV5-6, AUDIO1-2, V-AUX) of Zone2. • Adjusting the volume of Zone2 (when a Zone2 speaker is connected to the EXTRA SP jack). • Tuning into FM or AM when “TUNER” is selected as the input source of Zone2 (see page 29).
Controlling other components with the remote control You can control external components for a selected input source with the remote control. The keys available for controlling external components are as follows: Input source Category Manufacturer Default code oCursor, ENTER, RETURN Operates the menus of external components. [A]/[B] — — [XM] Tuner Yamaha 5017 qDISPLAY Switches between the screens of external components.
Advanced setup In the advanced setup, you can set basic operations of this unit, such as on and off of a bi-amp connection, or initialize user settings. Perform the following steps to change settings. 1 Set this unit to the standby mode. 2 Press AMAIN ZONE ON/OFF while pressing and holding MSTRAIGHT on the front panel. The advanced setup menu appears on the front panel display. ADVANCED SETUP 3 Press LPROGRAM l / h repeatedly to select the parameter you want to change.
APPENDIX Troubleshooting General Problem Remedy See page The speaker impedance setting is incorrect. Set the speaker impedance to match your speakers. 60 (When this unit is turned back on and “CHECK SP WIRES!” is displayed.) The protection circuitry has been activated because this unit was turned on while a speaker cable was shorted. Make sure that all speaker cables between this unit and speakers are connected properly. 12 This unit cannot be turned off.
Troubleshooting Problem No picture. Cause Remedy See page An appropriate video input is not selected on the monitor. Select an appropriate video input on the monitor. — The composite output terminals are used to output a component video signal, or the COMPONENT VIDEO jacks are used to output a composite video signal. If your monitor does not support the HDMI connection, connect it to the COMPONENT OUT jacks or the composite output terminals and select an appropriate video input on the monitor.
Troubleshooting Problem No sound is heard from the subwoofer. Remedy See page 28 Sound may not be output from certain channels depending on input sources or sound field programs. Try another sound field program. 25 “LFE/Bass Out” of “A)Config” in “Speaker Setup” of the setup menu (Speaker Setup→2 Manual Setup→A)Config) is set to “Front” when a Dolby Digital or DTS signal is being played. Set “LFE/Bass Out” to “SWFR” or “Both.
Troubleshooting Problem Cause Remedy See page “CHECK SP WIRES!” appears on the front panel display. Speaker cables are short-circuited. Make sure all speaker cables are connected correctly. 12 There is noise interference from digital or radio frequency equipment. This unit is too close to other digital or radio frequency equipment. Move this unit further away from such equipment. — The picture is disturbed. The video software is copy-protected. This unit suddenly enters the standby mode.
Troubleshooting Problem Remedy See page The signal is weak or the antenna connections are loose. Adjust the AM loop antenna orientation. 18 Use the manual tuning method. 29 There are continuous crackling and hissing noises. Supplied AM loop antenna is not connected. Connect the AM loop antenna correctly even if you use an outdoor antenna. 18 The noises may be caused by lightning, fluorescent lamps, motors, thermostats and other electrical equipment.
Troubleshooting Status message See page Cause Remedy CH UNAVAIL The selected channel is not available. The channel may have been reassigned to a different channel number. This message may occur initially with a new XM MiniTuner or an XM Mini-Tuner that has not received XM’s signal for an extended period. Consult the latest channel guide at http://www.xmradio.com/ for the current list of channels.
Troubleshooting Status message The selected channel is not subscribed. The subscription information is updated. INVALID The selected channel is currently out of service. Not Available The operation you made is not available. See page Contact SIRIUS Satellite Radio to subscribe the selected channel. URL: https://activate.siriusradio.com/ Phone: 1-888-539-SIRIUS (1-888-539-7474) 35 Select another channel. 35 Select another channel.
Troubleshooting iPod™ Note • In case of a transmission error without a status message appearing on the front panel display and on the OSD, check the connection of your iPod (see page 17). Problem Loading... Cause Remedy See page This unit is in the middle of recognizing the connection with your iPod. This unit is in the middle of acquiring song lists from your iPod. Connect error There is a problem with the signal path from your iPod to this unit.
Troubleshooting Auto Setup (YPAO) INTRODUCTION Notes • • • • If the “ERROR” or “WARNING” screen appears, resolve the problem and then run “Auto Setup” again. Warning message “W-2” or “W-3” indicates that the adjusted settings may not be optimal. Depending on the speakers, warning message “W-1” may appears even if the speaker connections are correct. If error message “E-10” occurs repeatedly, contact a qualified Yamaha service center.
Troubleshooting Error message Cause Remedy See page E-9:USER CANCEL “Auto Setup” was cancelled due to an inappropriate user operation. Run “Auto Setup” again. 19 E-10:INTERNAL ERROR An internal error occurred. Run “Auto Setup” again. 19 After Auto Setup Error message Cause Remedy See page W-1:OUT OF PHASE Speaker polarity is not correct. This message may appear depending on the speakers even when the speakers are connected correctly. Check the polarities (+, –) of the displayed speaker.
Glossary ■ Audio and video synchronization (lip sync) ■ Dolby Digital Surround EX Dolby Digital EX creates 6 full-bandwidth output channels from 5.1channel sources. For the best results, Dolby Digital EX should be used with movie sound tracks recorded with Dolby Digital Surround EX. With this additional channel, you can experience more dynamic and realistic moving sound especially with scenes with “fly-over” and “flyaround” effects.
Glossary ■ DSD Direct Stream Digital (DSD) technology stores audio signals on digital storage media, such as Super Audio CDs. Using DSD, signals are stored as single bit values at a high-frequency sampling rate of 2.8224 MHz, while noise shaping and oversampling are used to reduce distortion, a common occurrence with very high quantization of audio signals. Due to the high sampling rate, better audio quality can be achieved than that offered by the PCM format used for normal audio CDs.
Sound field program information ■ Virtual CINEMA DSP Yamaha has developed a Virtual CINEMA DSP algorithm that allows you to enjoy DSP sound field surround effects even without any surround speakers by using virtual surround speakers. It is even possible to enjoy Virtual CINEMA DSP using a minimal two-speaker system that does not include a center speaker.
Information on HDMI™ ■ HDMI signal compatibility Audio signals Audio signal types Audio signal formats Compatible media 2ch Linear PCM 2ch, 32-192 kHz, 16/20/24 bit CD, DVD-Video, DVD-Audio, etc. Multi-ch Linear PCM 8ch, 32-192 kHz, 16/20/24 bit DVD-Audio, Blu-ray Disc, HD DVD, etc. DSD 2/5.1ch, 2.8224 MHz, 1 bit SA-CD, etc. Bitstream Dolby Digital, DTS DVD-Video, etc.
Additional information About the HDMI™ control function 2 Turn on all components connected to this unit via the HDMI connection. For details on operations of external components, refer to their operating instructions. 3 Check the settings of those components and enable the HDMI control function. Bring up to setup menu, and set “Control” to “On.” For details on settings of the external components, refer to their operating instructions.
Specifications AUDIO SECTION • Minimum RMS Output Power for Front, Center, Surround, Surround back [U.S.A. and Canada models] 1 kHz, 0.9% THD, 8 Ω .......................................................... 90 W [Other models] 1 kHz, 0.9% THD, 6 Ω .......................................................... 90 W • Dynamic Power (IHF) [U.S.A. and Canada models] Front Speakers 8/6/4/2 Ω .................................. 95/110/130/150 W [Other models] Front Speakers 6/4/2 Ω .....................................
Index ■ Numerics A ■ C E E)Test Tone, speaker setup ............................ 53 Editing sound field program .......................... 46 Editing surround decoder ............................... 46 Effect Level, sound field parameter ............... 49 ENTER, remote control ................................... 7 EQ Type Select, D)Equalizer, speaker setup ............................................. 53 Extended Surround, OPTION menu ..............
Index Parental Lock, OPTION menu ...................... 45 PHONES jack, front panel ............................... 4 Placing speaker .............................................. 10 PORTABLE jack, front panel ......................... 4 Power cable connection ................................. 18 Power Cable, rear panel ................................... 5 POWER, remote control .................................. 7 PRE OUT jacks, rear panel .............................. 5 Presence left speaker ...........
List of remote control codes TV A.R.
Fujitsu Siemens 0425, 0426, 0427, 0428, 0429 Funai 0033, 0034, 0035, 0036, 0037, 0097, 0104, 0105, 0225, 0259 Futuretech 0104, 0225 Galaxi 0269, 0274 Galaxis 0243, 0274 Gateway 0163, 0226, 0227 GBC 0261, 0266, 0273 GE 0069, 0071, 0072, 0073, 0077, 0090, 0099, 0102, 0106, 0112, 0131 Geant Casino 0275 GEC 0260, 0265, 0268, 0271, 0274, 0328 Geloso 0261, 0264, 0273 General Technic 0261, 0273 Genexxa 0262, 0265, 0268, 0274 GFM 0177, 0210 Giant 0328 Gibralter 0076, 0090, 0096, 0108 GoldHand 0327 Goldline 0274 Gol
Neckermann NEI Net-TV Neufunk New Tech New World NewTech Nicamagic Nikkai Nikko Nobliko Nokia Norcent Nordic Nordmende Nordvision Novatronic Oceanic Okano Olevia ONCEAS Onwa Opera Oppo Optimus Optoma Optonica Orbit Orion Orline Osaki Oso Otto Versand Pael Palladium Palsonic Panama Panasonic Panavision Pathe Cinema Pausa Penney Perdio Perfekt Philco Philharmonic Philips 0243, 0257, 0260, 0264, 0268, 0269, 0271, 0274, 0328 0268, 0271, 0274 0226 0273, 0274 0261, 0268 0262 0273, 0274, 0328 0260, 0327 02
Sylvania Symphonic Syntax Syntax-Brillian Sysline Sytong Tandy Tashiko Tatung TCM Teac Tec Technics TechniSat Techwood TEDELEX Teknika Teleavia Telecor Telefunken Telegazi Telemeister Telesonic Telestar Teletech Teleton Televideon Televiso Tensai Tesmet Tevion Texet Thomson Thorn TMK TNCi Tokai Tokyo Tomashi Toshiba Totevision Towada Trakton Trans Continens Transtec Trident iv 0072, 0088, 0089, 0090, 0091, 0095, 0096, 0097, 0098, 0175, 0177, 0210 0097, 0104, 0108, 0133, 0210, 0225 0149 0149 0271 0327
iBUYPOWER Impego Imperial Inno Hit 1066 1076 1072 1075, 1076, 1078, 1079, 1090, 1091 Innovation 1074 Instant Replay 1022 Interbuy 1077, 1090 Interfunk 1078 Intervision 1072, 1091 Irradio 1077, 1079, 1090 ITT 1073 ITV 1075, 1077, 1091 JC Penney 1018, 1019, 1020, 1021, 1022 JCL 1022 JVC 1011, 1012, 1013, 1014, 1015, 1016, 1017, 1018, 1019, 1028, 1035, 1064, 1073, 1085, 1117, 1130, 1131, 1133, 1134, 1135, 1136 Kaisui 1079, 1090 Karcher 1078 Kendo 1074, 1075, 1076, 1090 Kenwood 1018, 1019, 1073 Kodak 1021, 102
ATACOM Audiovox Avious Awa Axion Bang & Olufsen Baze BBK Bellagio Best Buy Blaupunkt Blue Parade Boghe Brainwave Brandt Broksonic Bush 2318 2111, 2199 2317 2313 2171 2210 2317 2318 2313 2309 2209 2207 2300 2312 2198, 2238 2192, 2195 2018, 2060, 2248, 2264, 2301, 2308, 2317, 2350, 2368 California Audio Labs 2197 Cambridge Audio 2304 CAT 2306, 2307 CAVS 2146 Centrum 2307 CGV 2304, 2312 Changhong 2222 Cinetec 2313 CineVision 2191, 2215 Clatronic 2308, 2317 Coby 2077, 2124, 2314 Conia 2301 Continental Edison 2
Skyworth Slim Art SM Electronic Sonic Blue Sontech Sony 2310 2312 2305 2215 2316 2005, 2006, 2007, 2020, 2021, 2022, 2023, 2024, 2025, 2069, 2072, 2073, 2085, 2086, 2087, 2091, 2092, 2093, 2102, 2128, 2129, 2130, 2249, 2250, 2323, 2334, 2335, 2336, 2360, 2361, 2362, 2363, 2364, 2365, 2384 Soundmaster 2305 Soundmax 2305 Spectra 2313 Spectroniq 2155 Standard 2305 Star Cluster 2305 Starmedia 2308, 2318 Sungale 2158 Sunkai 2312 Superscan 2196 Supervision 2305 Sylvania 2094, 2180, 2189, 2196, 2219, 2224 Symphon
Viewmaster Vision Visiopass Vortex View Wittenberg Zenith Zentek 3045 3045 3051, 3054, 3055 3045 3048 3035, 3040, 3046 3044 Sattelite AB Sat AccessHD ADB AGS Akai Alba 4138, 4139 4058 4142 4138 4101, 4103 4083, 4084, 4085, 4086, 4108, 4139 Aldes 4085, 4087, 4088 Allsat 4098, 4101, 4103 Allsonic 4074, 4087, 4090 Alltech 4139 Alpha 4103 Alpha Digital 4058 Alphastar 4031 Amitronica 4139 Amstrad 4089, 4113, 4136, 4139 Anglo 4139 Ankaro 4074, 4087, 4090, 4139 Anttron 4083, 4086 Apollo 4083 Armstrong 4089, 410
Orbitech OSat Otto Versand Pace Pacific Packsat Palcom Palladium Palsat Panasat Panasonic Panda Pansat Patriot Paysat PCT Philco Philips Phoenix Phonotrend Pioneer Polsat Predki Premiere Priesner Primestar Profile Promax Prosat Proscan Protek Proton Provision Quadral Quelle Quiero RadioShack Radiola Radix Rainbow RCA Realistic Redpoint Redstar RFT Roadstar Roch Rover Saba Sabre Sagem Sakura Samsung SAT Sat Cruiser Sat Partner Sat Team 4083, 4134, 4135, 4136 4086 4093 4084, 4093, 4113, 4121, 4125, 4138
© 2009 Yamaha Corporation All rights reserved.
U HTR-6260 The letters in circles and the numbers in squares correspond to those in the Owner's Manual.
■ Remote control a c MAIN ZONE2 e CODE SET TRANSMIT b d POWER SOURCE POWER SLEEP f HDMI 1 2 3 4 3 4 g AV 1 h 2 AUDIO 5 6 1 2 V-AUX [ A ] [ B ] DOCK TUNER SIRIUS XM MULTI PRESET TUN./CH i CATEGORY FM AM j INFO MEMORY MOVIE MUSIC ENHANCER SUR.