
Service manual


ICP1
5
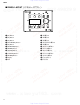
■ DISASSEMBLY PROCEDURE(分解手順)
Dust proof case
(防塵ケース)
Contact
(接触子)
LCD
(液晶ディスプレイ)
Encoder knob
(エンコーダツマミ)
[40]
[90]
[40]
[120]
[140]
[140]
PN
LCD1
DM
LCD2
Install these 2 screws first when
installing the dust proof case.
(防塵ケースを取り付ける際は、
この 2 本のネジを先に止めます。)
Contact
(接触子)
1
Direct the side with overlapping claws
to the RJ45 connector port.
(爪の重なっている方をRJ45コネクタ
挿入口にむけます。)
Match to the center of RJ45
connector for horizontal alignment.
(横方向はRJ45コネクタの中心に
合わせます。)
● Detailed figure showing the contact attaching position
(接触子貼付位置詳細)
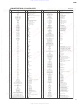
注意事項
1. フィラメントテープは、取り外す前と同じように取り
付けてください。
2. フラットケーブルの表・裏を逆に差し込まないように
注意して取り付けてください。(写真1)
Caution:
1. Be sure to attach the removed filament tape just
as it was before removal.
2. Pay attention not to insert and install the cable to
the connector inversely. (Photo 1)
Front Side (Printed Side)
表面(印刷面)
Back Side
裏面
Photo 1 (写真1)
Fig. 1 (図1)
[40]: Spacer (六角スペーサ)
M3.0 (V7332700)
[90]: Bind Head Tapping Screw-B (+バインドBタイト)
2.6X8 MFZN2BL (VB096700)
[120]: Flat Head Tapping Screw-S (Sタイト平頭)
3.0X6 MFZN2BL (WD010800)
[140]: Flat Head Tapping Screw-S (Sタイト平頭)
3.0X6 MFZN2BL (WD010800)
1. Dust Proof Case
(Time required: About 1 minute)
1-1 Remove the four (4) screws marked [140]. The dust
proof case can then be removed. (Fig. 1)
1. 防塵ケース(所要時間:約1分)
1-1 [140]のネジ4本を外し、防塵ケースを外します。
(図1)
http://www.xiaoyu163.com
http://www.xiaoyu163.com