UABGLVH OWNER’S MANUAL Before using this unit, be sure to read the “Safety Brochure” and “Quick Manual.
IMPORTANT SAFETY INSTRUCTIONS 12 Use only with the cart, stand, tripod, bracket, or table specified by the manufacturer, or sold with the apparatus. When a cart is used, use caution when moving the cart/apparatus combination to avoid injury from tip-over. 13 Unplug this apparatus during lightning storms or when unused for long periods of time. 14 Refer all servicing to qualified service personnel.
FCC INFORMATION (for US customers) IMPORTANT Please record the serial number of this unit in the space below. MODEL: Serial No.: The serial number is located on the rear of the unit. Retain the Owner’s Manual in a safe place for future reference. 1 IMPORTANT NOTICE: DO NOT MODIFY THIS UNIT! This product, when installed as indicated in the instructions contained in this manual, meets FCC requirements.
CAUTION: READ THIS BEFORE OPERATING YOUR UNIT. 1 2 3 4 5 6 7 8 9 10 11 12 13 14 15 16 17 18 19 20 To assure the finest performance, please read this manual carefully. Keep it in a safe place for future reference. Install this sound system in a well ventilated, cool, dry, clean place - away from direct sunlight, heat sources, vibration, dust, moisture, and/or cold. For proper ventilation, allow the following minimum clearances. Top: 5 cm (2 in.), Rear: 5 cm (2 in.), Sides: 5 cm (2 in.
Information for Users on Collection and Disposal of Old Equipment: The user shall not reverse engineer, decompile, alter, translate or disassemble the software used in this unit, whether in part or in whole. For corporate users, employees of the corporation itself as well as its business partners shall observe the contractual bans stipulated within this clause. If the stipulations of this clause and this contract cannot be observed, the user shall immediately discontinue using the software.
Table of Contents IMPORTANT SAFETY INSTRUCTIONS......i Listening to Internet radio......17 Supports streaming services......17 Presetting network contents......18 Using the sleep timer......29 CAUTION: READ THIS BEFORE OPERATING YOUR UNIT.......iii Listening to the Music with AirPlay......19 Updating with a “MusicCast CONTROLLER”......30 Updating with the unit......30 Introduction......3 Playing back songs with iPhone......19 Playing back songs with iTunes......19 Other functions......
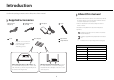
Introduction Confirm the package contents and useful points of this manual. About this manual • iOS and Android mobile devices are collectively referred as “mobile devices.” The specific type of mobile device is noted in explanations as needed. Supplied accessories FM antenna (ISX-18) DAB/FM antenna AC adaptor Stand (ISX-18D) • “iPhone” described in this manual may also refer to “iPod” or “iPad.” • Illustrations may differ from actual item depicted.
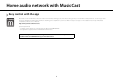
Home audio network with MusicCast Easy control with the app MusicCast is a brand new wireless musical solution from Yamaha, allowing you to share music among all of your rooms with a variety of devices. You can enjoy music from your smartphone, PC, NAS drive and music streaming service anywhere in your house with one easy-to-use app. For more details and a lineup of MusicCast compatible products, visit our website. http://www.yamaha.
Home audio network with MusicCast What you can do with this unit These unit operations are performed with the “MusicCast CONTROLLER” app. y indicates operations that can also be performed from the unit.
Part name 1 Wi-Fi indicator ( P.12) Top panel 2 Bluetooth indicator ( P.20) 3 A (Power)/CONNECT ( P.11) Turns the unit on or switches it to standby. 4 SOURCE Switches the playback source. 5 VOLUME–/+ Controls the volume. 6 PRESET ( P.18, 23 ) Recalls registered network contents or radio stations. a b c d e f g 7 ALARM ( P.27) Turns on/off the alarm function and stops the alarm. 1 Screw hole for installing the stand ( P.8) Rear panel a 2 Hole for wall-hanging installation ( P.
Part name 1 Source indicator Front panel display Setting the clock of front panel display Shows selected source. NET: Network sources : Bluetooth FM: FM radio DAB: DAB radio (ISX-18D) You can set the clock time in the “MusicCast CONTROLLER” app. Tap (Settings) in the room select display. The clock can be automatically synchronized with the clock on your smartphone by using the app (auto setting). 2 Play indicator Displays the playback mode.
Preparations Installation • Spread a soft cloth or other protective mat over the table before installation. When installing on a shelf • Keep the screw out of reach of children to prevent them from accidentally swallowing a screw. Have a Phillips (+) screwdriver ready to use during assembly. Attach the stand using the specified screw. Note • Attach the stand using the specified screw supplied in the package. • Tighten the screw firmly so that the unit never gets shaky.
Preparations Connecting the FM antenna (ISX-18) or DAB/FM antenna (ISX18D) 1 1 (ISX-18) Connect the supplied antenna to the unit. (ISX-18D) (For ISX-18) Remove the protection cap of the jack. • Keep the protection cap out of reach of children so as to ensure that it is not mistakenly swallowed. 2 Install antenna with pins where the unit can obtain good reception. • The antenna should be stretched out. 2 • If radio reception is poor, change the height, direction, or placement of the antenna.
Preparations Connecting AC adaptor Do not connect the power cable of the unit until you have finished connecting all cables. • Place the cable so that a hand or foot is not caught by it.
Preparations • When you turn on the unit for the first time after purchase, the Wi-Fi indicator blinks and the unit automatically starts to search iOS device ( P.14). Turning on the power Plug the power cable into the wall outlet and press A (power)/CONNECT. • When the unit is turned on, a Source indicator ( P.7) lights up. • The unit turns on. • Press A (power)/CONNECT again to turn off (standby mode).
Preparations Connecting to the network Mobile device You can play back music files stored on your PC, mobile devices, DLNA*-compatible NAS, or audio contents on the Internet, by connecting this unit to the network. You can also operate the unit with your mobile device. This unit Wired or wireless Network cable * Digital Living Network Alliance Connecting to the network using MusicCast CONTROLLER 1 Start the app, and then tap “Setup.
Preparations Setting of the devices and playback • If you want to install a MusicCast compatible device to a location that is out of range of the wireless router, connect another MusicCast support device to the router with a network cable to extend the range (Extend mode). Create the following network (MusicCast Network) using the MusicCast CONTROLLER app.
Preparations Connecting to the network by sharing the iOS device setting When you turn on the unit for the first time after purchase or initialization of network settings ( P.12), the Wi-Fi indicator blinks and the unit automatically starts to search iOS device (such as iPhone). You can easily setup a wireless connection by applying the network settings on iOS devices. Before proceeding, confirm that your iOS device is connected to a wireless router (access point).
Playing network contents This unit allows you to play back music files such as MP3, WMA, or FLAC (lossless audio data compression format) files stored in the computer (server) connected to the network or NAS. You can also listen to world-wide radio stations via the Internet. • For details on media sharing settings, refer to Windows Media Player help. Listening to the songs in the computer Setting the media sharing of music files For Windows Media Player 11 1 Start the Windows Media Player 11 on your PC.
Playing network contents • You can store your favorite songs beforehand ( P.18). Playing back songs in the PC 1 2 In the “MusicCast CONTROLLER,” select “Server.” Play back songs by following the indication of “MusicCast CONTROLLER.
Playing network contents • You can store your favorite stations beforehand ( P.18). Listening to Internet radio • You can use the advanced feature of vTuner (such as adding a new station to the list) by accessing the following website with the web browser on your PC. http://yradio.vtuner.com/ You can listen to Internet radio stations from all over the world. Make sure that the unit is connected to the Internet properly ( P.12). 1 2 In the “MusicCast CONTROLLER,” select “Net Radio.
Playing network contents Presetting network contents Up to 40 contents can be registered. You can easily play back contents after registered. Using “MusicCast CONTROLLER” Presetting contents 1 2 Use “MusicCast CONTROLLER” to play back the content you want to register. Register the contents by following the indication of “MusicCast CONTROLLER.” Selecting preset contents 1 Select a registered content from “Favorites” of “MusicCast CONTROLLER.
Listening to the Music with AirPlay The AirPlay function allows you to play back iPhone/iTunes music on the unit wirelessly via a network. Make sure that the unit and your PC or iPhone are connected to the same router ( P.12). Playing back songs with iPhone 1 Turn on the unit and display the playback screen on the iPhone. • If the iPhone recognizes the unit, on the screen of the iPhone. 2 Tap • For an iPhone with iOS7/iOS8/iOS9 installed, is displayed within the control center.
Listening to music via Bluetooth connection You can listen to sound wirelessly from a Bluetooth compatible device. Pairing a Bluetooth device with the unit 1 2 3 1 Once pairing is completed, subsequent connection can be made with a couple of easy steps. Press SOURCE to set the source to Bluetooth. Turn on the Bluetooth function on your device. In the Bluetooth setting of the device, select the unit (network name of the unit). • After pairing is complete, the Bluetooth indicator ( P.
Listening to music via Bluetooth connection Connecting a paired Bluetooth device and playing back music If the unit is connected to another device via Bluetooth connection, terminate that connection (see “Terminating the Bluetooth connection” on the right) before connecting to the target device. 1 Perform Bluetooth connection. • If connecting from the unit, the unit searches for the Bluetooth device connected the last time. In this case, make sure that device's Bluetooth function is turned on.
Listening to music via Bluetooth connection Listening to music through wireless headphones You can listen to the audio played back by this unit through Bluetooth-compatible wireless headphones. The audio will be transmitted to the wireless headphones using “MusicCast CONTROLLER” installed on your mobile device. • Use Bluetooth devices compatible with the A2DP profile. • Audio from AirPlay or a Bluetooth device cannot be transmitted to and output by another Bluetooth device.
Listening to FM radio stations To listen to FM radio stations, connect the supplied FM antenna. See “Connecting the FM antenna (ISX-18) or DAB/FM antenna (ISX-18D)” (P.9) for connecting the antenna to the unit. Tuning in FM stations 1 2 In the “MusicCast CONTROLLER,” select “Tuner.” Select FM station by following the indication of “MusicCast CONTROLLER.” Presetting FM stations Up to 30 contents can be registered.
Listening to DAB stations (ISX-18D) DAB (Digital Audio Broadcasting) and DAB+ use digital signals for clearer sound and more stable reception compared to analog signals. DAB+ is based on the original DAB standard but uses a more efficient audio codec. DAB and DAB+ are broadcast in blocks of data called “ensembles” containing up to several radio stations that are simultaneously broadcast. DAB and DAB+ can also include an extensive amount of text information, enabling you to select a station by name.
Listening to DAB stations (ISX-18D) Presetting DAB stations Up to 30 contents can be registered. • The Tune Aid function can also be used to check the signal quality. Using “MusicCast CONTROLLER” Presetting stations 1 2 Tune into a station you want to register. Register the station by following the indication of “MusicCast CONTROLLER.” Selecting preset stations 1 Select a registered radio station from “Favorites” of “MusicCast CONTROLLER.
Using the alarm function The unit includes an alarm function (IntelliAlarm) that plays back music sources or beeps (built-in alarm) at the set time in a variety of different methods. Before using the alarm function, set the time in the clock ( P.7). The alarm function has following features. 3 types of alarms Source Use “MusicCast CONTROLLER” to make setting. Select from 3 alarm types, combining music and beep sounds. Follow the indication of “MusicCast CONTROLLER” to make setting.
Using the alarm function Setting the alarm time 1 2 Tap (Settings) in the room select display of “MusicCast CONTROLLER.” • The indicator and alarm time setting flashes on the front panel display when the alarm time setting is being changed. When finished, it remains illuminated. Follow the instructions in “MusicCast CONTROLLER” to specify settings for the following. • Alarm time • Repeat function enabled/disabled • Beep on/off • Alarm volume 3 Select the playback source.
Using the alarm function Stopping the alarm for a short time (snooze) Press SOURCE or PRESET during the alarm playback. • When source and beep is set, press SOURCE or PRESET once to stop the beep sound, and twice to stop the audio source. 4 minutes after the audio source is stopped, it will start fading in again and after another minute the beep sound will resume. • Stop the alarm and resume again in 5 minutes.
Using the sleep timer You can set the time to elapse which the unit automatically enters to standby mode. 1 2 Tap in the playback display of “MusicCast CONTROLLER.” Follow the instructions in “MusicCast CONTROLLER” to set the time. • Time can be selected from 120/90/60/30 min., or Off. • lights up after the time is selected, and the sleep timer is set. • To cancel the sleep timer, set it to “Off” in “MusicCast CONTROLLER.
Updating the firmware When new firmware is detected from the network, “UP” will be shown on the front panel display (press any button to turn off the “UP” indication on the front panel display). There are two ways to updating the firmware. Updating with a “MusicCast CONTROLLER” You can use “MusicCast CONTROLLER” to update the firmware. Follow the indication of “MusicCast CONTROLLER” to update the firmware. Updating with the unit 1 2 3 Press A (power)/CONNECT to turn the unit off.
Other functions • Set the network standby setting ( P.11) to “ON.” Disabling the Wi-Fi function 1 2 Press A (power)/CONNECT to turn the unit to standby. Press and hold SOURCE and PRESET at 5 seconds. • The NET and 3 • The wireless function is enabled, when you connect to the network or the network setting is initialized. (Bluetooth) indicators flash alternately on the front panel display. Within 10 seconds, hold down VOLUME – for 2 seconds.
Other functions Initializing network settings 1 2 3 Press A (power)/CONNECT to turn the unit to standby. Pull out the plug from the outlet. While pressing A (power)/CONNECT, plug the power cable into an outlet. • After the Source indicator (NET and ) flashes for several seconds, the screen changes to the clock display. Setting the auto standby function If about 20 minutes have elapsed with no playback and no operation while the unit is on, it will automatically enter standby.
Troubleshooting Refer to the table below when the unit does not function properly. If your problem is not listed below or if the instruction below does not help, turn off the unit, disconnect the power cable, and contact the nearest authorized Yamaha dealer or service center. First, check that the connectors of each cable are securely inserted in to jacks on each device. General Problem The unit enters the standby mode soon after the power is turned on. The unit does not operate properly.
Troubleshooting Problem Cause Solution The front display becomes dim. The front display setting is set to Auto. Set the brightness of the front panel display to a setting other than Auto. Or, do not cover the illumination sensor. The clock setting has been cleared. The power cable of the unit was unplugged from the outlet. Or an outage occurred. Connect the power cable, and set the clock again ( P.7). There is noise interference from digital or high-frequency equipment.
Troubleshooting Problem Cause Solution The selected Internet radio station is currently not available. There may be a network problem at the radio station, or the service may have been stopped. Try the station later or select another station. The selected Internet radio station is currently broadcasting silence. Some Internet radio stations broadcast silence at certain of times of the day. In this case, no sound is output even if the radio waves are received.
Troubleshooting Bluetooth Problem Cause Solution The unit is turned off. Turn the unit on and perform the paring ( P.20). Another Bluetooth device is connected. Terminate current Bluetooth connection, and perform pairing with the new device. This unit and the device are too far apart. Cannot make the unit pair with a Bluetooth There is a device (microwave oven, wireless network, etc.) that outputs device. signals in the 2.4 GHz frequency band nearby. Cannot make a Bluetooth connection.
Troubleshooting Problem No sound is produced, or the sound is interrupted during playback. Cause Solution The volume of the connecting device is set too low. Turn up the volume of the connecting device. The connecting device is not set to send Bluetooth audio signals to the unit. Switch the output of Bluetooth audio signals of the connecting device to the unit. The Bluetooth connection of the unit with the device has terminated. Perform Bluetooth connection operations again ( P.21).
Troubleshooting DAB reception (ISX-18D) Problem Cannot tune into any DAB stations. Cause Solution The initial scan operations were not performed. Perform the initial scan operations ( P.24 ). There is no DAB coverage in your area. Check with your dealer or WorldDMB Online at “http://www.worlddab.org” for a listing of the DAB coverage in your area. The DAB signals are too weak. Change the height, direction, or placement of the antenna. The DAB signals are too weak.
Supported devices/media and file formats Supported devices/ medias PCs PC with Windows Media Player 11 or Windows Media Player 12 installed. NAS NAS compatible with DLNA version 1.5. AirPlay Supports iOS 7 or later for setup using Wireless Accessory Configuration. AirPlay works with iPhone, iPad, and iPod touch with iOS 4.3.3 or later, Mac with OS X Mountain Lion or later, and PC with iTunes 10.2.2 or later. (as of July 2016) File format File format the unit supporting is as follows.
Specifications FM Tuner FM tuning range Bluetooth (U.S.A. model) 87.5 to 107.9 MHz (Other models) 87.5 to 108.0 MHz DAB Tuner (ISX-18D) Bluetooth version Ver. 2.1+EDR Supported profile A2DP, AVRCP Radio Frequency (Operational Frequency) 2402 MHz to 2480 MHz Receive frequency band 174 to 240 MHz (Band III) Maximum Output Power (EIRP) 4.0 dBm (2.
Dimensions Bluetooth • Bluetooth is a technology for wireless communication between devices within an area of about 10 meters (33 ft) employing the 2.4 GHz frequency band, a band which can be used without a license. Handling Bluetooth communications 194 mm (7-5/8") (reference) 195 mm (7-5/8") 60 mm (2-3/8") 195 mm (7-5/8") • The 2.4 GHz band used by Bluetooth compatible devices is a radio band shared by many types of equipment.
Trademarks Android™ Google Play ™ Android and Google Play are trademarks of Google, Inc. AirPlay, iPad, iPhone, iPod, and iPod touch are trademarks of Apple Inc., registered in the U.S. and other countries. iPad Air and iPad mini are trademarks of Apple Inc. App Store is a service mark of Apple Inc. The Bluetooth® word mark and logos are registered trademarks owned by Bluetooth SIG, Inc. and any use of such marks by Yamaha Corporation is under license.
AVEEA71102A Important Notice: Guarantee Information for customers in EEA* and Switzerland English For detailed guarantee information about this Yamaha product, and Pan-EEA* and Switzerland warranty service, please either visit the website address below (Printable file is available at our website) or contact the Yamaha representative office for your country.