
User Manual
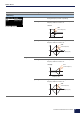
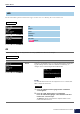
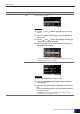
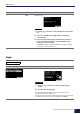
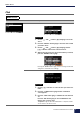
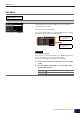


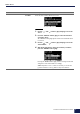
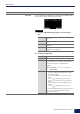
Table Of Contents
- Cover
- Contents
- Differences Between the DTX-PRO and the DTX-PROX
- Links from the Owner’s Manuals
- How the Triggers Generate Sounds
- The Relationship Between Trigger Input Jacks, Trigger Inputs, and Trigger Input Sources
- Trigger Input Jack Input Mode
- Sounds that are played by trigger (Inst and Voice)
- Voices and Layers
- User Voices
- Importing to User Voices
- Changing the way a user voice is played (one-shot or Loop)
- Editing and auditioning user voices
- Selecting the Trigger Input or Trigger Input Source
- Effect Processor Design
- PRO Series Modules Internal Memory
- MENU Button
- KIT Mode
- CLICK Mode
- RECORDER Mode
- Practicing with the Training Feature
- Fader Select FX
- Fader Select CUSTM
- LIVE SET Mode
- Settings for live performances
- Connecting a Computer
- Troubleshooting
- Reference

MENU Button
70
DTX-PRO DTX-PROX Reference Manual
Import All Imports all audio files saved in the root directory of the USB flash drive
into the wave memory of the PRO series module.
1. Press the “IMP TYPE” button ([F1]) to select the import
type.
2. Preset before importing.
Screen Parameter Description
Procedure
TO EMPTY Imports each audio file to the lowest numbered available
user voice.
TO 1VCE Imports a maximum of 10 audio files to the selected user
voice.
BY NAME Imports audio files using the file name for specifying the
destination.
SEL FILE Imports a selected file by specifying the destination.
Multiple files can be imported.
TO EMPTY
TO 1VCE Use the [–][+] controllers to select a user voice to import.
BY NAME Prepare a file with the user voice number (001–100) and
wave bank number (01–10) added to the beginning of
the file name and save it on a USB flash drive.
Example:
Importing “DTX.wav” to user voice 5 at wave bank 3
00503DTX.wav
SEL FILE 1. Use the [–][+] controllers to select a file to import.
2. Press the “CHECK” button ([F2]) to place a check
mark next to “Import.”
3. Use the [–][+] controllers to select a user voice to
import.
4. Use the “ ” button ([F2]) to move the cursor.
5. Use the [–][+] controllers to select a wave bank to
import.
Sounds will play when a wave bank with waves is
selected.
6. Use the “ ” button ([F2]) to move the cursor.
If a check mark is placed next to the file selected in step
1, you can press the “UNCHECK” button ([F2]) to
remove the check mark.