
User Manual
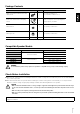
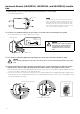
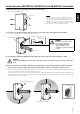
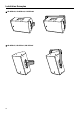

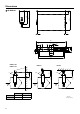
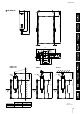
Table Of Contents
- Cover
- Introduction
- Contents
- PRECAUTIONS
- Package Contents
- Compatible Speaker Models
- Check Before Installation
- Horizontal Bracket (UB-DZR15H, UB-DZR12H, and UB-DZR10H) Installation
- Vertical Bracket (UB-DZR15V, UB-DZR12V, and UB-DZR10V) Installation
- Installation Examples (English only)
- Optional Brackets (sold separately) (English only)
- Dimensions (English only)

3
Packag e Contents
* Used together with the optional brackets sold separately shown on page 39.
Compatible Speaker Models
Check Before Installation
Fittings, bolts, and other items for installing the bracket to a wall or ceiling are not included. If you are not sure what fittings to
use, consult a specialist.
First attach this bracket to the speaker before installing it to a wall or ceiling. We recommend that you securely install the
bracket to a wall or ceiling using the proper fittings and bolts after attaching bracket to the speaker.
Accessories Qty. Comments
M8×30 hexagon bolts with flat washer and
spring washer
6
• For cabinet installation ×4
• For separately sold brackets* ×2
Knob screws with flat washer and spring
washer
2
Can be used in place of the angle-fixing bolts
during temporary installation.
M8 flat washers 2 For separately sold brackets*
M8 hexagon nuts 2 For separately sold brackets*
Owner’s Manual (this book) 1 —
Model Use Compatible speakers
UB-DZR15H
Horizontal installation
CZR15, DZR15, DZR15-D
UB-DZR12H CZR12, DZR12, DZR12-D
UB-DZR10H CZR10, DZR10, DZR10-D
UB-DZR15V
Vertical installation
CZR15, DZR15, DZR15-D
UB-DZR12V CZR12, DZR12, DZR12-D
UB-DZR10V CZR10, DZR10, DZR10-D
WARNING
Do not attach this product to any speaker not specified as compatible. Doing so may result in damage or injury.
CAUTION
• Make sure that the installation surface is strong enough to support the total weight of the speaker and the U-bracket. If you
are not sure about the installation surface, consult a specialist. Avoid attaching the U-bracket to drywall such as acoustic
tiles.
• Make sure that you do not pinch your fingers between the U-bracket and speaker.
• Make sure to take precautionary measures using wires to prevent the speaker from falling down in the event of an installa-
tion failure.
Yamaha cannot be held responsible for damage or injury caused by insufficient strength of the support structure or
improper installation.