
User Manual


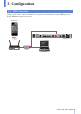

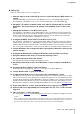


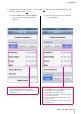

Table Of Contents

Wireless DCP Owner’s Manual
6
3. Configuration
Setting Up
Below are instructions for the basic configuration.
1. Check IP address mode of the MTX processor to which the Wireless DCP will be con-
nected.
Check that DIP SW6 on the rear panel of the MTX processor is set to UNIT ID (upper position).
The IP address of the MTX processor is now set as the UNIT ID (i.e., 192.168.0.[UNIT ID]).
2. Set the PC’s IP address to DHCP (obtain an IP address automatically) for use with
MTX Editor. The PC will obtain its IP address from the DHCP server on the access
point.
3. Change the IP address of the Wi-Fi access point.
The IP address of the MTX processor and the Wi-Fi access point should be the same subnet. Use
192.168.0.254 for the access point Wi-Fi IP address, ensuring this does not conflict with any other
devices on the network, such as a gateway address. Refer to the user manual of your particular
access point to set the IP address of the Wi-Fi access point.
4. Configure the DHCP server function in the Wi-Fi access point.
The IP address of the Wi-Fi access point and the DHCP address range must not have the same IP
address as any other device (i.e., MTX/XMV) in the network. We recommend a setting the DHCP
address within the range of 192.168.0.150 to 192.168.0.200. Refer to the user manual of your partic-
ular access point. It is important to ensure that no IP addresses are duplicated by multiple devices.
5. Launch MTX Editor and configure the Device Configuration Wizard according to the
devices present.
6. Configure the Wireless DCP settings in MTX Editor and store them as a library.
7. Assign the Wireless DCP library to all presets requiring control.
8. Go online and synchronize to the devices.
This will send all configured settings to the MTX processors.
9. Recall the preset made in step 7 from MTX Editor or the front panel of the MTX pro-
cessor.
10. Configure the Wi-Fi settings of the smart device.
Refer to the Wi-Fi configuration in “iOS Device” in section 3.2 about the iOS device.
11. Launch Wireless DCP on your smart device.
12. Confirm that the MTX processor is present in the “Select Device” screen.
If no MTX processor is present, turn off Wi-Fi in the smart device settings, then turn it back on again.
If the “Not connected” screen is displayed, check again that all presets to be controlled have the wire-
less DCP library assigned to them in MTX Editor; otherwise no MTX processor will be recognized by
the Wireless DCP. If the MTX processor is not automatically present in the “Select Device” screen
after the above settings are made, manually add the MTX processor’s IP address (3.3.5 Manual IP).
13. At the “Select Device” screen, select the MTX processor that you configured.
14. Unless a PIN (a four-digit number) has already been set, tap “Join” on the onscreen
keyboard.
15. The “Controller 1” screen will appear.
The Change PINs (page 33), and Staff Settings (page 34) can be configured according to the project.
NOTE
When changing previously configured Wireless DCP library settings, such as assigning parameters to switches and
knobs, the latest settings will not be reflected automatically on the smart device after going online to other devices.
The first time after going online, always recall the preset from the front panel or within MTX Editor.