
User Manual


Chord Tracker Manual
5
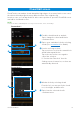
Activity List screen
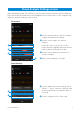
Transport area in detail
! @ # $ % ^
)
) Playback time and position
Here you can move the cursor and fast
forward or rewind playback.
! Rewind button
Tap once to move back by one measure.
& Tap to send a recording by e-mail (This button is
displayed only for recordings that you have made).
NOTE
Unauthorized copying of copyrighted music and sound data for
purposes other than the purchaser’s personal use is prohibited.
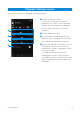
* Tap to send the chord sequence to the currently
connected musical instrument as a Song file. The
*
(
A
&
@ Play/Pause button
Tap to start playback. During playback, tap once again to pause.
# Fast Forward button
Tap once to move forward by one measure.
$ Record button
Tap to activate Record Standby mode, and then press the Play button to start recording.
Tap the Pause button to stop recording.
When Record Standby mode is activated, you can deactivate it by tapping the Record
button once again.
NOTE
• Recording is available only when connected via wireless LAN or a USB cable to a supported
instrument. Note that the connection via a USB cable is available only for instruments with a USB audio
interface function.
• Some instruments cannot record from the Player screen.
% AB Repeat button
Tap to set Point A to the cursor position at that time. Tap once again to set Point B to the
cursor position at that time.
The region between Point A and Point B will be repeatedly played in looped fashion.
Tap once again to stop repeating and return to normal playback.
^ Tap to toggle on and off the display of song information.
recommended style for the song can also be included in this file.
NOTE
• It may not be possible to send a chord progression if the file name is not in English.
• Depending on the instrument, this function may not be available.
( Tap to add the currently selected song to your Favorites.
A Tap to display the Chord Analysis Settings screen (See page7).