
User Manual


Network-MIDI Driver Installation Guide 4
1 Start the computer and log in to the Administrator account.
Exit any open applications and close all open windows.
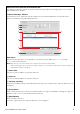
2 After the downloaded compressed file is properly extracted, double-click the file “Yamaha
Network-MIDI Driver V***.pkg.”
*** represents the version number.
The “Welcome to the Yamaha Network-MIDI Driver Installer” window appears.
3 Click [Continue].
The “Installation Type” window appears.
4 Click [Install].
The “Authenticate” window appears.
5 Enter the Administrator name and the password, then click [Install Software] or [OK].
The “Installation” window appears indicating the installation progress. When the installation is complete, the
“Summary” window appears.
6 Click [Close].
The Network-MIDI Driver has been installed.
Follow the steps below to uninstall the Yamaha Network-MIDI Driver.
1 Start the computer and log in to the Administrator account.
Exit any open applications and close all open windows.
2 After the downloaded compressed file is properly extracted, double-click on “Uninstall
Yamaha Network-MIDI Driver.”
3 Click [Run] when the “Welcome to the Yamaha Network-MIDI Driver uninstaller” window
appears.
After that, follow the on-screen instructions to uninstall the software.
4 After completing the uninstallation, an “Uninstallation completed” window appears. Click
[Close].
Installation
Uninstallation