Live Recording with M7CL or PM5D Via Dante Using Steinberg Cubase 5 / 4 or Nuendo 4
Yamaha Commercial Audio Live Recording with M7CL or PM5D via Dante Summary: This guide will show how quick and easy it is to achieve a high quality, live multi-track recording using a Yamaha digital mixer, and a Personal Computer. With the right selection of interface cards and software, an elegant solution can be built using just one cable between mixing system and PC.
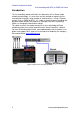
Yamaha Commercial Audio Live Recording with M7CL or PM5D via Dante Introduction The live recording solution outlined in this document utilises Dante media networking technology. It is one of the easiest methods of capturing a live recording consisting of a large number of audio channels. Using a Yamaha console such as PM5D or M7CL, it is simple to switch between recording and playback modes without the need for re-starting the console, re-patching cables, or changing the word-clock settings.
Yamaha Commercial Audio Live Recording with M7CL or PM5D via Dante Equipment List 1. Yamaha digital mixing console such as M7CL or PM5D/PM5D-RH. 2. Up to 4x Dante-MY16-AUD interface cards (maximum of 3 inside M7CL). 3. One computer. Either: a. PC running Windows XP (SP3 or later) or Vista (SP1 or later, 32-bit versions only), Intel or AMD Processor (Dual Core or better) 2GHz minimum, at least 1GB RAM, DVD drive, USB port, 1GB Ethernet port. b. Mac running OSX version 10.
Yamaha Commercial Audio Live Recording with M7CL or PM5D via Dante Hardware Setup The mixing console (PM5D or M7CL for example) will need to have the correct MY-cards installed (up to 4x Dante-MY16-AUD). Each card’s Primary port should be connected to a 1GB port on the Ethernet switch. The DanteMY16-AUD card will be identified as an MY16-AT in some mixers when running at 48kHz, and as an MY8-AE96 when running at 96kHz. M7CL with 3x Dante-MY16-AUD PM5D with 4x Dante-MY16-AUD. 5 www.yamahaproaudio.
Yamaha Commercial Audio Live Recording with M7CL or PM5D via Dante Word Clock In a Dante network, the Master device will provide an accurate word clock to the rest of the network. If the Master loses connection or fails, another device will automatically take over. So it is recommended to set the mixer to receive word clock from one of the Slots. Note that Dante-MY16-AUD only supports sample rates of 48kHz and 96kHz.
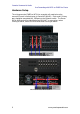
Yamaha Commercial Audio Live Recording with M7CL or PM5D via Dante Mixer Patching & Direct Outputs 1. Switch the Direct Output function on for each channel to be recorded, and select the Direct Out point. Pre HPF or Pre ATT is the most likely choice, though Post Fader is also possible with PM5D and M7CL-V2 and V3. M7CL Direct Out menu PM5D Direct Out Point page, Input Patch menu. 7 www.yamahaproaudio.
Yamaha Commercial Audio Live Recording with M7CL or PM5D via Dante 2. Patch the Direct Out for each channel to the required Slot Output. It will be most convenient to use Slot 1 for channels 1-16, Slot 2 for channels 17-32 and so on. M7CL Direct Out Menu (8 channel view) PM5D Direct Out Patch page, Input Patch menu. To save setup time, an example file for PM5D and M7CL containing all the Direct Out and Patch settings can be downloaded from http://www.yamahaproaudio.com/training/self_training/index.
Yamaha Commercial Audio Live Recording with M7CL or PM5D via Dante Dante Virtual Soundcard setup During the creation of this document, the current version of Dante Virtual Soundcard was V3.0.1. Please use this or a more recent version if available. Ensure that both Dante Virtual Soundcard and Dante Controller are installed on the computer to be used for audio recording. Refer to www.audinate.com for the latest software, user guides and support FAQs.
Yamaha Commercial Audio Live Recording with M7CL or PM5D via Dante Enable Dante Virtual Soundcard by clicking on the big button! Dante Controller setup During the creation of this document, the current software version of Dante Controller was V3.0.1. Please use this or a more recent version if available. Refer to www.audinate.com for the latest software, user guides and support FAQs. If you haven’t already done so, connect the computer’s Network port to the 1GB Ethernet switch.
Yamaha Commercial Audio Live Recording with M7CL or PM5D via Dante Dante Controller: Network View [Routing]. The default device names contain a brief description of the device type, followed by the last few digits of its MAC address. Double-click on a device name to open the “Device View” window. (or select “Device View” from the “Device” menu. Dante Controller: Device View Click on the “Eye” icon to identify the device. This will cause all the LEDs on the MY16-card to flash for a while.
Yamaha Commercial Audio Live Recording with M7CL or PM5D via Dante Dante Controller: Config: Rename Device. If the Sample Rate of the card needs to be changed (from 48k to 96k for example), the host console will need to be rebooted for the change to take effect. The “Reboot” option on the “Config” tab will not be sufficient in this case. Network Routing Once all the devices have been named, the audio routing can be set.
Yamaha Commercial Audio Live Recording with M7CL or PM5D via Dante Another way to make the routing is from the “Routing” tab of Dante Controller. Press the [+] buttons to expand the view. Check that the computer is receiving the correct channels from the MY16-cards. By clicking on the cross-point box while holding [Ctrl], all available channels are routed between the selected devices. All the device’s routing is removed by clicking on the box while holding both [Ctrl] and [shift].
Yamaha Commercial Audio Live Recording with M7CL or PM5D via Dante Dante Controller: Receive tab for Slot1. Again, the routing can be checked and modified in the “Routing” tab. Dante Controller: Routing from Computer to Mixer Slots. Now the audio signal flow of the Dante network is represented in the figure below. 14 www.yamahaproaudio.
Yamaha Commercial Audio Live Recording with M7CL or PM5D via Dante Dante signal flow for recording and playback. 15 www.yamahaproaudio.
Yamaha Commercial Audio Live Recording with M7CL or PM5D via Dante Nuendo 4 / Cubase 4 / Cubase 5 Setup Device Setup The setup procedures for Nuendo 4 and Cubase 4 / 5 are virtually identical. The pictures in this section are from Nuendo 4. After starting Nuendo 4 (or Cubase 4 / 5), open the “Devices” menu, and select “Device Setup…” Click on “VST Audio System” in the left column, and select the correct ASIO Driver for the sound-card on the right side of the window.
Yamaha Commercial Audio Live Recording with M7CL or PM5D via Dante Templates A Nuendo or Cubase template is a file which contains all relevant set up data for a project. When opened, it allows the user to instantly start working on a suitable project without having to configure a long list of settings from different menus and windows. A number of templates have been created to accompany this document, for live recording using Nuendo 4 or Cubase 4 / 5 and the Dante Virtual Soundcard.
Yamaha Commercial Audio Live Recording with M7CL or PM5D via Dante Open a New Project in Nuendo 4 With Cubase 5, the “Project Assistant” window will open after selecting “New Project” from the File menu. There are various categories of template. The templates placed in the folder described above will appear in the “More” category. Open a New Project in Cubase 5 18 www.yamahaproaudio.
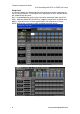
Yamaha Commercial Audio Live Recording with M7CL or PM5D via Dante Start Recording This procedure is the same for Nuendo 4 and Cubase 4 / 5. The pictures below show Nuendo 4, but the operation of Cubase 4 / 5 is almost identical. To prepare for recording, switch on the “Monitor” function for the main folder. This will turn the speaker icons orange for all the tracks. Then click on the “Record Enable” button for the folder, so all the “Record Enable” buttons turn red.
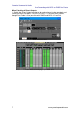
Yamaha Commercial Audio Live Recording with M7CL or PM5D via Dante Playback Move the play-marker to the required position by clicking in the “time-line”. Then click the “Play” transport button (or press the [Space] bar). Playback through PM5D-V2 The mixer’s input channel patch will need to be changed from the internal AD converters to the digital Slot inputs.
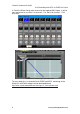
Yamaha Commercial Audio Live Recording with M7CL or PM5D via Dante The [PRESET] button will recall the default settings, which will be perfect for most cases. The left-side of the grid shows that all 48 AD Inputs will be swapped with the inputs from Slots 1-3. Of course, these assignments can be edited if necessary, allowing for a different patch configuration, or allowing some recording inputs to be mixed with some microphone inputs.
Yamaha Commercial Audio Live Recording with M7CL or PM5D via Dante Then set the Scene Focus to recall “Input Patch” only. Next reset the input channel patching to the slots. And store this as a “Playback” scene, again with only “IN PATCH” as the Scene Focus. Now “Playback” and “Live Recording” patches can be swapped without affecting any other mixing parameters. It’s a good idea to use the Focus function to take out “Input Patch” from all the other scenes.
Yamaha Commercial Audio Live Recording with M7CL or PM5D via Dante M7CL Scene List A setup file for M7CL containing the live recording and playback scenes can be downloaded from http://www.yamahaproaudio.com/training/self_training/index.html . Once your own setup is complete, don’t forget to save it onto a USB memory or onto a PC using Yamaha’s Studio Manager software. Then it can quickly be reloaded to start a new project in the future. 23 www.yamahaproaudio.
Yamaha Commercial Audio Live Recording with M7CL or PM5D via Dante Appendix Create a new Nuendo / Cubase Template If you are using a different sound-card, or want to configure the project differently, it is possible to make a new Template. This procedure is the same for Cubase 4 and Nuendo 4. (The pictures in this section are from Cubase 4). Open the File menu and select “New Project”. If the Templates window opens, select “Empty” and click [OK]. Browse for a folder to save the audio and data files.
Yamaha Commercial Audio Live Recording with M7CL or PM5D via Dante Do the same for the “Outputs”: The VST Connections window can now be closed. Open the “Project” menu and select “Project Setup…” Select the length of the project (for example, 2 hours and 30 minutes).
Yamaha Commercial Audio Live Recording with M7CL or PM5D via Dante Back in the “Project” menu, select “Add Track” and then “Folder”. And now in the “Project” menu, select “Add Track” followed by “Audio”. Choose 64 Mono tracks (or as many as are needed), and click [OK]. Now all the audio tracks need to be moved into the folder so that they can all be controlled together: click on the first track (called “Audio 01” by default), then scroll down to the bottom, hold [Shift] and click on the last track.
Yamaha Commercial Audio Live Recording with M7CL or PM5D via Dante Next each track needs to be assigned an input and an output from the bus list created in the “VST Connections” window. Obviously it makes sense to assign “Mono In 1” and “Mono Out 1” to track 1, “Mono In 2” and “Mono Out 2” to track 2 and so on… These assignments can be made in the left column of the project window when the “Show Inspector” button is enabled.