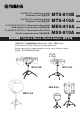
マルチタムスタンド /Multitom Stand/ Stand Multi-Tom/ 组鼓支架 マルチタムスタンド /Multitom Stand/ Stand Multi-Tom/ 组鼓支架 マーチングバスドラムスタンド /Marching Bass Drum Stand/ Stand de grosse caisse de marche/ 行进大鼓支架 マーチングスネアドラムスタンド /Marching Snare Drum Stand/ Stand de tambour de marche/ 行进小鼓支架 MTS-810B MTS-410A MBS-810A MSS-810A 取扱説明書 / Owner’s Manual / Mode d’emploi / 使用手册 ご使用の前にこの取扱説明書をお読みいただき、末永くご愛用ください。 Please read this Owner’s Manual throughly before use. Prenez soin de lire ce mode d’emploi en entier avant d’utiliser le stand.
安全上のご注意 ご使用の前に、必ずこの「 安全上のご注意」をよくお読みください。 ここに示した注意事項は、製品を安全に正しくご使用いただき、 お客様やほかの方々への危害や財産への損害を未然に防止するためのものです。必ずお守りください。 お子様がご使用になる場合は、保護者の方が以下の内容をお子様にご徹底くださいますようお願いいたします。 お読みになったあとは、使用される方がいつでも見られる所に必ず保管してください。 ■ 記号表示について ■「 警告」と「 注意」について この製品や取扱説明書に表示されている記号には、下表 のような意味があります。 以下、誤った取り扱いをすると生じることが想定される 内容を、危害や損害の大きさと切迫の程度を明示するた めに、「 警告」と「 注意」に区分して掲載しています。 「 ご注意ください」という注意喚起を示し ます。 ~しないでくださいという「 禁止」を示し ます。 「 必ず実行」してくださいという強制を示し ます。 警告 この表示の欄は、「 死亡する可能性 または重傷を負う可能性が想定され る」内容です。 注意 この表示の欄は、「 傷害を負う可能 性または
CAUTION • Before using the stand, please thoroughly read the following instructions and the Owner’s Manual. • Always place the stand on a flat, stable surface. Placing the stand on uneven surfaces such as uneven flooring or stairs may cause the stand to become unstable or overturn. • [MTS-410A] When attaching/removing the instrument, do not push/ pull on the tom holder frame alone (this is dangerous!). Please hold the tom itself to keep the weight balance of the whole instrument.
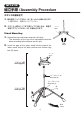
MTS-810B 組立手順 /Assembly Procedure スタンドの組み立て 1. 脚を開き、ウイングボルト(A)をしっかりと締め付けます。 ※ 脚の向きは、右図のようにしてください。 2. スタンド上部のパイプを下部パイプに差し込み、希望す る高さでウイングボルト(B)を締め付けます。 アーム Arms Stand Mounting 1. Spread the legs and fasten wing bolt (A) tightly. * The directions of the legs to be spreaded should be done according to the diagram on the right. 2. Insert the pipe of the upper stand into the pipe of the lower stand. Adjust the ideal position and fasten wing bolt (B) tightly.
マルチタムの取り付け 1. マルチタムキャリアのピボットの間隔に合わせて、スタンド のアームを開きます。 (右図参照) 2. スタンドのアームにキャリアのピボットを合わせて、しっか りと奥まで差し込みます。 (下図参照) 3. スタンド上部を上下してタムの打面高さを調節したら、ウイ ングボルト (B) をしっかり締め、さらに位置決めストッパー のネジをドラムキーを使ってしっかり締めます。 (下図参照) アーム Arms Multi Tom Mounting 1. Adjust the arms of the stand to match the space between the two pivots of the multi tom carrier. (diag. on the right) 2. Adjust the arms to the pivot positions and insert them firmly and completely. (see diag. below) 3.
MTS-810B Montage/ 组装步骤 Montage du stand 1. Déployez les pieds et serrez fermement la vis papillon (A). * Les pieds doivent être déployés selon le schéma de droite. 2. Introduisez le tube de la partie supérieure du stand dans celui de la partie inférieure. Trouvez la position idéale et serrez fermement la vis papillon (B). Bras 支臂 安装支架 1. 展开支腿并旋紧蝶型螺栓 (A)。 * 支腿的展开方向应如右图所示。 2.
Montage du support multi-tom 1. Réglez les bras du stand de façon à ce que leur écartement corresponde à celui des deux pivots du support multi-tom. (schéma à droite) 2. Faites correspondre les bras avec les pivots et introduisez-les dedans jusqu’en butée. (voir schéma ci-dessous) 3. Réglez la hauteur du support multi-tom en montant ou en descendant la partie supérieure du stand et en resserrant la vis papillon (B), puis serrez la vis du collier de positionnement avec la clef d’accord.
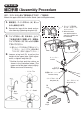
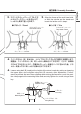
MTS-410A 組立手順 /Assembly Procedure まず、スタンドの上部と下部を組み立てます。(下図参照) Mount the upper stand on the lower stand. (refer to diagram below) 1. 脚を開き、ウイングボルト(A)をしっ かりと締め付けます。 1. Spread the legs of the stand and secure them by tightening wing bolt (A). 2. ウイングボルト(B)をゆるめ、上パイ プを適当な高さに調整します。調整後、 ウイングボルト(B)はしっかりと締め ておいてください。 ※ スタンドに取付時、 ホルダーを外しても かまいません。 ※ When the toms are attached to the stand, the holder can be removed. ※ 脚と上パイプの向きは下図のようにし てください。 (上パイプは上端が曲げ てあります。向きに注意してください。) 2.
3. 3. スタンドのキャッチャーにマルチタ ムホルダーのフレームを合わせて、 しっかりと奥まで差し込みます。 Align the frame of the multi tom holder with the catcher on the stand and insert the holder until it stops. ● クオード / Quad ● トリオ / Trio タムホルダーフレーム Tom Holder Flame タムホルダーフレーム Tom Holder Flame キャッチャー / Catcher キャッチャー / Catcher 4. ウイングボルト(B)をゆるめ、上パイプを上下してタムの打面高さを調整します。 調整後、ウイングボルト(B)をしっかりと締め付けておきます。さらに、演奏時 にタムが下がらないように、位置決めストッパーを締付ベースに合わせた後、ドラ ムキーを使ってネジをしっかりと締め付けておきます。 4.
MTS-410A Montage/ 组装步骤 Montez la partie supérieure du stand sur sa partie inférieure. (voir l’illustration ci-dessous) 将上支架安装到下支架上。(请参照下图) 1. Écartez les pieds du stand et fixez-les en serrant la vis papillon (A). 1. 展开支架的支腿,然后旋紧蝶型螺栓 (A) 将它们固定。 2. Desserrez la vis papillon (B) pour régler la hauteur du tube supérieur. Suite à ce réglage, resserrez la vis papillon (B). * Lorsque les toms sont fixés au stand, le harnais peut être retiré.
3. Alignez le châssis du support multi-tom avec le berceau du stand et introduisez-y le support jusqu’à ce qu’il vienne en butée. 3. 使组鼓座的框架对准支架的收纳器,插入组鼓座直至衔接处的底端。 ● Configuration Quad / 四件组 ● Configuration Trio / 三件组 Châssis du support des toms Châssis du support des toms 组鼓座框架 组鼓座框架 Berceau / 收纳器 Berceau / 收纳器 4. Desserrez la vis papillon (B) pour régler la hauteur des toms en montant ou en descendant le tube supérieur, puis resserrez ensuite la vis papillon (B).
MBS-810A ドラム取付図 /Drum Mouning Illustrations バスドラムのサイズによりスタンドのセッティングが異なりますので、図をよくご覧になり、 お手持ちのバスドラムに合った取り付け方をしてください。 The proper setting of the stand depends on the size of the bass drum. Please refer to the following illustrations when mounting your bass drum on the stand.
● MB-8300, 800, 6300, 600 シリーズ:16" 〜 28" の場合 ● For MB-8300, 800, 6300 or 600 series: 16"–28" 奏者 Player ● MB-8300, 800 シリーズ:30", 32" の場合 ● For MB-8300 or 800 series (30" and 32") 奏者 Player 13 MBS-810A ドラム取付図 /Drum Mouning Illustrations
MBS-810A Illustrations relatives au montage/ 鼓安装图 Le bon réglage du stand dépend de la taille de la grosse caisse. Référez-vous aux illustrations suivantes lorsque vous montez la grosse caisse de défilé sur son stand. 支架的正确安置取决于大鼓的尺寸。在支架上安装大鼓时,请参照以下图示。 ● Pour toutes les grosses caisses de la gamme MB-4000 ou 400 * Pour monter une grosse caisse MB-4000 ou 400, il est nécessaire de changer la position des bras.
● Pour grosses caisses des gammes MB-8300, 800, 6300 ou 600 (16 à 28 pouces) ● 对于 MB-8300, 800, 6300 或 600 系列 :16"-28" Musicien 演奏者 ● Pour grosses caisses de la gamme MB-8300 ou 800 (30 et 32 pouces) ● 对于 MB-8300 或 800 系列(30" 和 32") Musicien 演奏者 15 MBS-810A Illustrations relatives au montage/ 鼓安装图
MBS-810A 組立手順 /Assembly Procedure ※ 説明イラストは、MB-8300, 800, 6300, 600 シリーズ (16" 〜 28")を取り付ける場合です。 * The illustrations show mounting of an MB-8300, 800, 6300 or 600 series bass drum (16"–28").
1. 脚をいっぱいに開き、ウイングボルト(A)をしっかりと締め付けます。 1. Fully spread the legs of the stand and secure them by tightening wing bolt (A). 2. ウイングボルト(B)をゆるめ、上パイプを適当な高さに調整します。 調整後、ウイングボルト(B)はしっかりと締めておいてください。 ※ 脚とアームベースの向きは、ドラム取付図(左図)によりご確認ください。 2. Loosen wing bolt (B) to adjust the height of the stand. After adjustment, re-tighten wing bolt (B). * Position the legs and the arm base as shown in the illustration (left). 3.
組立手順 /Assembly Procedure 4 アーム Arm アームベース Arm Base 上パイプ Upper Pipe 脚 Leg ウイングボルト(B) Wing Bolt (B) 5 奏者 Player ウイングボルト(A) Wing Bolt (A) 18
4. ドラムをスタンドに載せ、アームを閉じて固定します。 4. Place the drum on the stand and position the arms tightly against the drum. 5. 演奏時にドラムが下がらないように、位置決めストッパーを締付ベース に合わせた後、ウイングナットをしっかりと締め付けておきます。 ドラムの高さを調整する場合は、ドラムをスタンドからおろしてから、 ウイングボルト(B)をゆるめ、上パイプを上下してください。調整後は、 ウイングボルト(B)および位置決めストッパーのウイングナットをしっ かりと締め付けておきます。 5. To prevent the upper pipe from sliding down during performance, push the position clamp tightly against the mounting base and securely tighten its wing nut.
MBS-810A Montage/ 组装步骤 * Les schémas illustrent le montage d’une grosse caisse MB-8300, 800, 6300 ou 600 (16 à 28 pouces).
1. Écartez complètement les pieds du stand et fixez-les en serrant la vis papillon (A). 1. 充分展开支架的支腿,然后旋紧蝶型螺栓 (A) 将它们固定。 2. Desserrez la vis papillon (B) pour régler la hauteur du stand. Suite à ce réglage, resserrez la vis papillon (B). * Positionnez les pieds et la base des bras comme illustré à gauche. 2. 松开蝶型螺栓 (B) 以调整支架的高度。调整后,重新旋紧蝶型螺栓 (B)。 * 如图 ( 左 ) 所示定位支腿和支臂基座。 3. Déployez les quatre bras en fonction de la largeur de la grosse caisse.
Montage/ 组装步骤 4 Bras 支臂 Base des bras 支臂基座 Tube supérieur 上管 Vis papillon (B) Pied 蝶型螺栓 (B) 支腿 5 Musicien 演奏者 Vis papillon (A) 蝶型螺栓 (A) 22
4. Placez la grosse caisse sur le stand et positionnez les bras de façon bien serrée autour de la grosse caisse. 4. 将鼓放在支架上,使支臂紧贴鼓。 5. Pour empêcher le tube supérieur de glisser pendant le jeu, poussez le collier de positionnement contre l’étrier de montage et serrez fermement sa vis papillon. Pour régler la hauteur de la grosse caisse, retirez d’abord la grosse caisse du stand puis desserrez la vis papillon (B).
MSS-810A ドラム取付図 /Drum Mouning Illustrations スネアドラムのサイズによりスタンドのセッティングが異なりますので、図をよくご覧 になり、お手持ちのスネアドラムに合った取り付け方をしてください。 The proper setting of the stand depends on the size of the snare drum. Please refer to the following illustrations when mounting your snare drum on the stand.
ドラム取付図 /Drum Mouning Illustrations The MSS-810A stand can also be used for MB-2000, 200 or 100 series bass drums. For these drums the mounting method also depends on the drum size. Please refer to the following illustrations.
MSS-810A Illustrations relatives au montage/ 鼓安装图 Le bon réglage du stand dépend de la taille de la caisse de défilé. Référez-vous aux illustrations suivantes lorsque vous montez la caisse de défilé sur son stand.
Le stand MSS-810A peut aussi être utilisé pour accueillir les grosses caisses MB-2000, 200 ou 100. Pour ces instruments, le mode de montage dépend aussi de la taille. Référez-vous aux illustrations suivantes. MSS-810A 支架也可用于 MB-2000, 200 或 100 系列大鼓。 这些鼓的安装方法同样取决于鼓的尺寸。请参照以下图示。 ● Pour grosse caisse MB-2000 ou 200 ● 对于 MB-2000 或 200 系列大鼓 Musicien 演奏者 ● Pour grosse caisse MB-100 ● 对于 MB-100 系列大鼓 * Pour monter une grosse caisse MB-100, montez les quatre bras sur les orifices intérieurs du stand.
MSS-810A 組立手順 /Assembly Procedure ※ 説明イラストは、14" または 13" スネアドラムを取 り付ける場合です。 * The illustrations show mounting of a 14” or 13” snare drum.
1. 脚をいっぱいに開き、ウイングボルト(A)をしっかりと締め付けます。 1. Fully spread the legs of the stand and secure them by tightening wing bolt (A). 2. ウイングボルト(B)をゆるめ、上パイプを適当な高さに調整します。 調整後、ウイングボルト(B)はしっかりと締めておいてください。 ※ 脚とアームベースの向きは、ドラム取付図(左図)によりご確認ください。 2. Loosen wing bolt (B) to adjust the height of the stand. After adjustment, re-tighten wing bolt (B). * Position the legs and the arm base as shown in the illustration (left). 3.
組立手順 /Assembly Procedure 4 アーム Arm アームベース Arm Base 上パイプ Upper Pipe ウイングボルト(B) Wing Bolt (B) 5 脚 Leg 奏者 Player ウイングボルト(A) Wing Bolt (A) 30
4. ドラムをスタンドに載せ、アームを閉じて固定します。 4. Place the drum on the stand and position the arms tightly against the drum. 5. ウイングボルト(B)をゆるめ、上パイプを上下してドラムの高さを調整 します。調整後、ウイングボルト(B)をしっかりと締め付けておきます。 さらに、演奏時にドラムが下がらないように、位置決めストッパーを締 付ベースに合わせた後、ドラムキーを使ってネジをしっかりと締め付け ておきます。 5. Loosen wing bolt (B) to adjust the drum height. After adjustment, retighten wing bolt (B).
MSS-810A Montage/ 组装步骤 * Ces schémas illustrent le montage d’une caisse de défilé de 14 ou de 13 pouces.
1. Écartez complètement les pieds du stand et fixez-les en serrant le boulon à oreilles (A). 1. 充分展开支架的支腿,然后旋紧蝶型螺栓 (A) 将它们固定。 2. Desserrez le boulon à oreilles (B) pour régler la hauteur du stand. Suite à ce réglage, resserrez le boulon à oreilles (B). * Positionnez les pieds et la base des bras comme illustré à gauche. 2. 松开蝶型螺栓 (B) 以调整支架的高度。调整后,重新旋紧蝶型螺栓 (B)。 * 如图 ( 左 ) 所示定位支腿和支臂基座。 3. Déployez les quatre bras en fonction de la taille du tambour.
Montage/ 组装步骤 4 Bras 支臂 Base des bras 支臂基座 Tube supérieur Vis papillon (B) 上管 蝶型螺栓 (B) 5 Pied 支腿 Musicien 演奏者 Vis papillon (A) 蝶型螺栓 (A) 34
4. Placez le tambour sur le stand et positionnez les bras de façon bien serrée autour du tambour. 4. 将鼓放在支架上,使支臂紧贴鼓。 5. Desserrez le boulon à oreilles (B) pour régler la hauteur du tambour. Suite à ce réglage, resserrez le boulon à oreilles (B). Ensuite, poussez le collier de positionnement contre l’étrier de montage et serrez-le fermement à l’aide d’une clé d’accord de tambour pour empêcher le tube supérieur de glisser pendant le jeu. 5.
ご相談窓口のご案内 製品についての機能や取扱については、最寄の特約店または下記ヤマハお客様コミュニケーション センターへお問い合わせください。修理に関するお問合せはご購入店へお申し出ください。 ■ お客様コミュニケーションセンター ナビダイヤル (全国共通番号) 管弦打楽器ご相談窓口 0570-013-808 ※固定電話は、全国市内通話料金でご利用いただけます。通話料金は音声案内で確認できます。 上記番号でつながらない場合は、053-411-4744 におかけください。 受付: 月〜金曜日 10:00 〜 17:00 (土曜、日曜、祝日およびセンター指定の休日を除く) ホームページ http://jp.yamaha.