ULHV Micro Component System Micro-Chaîne MCR-042 27 May OWNER’S MANUAL MODE D’EMPLOI MANUAL DE INSTRUCCIONES
IMPORTANT SAFETY INSTRUCTIONS CAUTION RISK OF ELECTRIC SHOCK DO NOT OPEN CAUTION: TO REDUCE THE RISK OF ELECTRIC SHOCK, DO NOT REMOVE COVER (OR BACK). NO USER-SERVICEABLE PARTS INSIDE. REFER SERVICING TO QUALIFIED SERVICE PERSONNEL.
FCC INFORMATION (for US customers) Compliance with FCC regulations does not guarantee that interference will not occur in all installations. If this product is found to be the source of interference, which can be determined by turning the unit “OFF” and “ON”, please try to eliminate the problem by using one of the following measures: Relocate either this product or the device that is being affected by the interference. In the case of radio or TV interference, relocate/reorient the antenna.
CAUTION: READ THIS BEFORE OPERATING YOUR UNIT. 1 To assure the finest performance, please read this manual carefully. Keep it in a safe place for future reference. 2 Install this unit in a well ventilated, cool, dry, clean place away from direct sunlight, heat sources, vibration, dust, moisture and cold. For proper ventilation, allow the following minimum clearances.
CONTENTS LISTENING TO FM/AM STATIONS........................11 Connecting the speakers and antenna ..........................2 Connecting the power cable...........................................3 Other connections ..........................................................3 Selecting an FM/AM station .........................................11 Presetting FM/AM stations (remote control only) .........12 Selecting preset FM/AM stations .................................
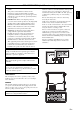
CONNECTIONS Connecting the speakers and antenna Connect the speakers and antenna. If you use a commercially available outdoor antenna instead of the supplied antenna, reception may be better. If FM/AM reception is poor, try changing the height or direction or placement of the antenna to find a location that has better reception. AM radio is available only for U.S.A. model. Do not connect this unit’s power cable until you’ve finished connecting all cables.
CONNECTIONS Connecting the power cable When you’ve completed all connections, connect this unit’s power cable to an AC outlet. English Rear panel Français Other connections iPod Connect your iPod to the iPod dock on the top panel. For details on compatible iPod models, refer to “SPECIFICATIONS” (P. 23). iPod dock iPad Connect your iPad to the front panel USB port. For details on compatible iPad models, refer to “SPECIFICATIONS” (P. 23).
NAMES OF PARTS AND THEIR FUNCTIONS Top panel/Front panel 1 2 k 3 4 5 6 7 a iPod dock 8 9 g SOURCE Connect your iPod here (☞ P. 3, 6, 7). Be sure to use a dock adaptor that is compatible with your iPod (☞ P. 3). Switch the audio source to be played. Pressing this repeatedly will change the selection in the following order. CD iPod USB FM AM (U.S.A. model only) AUX back to CD b Front panel display The clock and other information is displayed here. h VOLUME knob c Disc slot Adjust the volume.
NAMES OF PARTS AND THEIR FUNCTIONS Remote control AM radio is available only for U.S.A. model. b c SNOOZE/SLEEP Set the sleep timer or switch the alarm to snooze mode (☞ P. 15, 18). 4 d ALARM Switches the alarm on/off (☞ P. 18). e Source buttons 5 Switch the audio source to be played. If you press one of these while the system is off, the system will automatically turn on. (U.S.A. model only) When listening to the radio, press RADIO to switch between FM/AM.
ADJUSTING THE CLOCK (OPTION MENU) You’ll use the option menu (☞ P. 15) to set this unit’s date and time. To copy the time from your iPod 1 Press OPTION. The option menu will appear. 1 2 Press / to select “CLOCK SET,” and then press ENTER. 2 The display will indicate “CLOCK YEAR,” and the numerical value to be set will blink. 3 Set your iPod in the iPod dock (☞ P. 3). The time will be copied from your iPod to this unit. Press ENTER to confirm the items in the order of year month day hour minute.
?? LISTENING TO YOUR iPod Playing music from your iPod English • For details on compatible iPod models, refer to “SPECIFICATIONS” (P. 23). • Your iPod can also play back music and charge while connected to the USB port. To do this, select USB as the audio source (☞ P. 10). 1 Press the iPod source button to switch the audio source to iPod. 1 3 Play the iPod. Playback can be controlled with either the remote control, iPod or the front panel on this unit (☞ P. 4, 5). 2 Svenska Dock adaptor (☞ P.
LISTENING TO YOUR iPod Using repeat/shuffle playback (remote control only) The playback status is shown by the repeat/shuffle indicator in the front panel display. Repeat playback Shuffle playback Press (repeat) repeatedly to select one of the following playback modes. No display: : Off One : All Press (shuffle) repeatedly to select one of the following playback modes. No display: : : The operation or display of repeat/shuffle may differ, depending on the type or software version of iPod used.
LISTENING TO CD AND USB DEVICES − Audio CD: from the first track of the CD. − Data CD*/USB device: from the first track of the folder contains the track you listened to last time. Français • This unit automatically turns off the system if no operation has been performed for 60 minutes after CD/USB device playback is stopped. * “Data CD” is a CD that contains MP3/WMA files. For details on playable discs and files, refer to “NOTES ON DISCS AND USB DEVICES” (P. 22).
LISTENING TO CD AND USB DEVICES Listening to a USB device 1 Press the USB source button to switch the audio source to USB. 1 If a USB device is already connected, playback will start. 2 Connect a USB device to the USB port. Playback starts automatically. Playback can be controlled using either the remote control, the front panel on this unit, or the USB device (☞ P. 4, 5). • Folders and files will play in the order in which they were written.
LISTENING TO FM/AM STATIONS AM radio is available only for U.S.A. model. English Selecting an FM/AM station To listen to a FM/AM station, connect the antenna as described in “Connecting the speakers and antenna” (P. 2). 1 Press the RADIO source button to switch the audio source to FM/AM. Automatic tuning: Press and hold TUNING / . Manual tuning: Press TUNING / repeatedly. 1 Deutsch If you tune to a station manually while receiving FM, the sound will be monaural.
LISTENING TO FM/AM STATIONS Presetting FM/AM stations (remote control only) Use the preset function to store your favorite 30 stations. Auto preset This method tunes automatically, and automatically presets only the stations that have good reception. 1 Press and hold down MEMORY. 1 2 “AUTO PRESET” will appear and “Press MEMORY” will blink. 2 Press MEMORY. Auto preset will begin.
LISTENING TO FM/AM STATIONS Selecting preset FM/AM stations 2 Press PRESET / to select the FM/AM station that you want to hear. English 1 Press the RADIO source button to switch the audio source to FM/AM. Français You can only select presets that have been stored.
LISTENING TO EXTERNAL SOURCES Rear panel 1 Using a commercially available 3.5 mm miniplug cable, connect your external device to the AUX jack on the rear panel of this unit. AUX IN 1 • Turn off the system before connecting the audio cable. • Turn down the volume of the unit and your external audio device before connection. 2 Press 2 to turn the system on. 3 Press the AUX source button to switch the audio source to AUX. 4 Start playback on the connected external audio device.
USEFUL FUNCTIONS Using the Option menu (eject button) cannot be operated while the option menu is displayed. Option menu Setting or range See page FM/AM*1). 12 DIMMER Adjusts the brightness of the front panel display (1*2: bright, 2: medium, 3: dim). – EQ LOW Adjusts the tonal character (low frequencies) (–10 - 0*2 - +10 dB). – EQ MID Adjusts the tonal character (mid frequencies) (–10 - 0*2 - +10 dB). – EQ HIGH - +10 dB).
USEFUL FUNCTIONS Using the alarm function The unit includes an alarm function (IntelliAlarm) that plays back audio sources or a set of beep (internal alarm sound) at the set time using a variety of different methods. The alarm function has the following features. 3 types of alarms Select from 3 alarm types, combining music and beep sounds. SOURCE+BEEP SOURCE BEEP The selected audio source and the beep sound are played at the set time.
USEFUL FUNCTIONS Setting the alarm Setting the alarm time and alarm type (Option menu) English The alarm will not function when the unit is in power saving (☞ P. 15). To use the alarm function, set the Option menu item POWER SAVING to NORMAL. 1 Press OPTION. 2 Press / to select “ALARM SET”, and then press ENTER. The alarm indicator ( 2 3 ) and numerical value you’re setting will blink. Français The option menu will appear. 1 3 Set the alarm. Set items 1-5 described below.
USEFUL FUNCTIONS Switching the alarm on/off Press ALARM to turn the alarm on/off. When the alarm is on, the alarm indicator ( ) will light, and the alarm time will be shown. If you press ALARM again, the alarm indicator ( ) and the alarm will turn off. If the Option menu item POWER SAVING is set to ECO, the alarm will not function (☞ P. 15). Operations while the alarm sound is playing When the set time arrives, the selected alarm sound will play. During playback, the following operations are available.
TROUBLESHOOTING General Problem Cause Solution The volume might be set to the minimum level, or muted. Adjust the volume level. The source may be incorrect. Select the correct source. The speakers may not be connected securely. Check the connections (☞ P. 2). Headphones are connected. Remove the headphones. The volume of a connected external device is not loud enough. Raise the volume of the external device. The sleep timer may be set (☞ P. 15). Turn the system on and play the source again.
TROUBLESHOOTING iPod Problem No sound. The iPod does not charge up. The front panel display indicates “iPod Unknown” when you connect the iPod. Cause Solution The iPod is not set in the iPod dock firmly. Remove the iPod from the unit, and then set it in the iPod dock again (☞ P. 3). The headphones of the iPod are connected. Remove the Headphones. The iPod software version has not been updated. Download the latest iTunes software to update the iPod software version to the latest.
TROUBLESHOOTING USB device playback MP3/WMA file in the USB device does not play. Solution The USB device is not recognized. Turn the system off and reconnect the USB device to the unit. If the solutions above do not resolve the problem, the USB device is not playable on the unit (☞ P. 22). The USB device does not contain playable files. Use a USB device contains playable files (☞ P. 22). An incompatible USB device was connected to the unit.
NOTES ON DISCS AND USB DEVICES CD information This unit is designed for use with audio CD, CD-R*, and CD-RW* with the logos followings. * ISO 9660 format CD-R/RW This unit can play back discs bearing any of the logo marks above. A disc logo mark is printed on the disc and the disc jacket. • Do not load any other type of disc into this unit. Doing so may damage this unit. • CD-R/RW cannot be played back unless finalized.
SPECIFICATIONS PLAYER SECTION [As of July, 2012] Tuning range • FM ......................................................................87.50 to 108.00 MHz • Compatible iPhone models ......................... iPhone 4S, iPhone 4, iPhone 3GS, iPhone 3G, iPhone SPEAKER SECTION • Compatible iPad models .............. iPad (3rd generation), iPad 2, iPad • Type ...................................................................
PRÉCAUTIONS CONCERNANT LA SÉCURITÉ CAUTION RISK OF ELECTRIC SHOCK DO NOT OPEN ATTENTION: POUR RÉDUIRE LES RISQUES D’INCENDIE ET DE DÉCHARGE ELECTRIQUE, NE PAS RETIRER LE COUVERCLE (OU LE PANNEAU ARRIÈRE). AUCUNE PIÈCE INTERNE NE PEUT ÊTRE CHANGÉE PAR L’UTILISATEUR. POUR L’ENTRETIEN, S’ADRESSER À UN PERSONNEL QUALIFIÉ.
Informations de la FCC (Pour les clients résidents aux États-Unis) 2 IMPORTANT: N’utiliser que des câbles blindés de haute qualité pour le raccordement de ce produit à des accessoires et/ou à un autre produit. Seuls le ou les câbles fournis avec le produit DOIVENT être utilisés. Suivre les instructions concernant l’installation. Le non respect des instructions peut invalider l’autorisation, accordée par la FCC, d’utiliser ce produit aux États-Unis.
ATTENTION: VEUILLEZ LIRE CE QUI SUIT AVANT D’UTILISER L’APPAREIL. 1 Pour utiliser l’appareil au mieux de ses possibilités, lisez attentivement ce mode d’emploi. Conservez-le soigneusement pour référence. 2 Installez cet appareil dans un endroit frais, bien aéré, sec et propre - à l’abri de la lumière du soleil, des sources de chaleur, des vibrations, des poussières, de l’humidité et du froid. Pour une aération correcte, tenez compte des distances minimales suivantes.
TABLE DES MATIÈRES ÉCOUTE DE STATIONS FM/AM ............................11 Connexion des haut-parleurs et de l’antenne ................2 Connexion du cordon d’alimentation..............................3 Autres connexions..........................................................3 Sélection d’une station FM/AM ....................................11 Présélection de stations FM/AM (télécommande uniquement) .......................................12 Sélection de stations FM/AM mémorisées ...................
CONNEXIONS Connexion des haut-parleurs et de l’antenne Connectez les haut-parleurs et l’antenne. Si, au lieu de l’antenne fournie, vous utilisez une antenne extérieure disponible dans le commerce, la réception pourrait s’avérer meilleure. Si la réception FM/AM laisse à désirer, changez la hauteur, l’orientation ou l’emplacement de l’antenne pour essayer d’améliorer la réception. La radio AM est uniquement disponible sur le modèle pour les États-Unis.
CONNEXIONS Connexion du cordon d’alimentation Quand toutes les connexions sont effectuées, branchez le cordon d’alimentation de cet appareil à une prise secteur. English Panneau arrière iPod Branchez votre iPod à la station d’accueil sur le panneau supérieur de l’appareil. Pour plus de détails à propos des modèles d’iPod compatibles, veuillez consulter “CARACTÉRISTIQUES TECHNIQUES” (P. 23). iPad Italiano • Votre iPod se recharge quand il est branché à sa station d’accueil.
NOM ET FONCTIONS DES ÉLÉMENTS Panneau supérieur / panneau avant 1 2 k 3 4 5 6 7 a Station d’accueil pour iPod 8 9 g SOURCE Branchez-y votre iPod (☞ P. 3, 6, 7). Assurez-vous d’utiliser un adaptateur de station d’accueil compatible avec votre iPod (☞ P. 3). Change de source audio de lecture. Chaque pression sélectionne une source audio dans l’ordre suivant. CD iPod USB FM AM (modèle pour les ÉtatsUnis uniquement) AUX retour à la source CD b Afficheur Affiche l’horloge et d’autres informations.
NOM ET FONCTIONS DES ÉLÉMENTS Télécommande La radio AM est uniquement disponible sur le modèle pour les États-Unis. b English a Émetteur de télécommande 1 (Alimentation) Appuyez pour allumer/éteindre le système. 2 c SNOOZE/SLEEP Règle la minuterie ou bascule l’alarme en mode snooze (☞ P. 15, 18). 4 d ALARM Active/désactive l’alarme (☞ P. 18). Français 3 e Touches de sélection de source 6 7 Change d’option de menu iPod / retourne au menu précédent (☞ P. 7).
RÉGLAGE DE L’HORLOGE (MENU OPTION) Le menu Option (☞ P. 14) de cet appareil permet de régler la date et l’heure. Régler l’heure sur celle de votre iPod 1 Appuyez sur OPTION. Le menu Option s’affiche. 1 2 Appuyez sur / pour sélectionner “CLOCK SET”, puis appuyez sur ENTER. 2 “CLOCK YEAR” apparaît sur l’afficheur et la valeur numérique à ajuster clignote. 3 Placez votre iPod sur la station d’accueil (☞ P. 3). 3 L’heure de l’appareil est réglée sur celle de votre iPod.
?? ÉCOUTER UN iPod Écouter la musique d’un iPod 2 Placez votre iPod sur la station d’accueil (☞ P. 3). Français 1 Appuyez sur la touche de sélection de source iPod pour choisir iPod comme source audio. 1 English • Pour plus de détails à propos des modèles d’iPod compatibles, veuillez consulter “CARACTÉRISTIQUES TECHNIQUES” (P. 23). • Vous pouvez aussi écouter de la musique avec un iPod connecté au port USB tout en le chargeant. Pour ce faire, sélectionnez USB comme source audio (☞ P. 10).
ÉCOUTER UN iPod Utilisation des modes de lecture répétée/aléatoire (télécommande uniquement) Le statut de lecture est signalé sur l’afficheur par l’indicateur de lecture répétée/aléatoire. Lecture répétée Lecture aléatoire Appuyez plusieurs fois sur (lecture répétée) pour choisir un des modes suivants de lecture. Aucun affichage: : Désactivé Un : Tous Appuyez plusieurs fois sur (lecture aléatoire) pour choisir un des modes suivants de lecture.
ÉCOUTE D’UN CD ET D’APPAREILS USB English Cette section décrit le fonctionnement de l’appareil pour la lecture de plages/fichiers sur CD/appareils USB. • Quand vous arrêtez puis relancez la lecture du CD/de l’appareil USB, cet appareil reprend la lecture de la dernière plage lue depuis le début. • Si vous appuyez sur quand la lecture est à l’arrêt, l’appareil lit les plages comme suit la prochaine fois que vous lancez la lecture: − CD audio: depuis la première plage du CD.
ÉCOUTE D’UN CD ET D’APPAREILS USB Écoute d’un appareil USB 1 Appuyez sur la touche de sélection de source USB pour choisir USB comme source audio. 1 Si un dispositif USB est déjà connecté, la lecture démarre. 2 Branchez un appareil USB au port USB. La lecture commence automatiquement. Vous pouvez piloter la lecture avec la télécommande, le panneau avant de cet appareil ou le dispositif USB (☞ P. 4, 5). • Les dossiers et fichiers sont lus selon l’ordre dans lequel ils ont été créés.
ÉCOUTE DE STATIONS FM/AM La radio AM est uniquement disponible sur le modèle pour les États-Unis. Pour pouvoir écouter des stations radio FM/AM, vous devez brancher l’antenne comme décrit sous “Connexion des hautparleurs et de l’antenne” (P. 2). 2 Choisissez la station FM/AM voulue. 1 Si vous syntonisez manuellement une station FM, le son sera en mono. Deutsch Syntonisation automatique: appuyez et maintenez TUNING / enfoncé. Syntonisation manuelle: appuyez plusieurs fois sur TUNING / .
ÉCOUTE DE STATIONS FM/AM Présélection de stations FM/AM (télécommande uniquement) La fonction Preset vous permet de mémoriser vos 30 stations préférées. Présélection automatique Cette méthode accorde et mémorise automatiquement uniquement les stations dont le signal est assez puissant. 1 Appuyez et maintenez MEMORY enfoncé. 1 2 “AUTO PRESET” s’affiche et “Press MEMORY” clignote. 2 Appuyez sur MEMORY. La présélection automatique démarre.
ÉCOUTE DE SOURCES EXTERNES Effacer une présélection (menu Option) 1 Appuyez sur OPTION. 2 Appuyez sur / pour sélectionner “PRESET DELETE”, puis appuyez sur ENTER. 1 5 4 2 3 English Le menu Option s’affiche. 3 Appuyez sur / pour choisir le numéro de la présélection à effacer. 4 Appuyez sur ENTER pour valider l’opération. Français Pour annuler la procédure d’effacement, appuyez sur OPTION. Quand la présélection est effacée, “Deleted!” apparaît sur l’afficheur.
FONCTIONS UTILES Utilisation du menu Option Quand vous appuyez sur OPTION, le menu Option apparaît sur l’afficheur. Il permet d’effectuer les réglages suivants. (touche d’éjection) n’est pas disponible quand le menu Option est affiché. Menu Option Réglage ou plage Voyez page PRESET DELETE Efface une station mémorisée (apparaît uniquement si FM/AM*1 est sélectionné comme source audio). 13 DIMMER Règle la luminosité de l’afficheur (1*2: lumineux, 2: moyen, 3: faible).
FONCTIONS UTILES Utilisation de la minuterie L’appareil est mis automatiquement hors tension après l’écoulement de la durée définie. Appuyez plusieurs fois de suite sur SNOOZE/ SLEEP pour régler le délai avant la mise hors tension de le système. Français Vous pouvez sélectionner 30, 60, 90, 120 ou OFF. Quand vous réglez le délai, la minuterie est activée et le témoin de minuterie ( ) s’affiche sur la face avant.
FONCTIONS UTILES Utilisation de la fonction d’alarme Cet appareil comporte une fonction d’alarme (IntelliAlarm) qui vous permet de lire la source audio voulue et/ou de déclencher une sonnerie (son du système) à l’heure prédéfinie. Voici les particularités de cette fonction d’alarme : 3 types d’alarmes Les 3 types d’alarmes permettent de combiner de la musique avec la sonnerie. SOURCE+BEEP La source audio sélectionnée et la sonnerie retentissent en même temps.
FONCTIONS UTILES Réglage de l’alarme Réglage de l’heure et du type d’alarme (menu Option) English Quand l’appareil est en mode d’économie d’énergie, l’alarme ne fonctionne pas (☞ P. 14). Pour utiliser l’alarme, réglez le paramètre POWER SAVING du menu Option sur NORMAL. 1 Appuyez sur OPTION. 2 3 Français Le menu Option s’affiche. 1 2 Appuyez sur / pour sélectionner “ALARM SET”, puis appuyez sur ENTER. L’indicateur d’alarme ( clignoter.
FONCTIONS UTILES 4 Valide les réglages. 4 Heure du réveil 9:12 Completed! Indicateur d’alarme Quand vous réglez le paramètre VOLUME (5), l’écran affiche “Completed!” et vos réglages sont validés. L’alarme est activée et l’indicateur d’alarme ( ) s’allume. Si vous appuyez sur OPTION ou mettez le système hors tension pendant les réglages d’alarme, ces derniers seront effacés. Activation/Désactivation de l’alarme Appuyez sur ALARM pour activer/désactiver l’alarme.
GUIDE DE DÉPANNAGE Généralités Anomalies Solution Le volume est peut-être réglé au niveau minimum ou le son est coupé. Réglez le niveau du volume. La source est peut-être incorrecte. Sélectionnez la source correcte. Les connexions des haut-parleurs ne sont peutêtre pas correctes. Vérifiez les connexions (☞ P. 2). Le casque est branché. Débranchez le casque. Le volume d’un dispositif externe connecté n’est pas suffisant. Augmentez le volume du dispositif externe.
GUIDE DE DÉPANNAGE iPod Anomalies Aucun son. Causes possibles Solution L’iPod n’est pas solidement placé sur sa station d’accueil. Retirez l’iPod de l’appareil puis replacez-le sur sa station d’accueil (☞ P. 3). Les écouteurs de l’iPod sont branchés. Débranchez les écouteurs. La version du logiciel de l’iPod n’a pas été mise à Téléchargez le logiciel iTunes le plus récent pour mettre à jour. jour la version du logiciel de l’iPod. L’iPod ne se charge pas.
GUIDE DE DÉPANNAGE Lecture d’un appareil USB Un fichier MP3/WMA sur l’appareil USB ne peut pas être lu. Causes possibles Solution Arrêtez le système et rebranchez l’appareil USB à l’appareil. Si les solutions ci-dessus ne permettent pas de résoudre le problème, alors l’appareil USB n’est pas compatible avec l’appareil (☞ P. 22). L’appareil USB ne contient aucun fichier lisible. Utilisez un appareil USB contenant des fichiers lisibles (☞ P. 22).
REMARQUES SUR LES DISQUES ET APPAREILS USB Informations sur les disques Cet appareil est conçu pour lire des CD audio, CD-R*, et CD-RW* comportant les logos suivants. * CD-R/RW au format ISO 9660 De façon générale, cet appareil est capable de lire les disques portant les logos ci-dessus. Les logos sont imprimés sur les disques et sur leur pochette. • Ne mettez pas d’autres types de disques dans cet appareil. Vous risqueriez sinon de l’endommager.
CARACTÉRISTIQUES TECHNIQUES SECTION LECTEUR [Spécifications en juillet 2012] Plage de syntonisation • iPod compatibles ................iPod touch (1re, 2e, 3e et 4e générations) • FM ....................................................................... 87,50 à 108,00 MHz iPod nano (2e, 3e, 4e, 5e et 6e générations) • AM (modèle pour les États-Unis uniquement)............530 à 1710 kHz • iPhone compatibles .........................
PRECAUCIONES DE SEGURIDAD IMPORTANTES CAUTION RISK OF ELECTRIC SHOCK DO NOT OPEN PRECAUCIÓN: PARA REDUCIR EL RIESGO DE DESCARGA ELECTRICA, NO QUITE LA CUBIERTA. EL USUARIO NO DEBERA DAR NINGUN TIPO DE SERVICIO A NINGUNA PARTE INTERNA. DEBERA SER REALIZADO SOLO POR PERSONAL DE SERVICIO CALIFICADO.
Información de la Comisión Federal de las Comunicaciones (FCC) (para los consumidores de EE. UU.) PARA CLIENTES EN CANADÁ Este aparato digital de Clase B cumple la norma canadiense ICES-003. ANTENNA FM SPEAKERS AUX IN PRECAUCIÓN El uso de los controles, los ajustes o los procedimientos que no se especifican enste manual pueden causar una exposición peligrosa a la radiación. SEGURIDAD CONTRA LA RADIACIÓN LÁSER Esta unidad utiliza rayos láser.
PRECAUCIÓN: LEA LAS INDICACIONES SIGUIENTES ANTES DE UTILIZAR ESTE APARATO. 1 Para asegurar el mejor rendimiento de este aparato, lea atentamente este manual. Y luego guárdelo en un lugar seguro para poder consultarlo en el futuro en caso de ser necesario. 2 Instale esta unidad en un lugar bien ventilado, fresco, seco y limpio, alejado de la luz directa del sol, fuentes de calor, vibración, polvo, humedad y frío.
CONTENIDO ESCUCHAR EMISORAS DE FM/AM......................11 Conexión de los altavoces y la antena...........................2 Conexión del cable de alimentación ..............................3 Otras conexiones ...........................................................3 Selección de una emisora FM/AM ...............................11 Presintonización de emisoras FM/AM (solo con el mando a distancia) ...................................12 Selección de emisoras FM/AM presintonizadas ..........
CONEXIONES Conexión de los altavoces y la antena Conecte los altavoces y la antena. Si utiliza una antena exterior de venta en tiendas en lugar de la antena incluida, la recepción puede ser mejor. Si la recepción de FM es deficiente, pruebe a cambiar la altura, la dirección o la colocación de la antena para encontrar una ubicación que proporcione una mejor recepción. La radio AM solo está disponible para el modelo EE.UU.
CONEXIONES Conexión del cable de alimentación Una vez finalizadas todas las conexiones, conecte el cable de alimentación de esta unidad a una toma de CA. English Panel posterior Français Otras conexiones iPod Conecte el iPod a la base de iPod en el panel superior. Para obtener información sobre los modelos de iPod compatibles, consulte “ESPECIFICACIONES” (P. 23). • Puede recargar el iPod mientras está conectado a la base.
NOMBRES DE LAS PARTES Y SUS FUNCIONES Panel superior / Panel frontal 1 2 k 3 4 5 6 7 a Base de iPod 8 9 j g SOURCE Conecte el iPod aquí (☞ P. 3, 6, 7). Es importante que utilice un adaptador de la base que sea compatible con el iPod (☞ P. 3). Cambie la fuente de audio que va a reproducir. Si pulsa varias veces cambiará la selección en el orden siguiente. CD iPod USB FM AM (solo para el modelo EE.UU.) AUX de nuevo CD b Pantalla del panel frontal El reloj y otra información se muestran aquí.
NOMBRES DE LAS PARTES Y SUS FUNCIONES Mando a distancia La radio AM solo está disponible para el modelo EE.UU. b (Alimentación) Pulse este botón para encender o apagar el sistema. 2 English a Transmisor de señales del mando a distancia 1 c SNOOZE/SLEEP Français Configure el temporizador para dormir o cambie la alarma al modo de repetición (☞ P. 15, 18). 3 d ALARM 4 Activa o desactiva la alarma (☞ P. 18).
AJUSTE DEL RELOJ (MENÚ DE OPCIONES) Debe utilizar el menú de opciones (☞ P. 14) para establecer la fecha y hora de esta unidad. Para copiar la hora desde el iPod 1 Pulse OPTION. Aparecerá el menú de opciones. 1 2 Pulse / para seleccionar “CLOCK SET” y, a continuación, pulse ENTER. 2 La pantalla indicará “CLOCK YEAR” y el valor numérico que se va a configurar parpadeará. 3 Coloque el iPod en la base de iPod (☞ P. 3). 3 La hora se copiará desde el iPod a esta unidad.
?? ESCUCHAR EL iPod Reproducción de música desde el iPod English • Para obtener información sobre los modelos de iPod compatibles, consulte “ESPECIFICACIONES” (P. 23). • El iPod también puede reproducir música y cargarse cuando está conectado al puerto USB. Para ello, seleccione USB como la fuente de audio (☞ P. 10). 1 Pulse el botón de fuente iPod para cambiar la fuente de audio a iPod. 1 3 Inicie la reproducción del iPod.
ESCUCHAR EL iPod Uso de la repetición/reproducción aleatoria (solo con el mando a distancia) El indicador de repetición/reproducción aleatoria muestra el estado de reproducción en la pantalla del panel frontal. Repetición de la reproducción Pulse (repetición) varias veces para seleccionar uno de los modos de reproducción siguientes.
ESCUCHAR CD Y DISPOSITIVOS USB English La unidad funcionará del siguiente modo al reproducir pistas o archivos de CD/dispositivos de USB. • Si se detiene el CD/dispositivo de USB que se está reproduciendo, la pista que estaba escuchando empezará a reproducirse desde el principio la próxima vez que la reproduzca. • Si pulsa con la reproducción detenida, las pistas se reproducirán de la siguiente forma la próxima vez que se inicie la reproducción: − CD de audio: desde la primera pista del CD.
ESCUCHAR CD Y DISPOSITIVOS USB Escuchar un dispositivo USB 1 1 Pulse el botón de fuente USB para cambiar la fuente de audio a USB. Si ya hay un dispositivo USB conectado, se iniciará la reproducción. 2 Conecte un dispositivo USB al puerto USB. La reproducción empezará automáticamente. La reproducción puede controlarse con el mando a distancia, el panel frontal de esta unidad o el dispositivo USB (☞ P. 4, 5). 2 • Las carpetas y archivos se reproducirán en el orden en que se grabaron.
ESCUCHAR EMISORAS DE FM/AM Uso de la repetición/reproducción aleatoria (solo con el mando a distancia) El indicador de repetición/reproducción aleatoria muestra el estado de reproducción en la pantalla del panel frontal. Reproducción aleatoria Pulse (repetición) varias veces para seleccionar uno de los modos de reproducción siguientes.
ESCUCHAR EMISORAS DE FM/AM Presintonización de emisoras FM/AM (solo con el mando a distancia) Use la función de presintonización para guardar sus 30 emisoras favoritas. Presintonización automática Este método permite sintonizar y presintonizar de forma automática únicamente las emisoras con buena recepción. 1 Mantenga pulsado MEMORY. 1 2 “AUTO PRESET” aparecerá y “Press MEMORY” parpadeará. 2 Pulse MEMORY. Se iniciará la presintonización automática.
ESCUCHAR UNA FUENTE EXTERNA Selección de emisoras FM/AM presintonizadas 2 Pulse PRESET / para seleccionar la emisora FM/AM que desee escuchar. English 1 Pulse el botón de fuente RADIO para cambiar la fuente de audio a FM/AM. Français Solo puede seleccionar presintonías que haya guardado. 1 2 Español ESCUCHAR UNA FUENTE EXTERNA Panel posterior AUX IN 1 2 1 Con un cable mini de 3,5 mm de venta en tiendas, conecte el dispositivo externo al conector AUX en la parte posterior de esta unidad.
FUNCIONES ÚTILES Uso del menú de opciones Al pulsar OPTION aparecerá el menú de opciones en la pantalla del panel frontal, que le permite realizar los ajustes siguientes. (botón de expulsión) no se puede utilizar cuando se muestra el menú de opciones. Menú de opciones Ajuste o rango Consulte la página PRESET DELETE Elimina una presintonía guardada (solo se muestra si la fuente de audio es FM/AM*1). 12 DIMMER Ajusta el brillo de la pantalla del panel frontal (1*2: brillante, 2: medio, 3: tenue).
FUNCIONES ÚTILES Uso del temporizador para dormir Una vez transcurrido el tiempo especificado, el sistema se apagará automáticamente. Pulse SNOOZE/SLEEP varias veces para especificar el tiempo que transcurrirá hasta que el sistema se apague. Français Puede especificar 30, 60, 90, 120 o OFF minutos. Cuando selecciona un tiempo, el temporizador para dormir está activado y el indicador de temporización de apagado ( ) se muestra en la pantalla del panel frontal.
FUNCIONES ÚTILES Uso de la función de alarma La unidad incluye una función de alarma (IntelliAlarm) que reproduce fuentes de audio o un conjunto de sonidos (sonido de la alarma interna) a la hora programada mediante distintos métodos. La función de alarma incluye las siguientes prestaciones. 3 tipos de alarmas Seleccione entre 3 tipos de alarma, que combinan la música con el sonido de pitido.
FUNCIONES ÚTILES Configuración de la alarma Ajuste de la hora y del tipo de alarma (menú de opciones) English Si la unidad se encuentra en modo de ahorro de energía, la alarma no funcionará (☞ P. 14). Para utilizar la alarma, configure el elemento del menú de opciones POWER SAVING en NORMAL. 1 Pulse OPTION. 2 3 2 Pulse / para seleccionar “ALARM SET” y, a continuación, pulse ENTER. El indicador de alarma ( parpadearán.
FUNCIONES ÚTILES 4 Finalice la configuración. 4 Hora de alarma 9:12 Completed! Indicador de alarma Al configurar el valor VOLUME para el elemento 5, la pantalla indicará “Completed!” y la configuración se confirmará. La alarma se activará y el indicador de alarma ( ) se iluminará. Si pulsa OPTION o desactiva el sistema durante la configuración de la alarma, esta se cancelará. Activación/desactivación de la alarma Pulse ALARM para encender o apagar la alarma.
RESOLUCIÓN DE PROBLEMAS General Problema Los altavoces no suenan. Causa Solución Ajuste el nivel del volumen. Es posible que la fuente no sea la correcta. Seleccione la fuente correcta. Es posible que los altavoces no estén conectados correctamente. Revise las conexiones (☞ P. 2). Français Es posible que el volumen esté ajustado al mínimo o silenciado. Desconecte los auriculares. El volumen de un dispositivo externo conectado no es lo suficientemente alto.
RESOLUCIÓN DE PROBLEMAS iPod Problema No hay sonido. El iPod no se carga. Causa Solución El iPod no está bien colocado en la base para iPod. Retire el iPod de la unidad y, a continuación, vuelva a colocarlo en la base para iPod (☞ P. 3). Los auriculares del iPod están conectados. Desconecte los auriculares. No se ha actualizado la versión de software del iPod. Descargue la versión de iTunes más reciente para actualizar la versión de software del iPod a la más reciente.
RESOLUCIÓN DE PROBLEMAS Reproducción de un dispositivo USB Problema Causa El dispositivo USB no contiene archivos reproducibles. Utilice un dispositivo USB que contenga archivos reproducibles (☞ P. 22). El dispositivo USB que se ha conectado a la unidad no es compatible. O bien, el dispositivo USB no está bien conectado a la unidad. Apague el sistema y vuelva a conectar el dispositivo USB a la unidad.
NOTAS SOBRE LOS DISCOS Y LOS DISPOSITIVOS USB Información del disco compacto Esta unidad está diseñada para CD, CD-R* y CD-RW* de audio con los siguientes logotipos. * CD-R/RW formato ISO 9660 Esta unidad puede reproducir discos que lleven cualquiera de las marcas de logotipos anteriores. La marca del logotipo del disco se imprime en el disco y en la carátula. • No cargue ningún otro tipo de disco en esta unidad. Podría dañarla. • CD-R/RW no puede reproducirse hasta que no finalice.
ESPECIFICACIONES SECCIÓN DEL TUNER iPod (conexión digital) Margen de sintonía [Hasta julio de 2012] • Modelos de iPod compatibles ...................................................iPod touch (1ª, 2ª, 3ª y 4ª generación) • FM ................................................................ De 87,50 a 108,00 MHz • AM (solo para el modelo EE.UU.) .......................
© 2012 Yamaha Corporation Printed in Malaysia ZD94890-1