English Français Español Micro Component System Micro-Chaîne OWNER’S MANUAL MODE D’EMPLOI MANUAL DE INSTRUCCIONES ULV
IMPORTANT SAFETY INSTRUCTIONS 1 Read these instructions. 2 Keep these instructions. CAUTION RISK OF ELECTRIC SHOCK DO NOT OPEN CAUTION: TO REDUCE THE RISK OF ELECTRIC SHOCK, DO NOT REMOVE COVER (OR BACK). NO USER-SERVICEABLE PARTS INSIDE. REFER SERVICING TO QUALIFIED SERVICE PERSONNEL.
FCC INFORMATION (for US customers) 1 IMPORTANT NOTICE: DO NOT MODIFY THIS UNIT! This product, when installed as indicated in the instructions contained in this manual, meets FCC requirements. Modifications not expressly approved by Yamaha may void your authority, granted by the FCC, to use the product. 2 IMPORTANT: When connecting this product to accessories and/or another product use only high quality shielded cables. Cable/s supplied with this product MUST be used. Follow all installation instructions.
CAUTION: READ THIS BEFORE OPERATING YOUR UNIT. 1 To assure the finest performance, please read this manual carefully. Keep it in a safe place for future reference. 2 Install this unit in a well ventilated, cool, dry, clean place away from direct sunlight, heat sources, vibration, dust, moisture and cold. For proper ventilation, allow the following minimum clearances.
CONTENTS LISTENING TO FM/AM STATIONS........................11 Top panel/Front panel ....................................................2 Front panel display.........................................................2 Remote control...............................................................3 Selecting an FM/AM station .........................................11 Presetting FM/AM stations (remote control only) .........12 Selecting preset FM/AM stations .................................13 CONNECTIONS ..
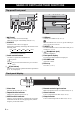
NAMES OF PARTS AND THEIR FUNCTIONS Top panel/Front panel 1 (Power) 5 USB port Press to turn the unit on/off (standby). There are two types of the standby state (☞ P. 5). Connect your USB device (☞ P. 5, 8). When the USB device is not in use, put the USB cap in place to protect the connector. 2 SOURCE Switch the audio source to be played. Pressing this repeatedly will change the selection in the following order.
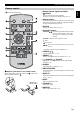
NAMES OF PARTS AND THEIR FUNCTIONS Remote control 1 Remote control signal transmitter English 2 (Power) Press to turn the unit on/off (standby). There are two types of the standby state (☞ P. 5). 3 Source buttons Switch the audio source to be played. If you press one of these while the unit is in standby (except ECO standby), the unit will automatically turn on. 4 OPTION Display the option menu (☞ P. 14).
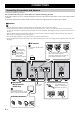
CONNECTIONS Connecting the speakers and antenna Connect the speakers and antenna. Do not connect this unit’s power cable until you’ve finished connecting all cables. If the radio reception is poor, try changing the height or direction or placement of the antenna to find a location that has better reception. If you use a commercially available outdoor antenna instead of the supplied antenna, reception may be better.
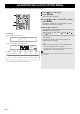
CONNECTIONS Connecting the power cable Rear panel To AC outlet Other connections USB device Connect your USB device to the USB port on the top panel. For details on playable files, refer to “NOTES ON DISCS AND USB DEVICES” (☞ P. 21). The USB device is automatically charged when this unit is connected to the AC outlet. • Stop playback before disconnecting the USB device. • Charging may not be possible depending on the USB device. External devices Using a commercially available 3.
ADJUSTING THE CLOCK (OPTION MENU) You’ll use the option menu (☞ P. 14) to set this unit’s date and time. 1 Press to turn the unit on. 2 Press OPTION. 1 The option menu will appear. 3 Press S / T to select “CLOCK SET,” and then press ENTER. 2 3 The display will indicate “CLOCK YEAR,” and the numerical value to be set will blink. 4 4 Set the date and time. Press ▲/▼ to edit each numerical value, and then press ENTER to confirm the setting. Set the items in the order of year month day hour minute.
LISTENING TO CD AND USB DEVICES − Audio CD: Play from the first track of the CD. − Data CD*/USB device: Play from the first track of the folder contains the track you listened to last time. • This unit automatically turns off if no operation has been performed for 20 minutes after CD/USB device playback is stopped. * “Data CD” is a CD that contains MP3/WMA files. For details on playable discs and files, refer to “NOTES ON DISCS AND USB DEVICES” (☞ P. 21).
LISTENING TO CD AND USB DEVICES Listening to a USB device 1 Press the USB source button to switch the audio source to USB. 1 If a USB device is already connected, playback will start. 2 Connect a USB device to the USB port. Playback starts automatically. Playback can be controlled with either the remote control, or the top panel on this unit (☞ P. 2, 3). 2 Folders and files will play in the order in which they were written. Stop playback before disconnecting the USB device.
LISTENING TO MUSIC FROM YOUR Bluetooth DEVICE This unit provides Bluetooth functionality. You can enjoy wireless music playback from your Bluetooth device (mobile phone, digital audio player, etc.). Please also refer to the owner’s manual of your Bluetooth device. You’ll need to perform the pairing operation the first time you use your Bluetooth device with this unit, or if the pairing settings have been deleted. Pairing is an operation that registers the Bluetooth device with this unit.
LISTENING TO MUSIC FROM YOUR Bluetooth DEVICE Connecting an already-paired device via Bluetooth Once pairing has been completed, connecting a Bluetooth will be easy the next time. Connecting from this unit Press the BLUETOOTH source button to switch the audio source to Bluetooth.
LISTENING TO FM/AM STATIONS AM radio is available only for North America model. English Selecting an FM/AM station To listen to the FM/AM station, connect the antenna as described in “Connecting the speakers and antenna” (☞ P. 4). 1 Press the RADIO source button to switch the audio source to FM or AM. 2 Tune FM/AM stations 1 2 Automatic tuning: Press and hold TUNING / . Manual tuning: Press TUNING / repeatedly. If you tune to a station manually while receiving FM, the sound will be monaural.
LISTENING TO FM/AM STATIONS Presetting FM/AM stations (remote control only) Use the preset function to store your favorite 30 stations. First, press the RADIO source button to switch the audio source to FM or AM. Auto preset This method tunes automatically, and automatically presets only the stations that have good reception. 1 Press and hold down MEMORY. 1 2 “AUTO PRESET” will appear and “Press MEMORY” will blink. 2 Press MEMORY. Auto preset will begin.
LISTENING TO FM/AM STATIONS Selecting preset FM/AM stations 2 Press PRESET / to select the FM/AM station that you want to hear. 1 You can only select presets that have been stored. 2 LISTENING TO EXTERNAL SOURCES Rear panel 1 1 Using a commercially available 3.5 mm stereo mini-plug cable, connect your external device to the AUX jack on the rear panel of this unit. • Turn the unit off before connecting the audio cable.
USEFUL FUNCTIONS Using the Option menu When you press OPTION, the option menu will appear in the front panel display, allowing you to make the following settings. (eject button) cannot be operated while the option menu is displayed. Option menu Setting or range See page PRESET DELETE Deletes a stored preset (shown only if the audio source is FM/AM*1). 12 DIMMER Adjusts the brightness of the front panel display (1*2: bright, 2: medium, 3: dim).
USEFUL FUNCTIONS Using the sleep timer When the specified time has elapsed, the unit will turn off automatically. You can specify 30, 60, 90, 120 or OFF. When you select a time, the sleep timer is turned on, and the sleep indicator ( ) is shown in the front panel display. If you press SNOOZE/SLEEP while the sleep timer is activated, the sleep timer setting will be canceled. Using the alarm function The internal sound (melody) and then the selected audio source are played at the time set for the alarm.
USEFUL FUNCTIONS Setting the alarm Setting the alarm time and alarm source (Option menu) The alarm will not function when the unit is in ECO standby. To use the alarm function, set the Option menu item POWER SAVING to NORMAL (☞ P. 14). 1 Press OPTION. The option menu will appear. 2 Press S / T to select “ALARM SET”, and then press ENTER. 1 The alarm indicator ( 2 3 ) and numerical value you’re setting will blink. 3 Set the alarm. Set items 1-3 described below.
USEFUL FUNCTIONS Switching the alarm on/off Press ALARM to turn the alarm on/off. If the Option menu item POWER SAVING is set to ECO, the alarm will not function (☞ P. 14). Operations while the alarm sound is playing When the set time arrives, the set alarm sound will play. During playback, the following operations are available. To pause the alarm (Snooze) Press SNOOZE/SLEEP. Snooze will stop the alarm and play it again 5 minutes later.
TROUBLESHOOTING If there is a problem with the unit, check the following list first. If you cannot resolve the problem with the suggested solutions or if the problem is not listed below, turn off and unplug the unit, and consult the nearest authorized Yamaha dealer or service center. General Problem The speakers make no sound. Cause The volume might be set to the minimum level, or muted. Solution Adjust the volume level. The source may be incorrect. Select the correct source.
TROUBLESHOOTING CD playback Playback does not start immediately after pressing (stops immediately). Cause Solution The disc set into the unit may not be compatible. Use a disc supported by the unit (☞ P. 21). The disc may be dirty. Wipe the disc clean (☞ P. 21). English Problem Some button operations do not work. The disc set into the unit may not be compatible. Use a disc supported by the unit (☞ P. 21).
TROUBLESHOOTING Bluetooth Problem Cannot make this unit paired with the Bluetooth device. Cause Solution The Bluetooth device does not support A2DP. Perform pairing operations with a device which supports A2DP. A Bluetooth adaptor, etc. that you want to pair with this unit has a password other than “0000”. Use a Bluetooth adaptor, etc. whose password is “0000”. This unit and the Bluetooth device are too far apart. Move the Bluetooth device closer to this unit.
NOTES ON DISCS AND USB DEVICES CD information * ISO 9660 format CD-R/RW This unit can play back discs bearing any of the logo marks above. A disc logo mark is printed on the disc and the disc jacket. • Do not set any other type of disc into this unit. Doing so may damage this unit. • CD-R/RW cannot be played back unless finalized. • Some discs cannot be played back depending on the disc characteristics or recording conditions. • Do not use any non-standard shaped discs such as a heart-shaped disc.
SPECIFICATIONS PLAYER SECTION TUNER SECTION CD Tuning range • Media ........................................................................... CD, CD-R/RW • Audio format .................................................. Audio CD, MP3, WMA • FM [North America model] ...................................... 87.50 to 107.90 MHz [Other models].................................................... 87.50 to 108.00 MHz USB • AM (North America model only)...............................
If there should be color blotching or noise when used near a TV, move this unit away from the TV when using it. Do not use this unit within 22 cm (9 inches) of persons with a heart pacemaker implant or defibrillator implant. English Radio waves may affect electro-medical devices. Do not use this unit near medical devices or inside medical facilities. The user shall not reverse engineer, decompile, alter, translate or disassemble the software used in this unit, whether in part or in whole.
PRÉCAUTIONS CONCERNANT LA SÉCURITÉ CAUTION RISK OF ELECTRIC SHOCK DO NOT OPEN ATTENTION: POUR RÉDUIRE LES RISQUES D’INCENDIE ET DE DÉCHARGE ELECTRIQUE, NE PAS RETIRER LE COUVERCLE (OU LE PANNEAU ARRIÈRE). AUCUNE PIÈCE INTERNE NE PEUT ÊTRE CHANGÉE PAR L’UTILISATEUR. POUR L’ENTRETIEN, S’ADRESSER À UN PERSONNEL QUALIFIÉ.
Informations de la FCC (Pour les clients résidents aux États-Unis) 1 AVIS IMPORTANT: NE PAS APPORTER DE MOFIDICATIONS À CET APPAREIL! Ce produit est conforme aux exigences de la FCC s’il est installé selon les instructions du mode d’emploi. Toute modification non approuvée expressément par Yamaha peut invalider l’autorisation, accordée par la FCC, d’utiliser ce produit.
ATTENTION: VEUILLEZ LIRE CE QUI SUIT AVANT D’UTILISER L’APPAREIL. 1 Pour utiliser l’appareil au mieux de ses possibilités, lisez attentivement ce mode d’emploi. Conservez-le soigneusement pour référence. 2 Installez cet appareil dans un endroit frais, bien aéré, sec et propre - à l’abri de la lumière du soleil, des sources de chaleur, des vibrations, des poussières, de l’humidité et du froid. Pour une aération correcte, tenez compte des distances minimales suivantes.
TABLE DES MATIÈRES NOMS ET FONCTIONS DES ÉLÉMENTS ...............2 ÉCOUTE DE STATIONS FM/AM ............................11 Panneau supérieur/panneau avant ................................2 Afficheur .........................................................................2 Télécommande ..............................................................3 Sélection d’une station FM/AM ....................................11 Présélection de stations FM/AM (télécommande uniquement) ................................
NOMS ET FONCTIONS DES ÉLÉMENTS Panneau supérieur/panneau avant 1 (Alimentation) 5 Port USB Appuyez sur cette touche pour mettre le système sous tension/hors tension (veille). Il existe deux types d’état de veille (☞ P. 5). Branchez votre dispositif USB (☞ P. 5, 8). Lorsque le dispositif USB n’est pas utilisé, mettez le capuchon USB pour protéger le connecteur. 2 SOURCE Change de source audio de lecture. Chaque pression sélectionne une source audio dans l’ordre suivant.
NOMS ET FONCTIONS DES ÉLÉMENTS Télécommande 1 Émetteur de télécommande 2 (Alimentation) Appuyez sur cette touche pour mettre le système sous tension/hors tension (veille). Il existe deux types d’état de veille (☞ P. 5). Change de source audio de lecture. Une pression sur une de ces touches quand l’appareil est en veille (à l’exception du mode de veille ECO) active automatiquement ce dernier. 4 OPTION Affiche le menu Option (☞ P. 14).
CONNEXIONS Connexion des haut-parleurs et de l’antenne Connectez les haut-parleurs et l’antenne. Ne connectez pas le cordon d’alimentation de l’appareil avant d’avoir effectué tous les branchements. Si la réception radio laisse à désirer, améliorez-la en changeant la hauteur, l’orientation ou l’emplacement de l’antenne. Si, au lieu de l’antenne fournie, vous utilisez une antenne extérieure disponible dans le commerce, la réception pourrait s’avérer meilleure.
CONNEXIONS Connexion du cordon d’alimentation Quand tous les raccordements sont terminés, branchez le cordon d’alimentation fourni sur AC IN, puis raccordez sa fiche à une prise secteur. Panneau arrière Français Vers la prise secteur Autres connexions Dispositif USB Branchez votre dispositif USB au port USB du panneau supérieur. Pour plus de détails sur les types de fichiers compatibles, lisez « REMARQUES SUR LES DISQUES ET DISPOSITIFS USB » (☞ P.21).
RÉGLAGE DE L’HORLOGE (MENU OPTION) Le menu Option (☞ P. 14) de cet appareil permet de régler la date et l’heure. 1 Appuyez sur tension. 1 pour mettre l’appareil sous 2 Appuyez sur OPTION. Le menu Option s’affiche. 3 Appuyez sur S / T pour sélectionner « CLOCK SET », puis appuyez sur ENTER. 2 3 « CLOCK YEAR » apparaît sur l’afficheur et la valeur numérique à ajuster clignote. 4 4 Réglez la date et l’heure.
ÉCOUTE D’UN CD ET DE DISPOSITIFS USB Cette section décrit le fonctionnement de l’appareil pour la lecture de plages/fichiers sur CD/dispositifs USB. • Quand vous arrêtez puis relancez la lecture du CD/dispositif USB, la lecture reprend à partir du début de la dernière plage lue. • Si vous appuyez sur quand la lecture est à l’arrêt, l’appareil lit les plages comme suit la prochaine fois que vous lancez la lecture : − CD audio : depuis la première plage du CD.
ÉCOUTE D’UN CD ET DE DISPOSITIFS USB Écoute d’un dispositif USB 1 Appuyez sur la touche de sélection de source USB pour choisir USB comme source audio. 1 Si un dispositif USB est déjà connecté, la lecture démarre. 2 Branchez un dispositif USB au port USB. La lecture commence automatiquement. Vous pouvez piloter la lecture avec la télécommande ou le panneau supérieur de l’appareil (☞ P. 2, 3). 2 Les dossiers et fichiers sont lus selon l’ordre dans lequel ils ont été créés.
ÉCOUTE DE MUSIQUE D’UN DISPOSITIF Bluetooth Cet appareil bénéficie de la technologie Bluetooth. Cette fonction vous permet d’écouter un dispositif Bluetooth (téléphone portable, lecteur audio numérique, etc.) sans fil. Lisez également les instructions de la notice accompagnant votre dispositif Bluetooth. Lecture du votre dispositif Bluetooth Yamaha ne garantit pas toutes les connexions entre cet appareil et un dispositif Bluetooth. • Cet appareil peut être couplé avec 8 dispositifs Bluetooth maximum.
ÉCOUTE DE MUSIQUE D’UN DISPOSITIF Bluetooth Connexion d’un dispositif déjà couplé via Bluetooth Une fois effectué, le couplage initial facilite les connexions Bluetooth ultérieures avec le dispositif en question. Connexion depuis cet appareil Appuyez sur la touche de sélection de source BLUETOOTH pour choisir Bluetooth comme source audio.
ÉCOUTE DE STATIONS FM/AM La radio AM est uniquement disponible sur le modèle pour l’Amérique du Nord. Sélection d’une station FM/AM Pour écouter la station FM/AM, vous devez brancher l’antenne comme décrit sous « Connexion des haut-parleurs et de l’antenne » (☞ P. 4). 2 Choisissez la station FM/AM voulue. 1 2 Syntonisation automatique : appuyez et maintenez TUNING / enfoncée. Syntonisation manuelle : appuyez plusieurs fois sur TUNING / .
ÉCOUTE DE STATIONS FM/AM Présélection de stations FM/AM (télécommande uniquement) La fonction de présélection vous permet de mémoriser vos 30 stations préférées. Appuyez d’abord sur la touche de sélection de source RADIO pour choisir FM ou AM comme source audio. Présélection automatique Cette méthode accorde et mémorise automatiquement uniquement les stations dont le signal est assez puissant. 1 Appuyez et maintenez MEMORY enfoncée. 1 2 « AUTO PRESET » s’affiche et « Press MEMORY » clignote.
ÉCOUTE DE STATIONS FM/AM Sélection de stations FM/AM mémorisées 1 Appuyez sur la touche de sélection de source RADIO pour choisir FM ou AM comme source audio. 1 Français 2 Appuyez sur PRESET / pour choisir la station FM/AM que vous voulez écouter. Vous pouvez uniquement choisir des stations qui ont été mémorisées.
FONCTIONS UTILES Utilisation du menu Option Quand vous appuyez sur OPTION, le menu Option apparaît sur l’afficheur. Il permet d’effectuer les réglages suivants. (touche d’éjection) n’est pas disponible quand le menu Option est affiché. Menu Option Réglage ou plage Voyez page PRESET DELETE Efface une station mémorisée (apparaît uniquement si FM/AM*1 est sélectionné comme source audio). 12 DIMMER Règle la luminosité de l’afficheur (1*2 : lumineux, 2 : moyen, 3 : faible).
FONCTIONS UTILES Utilisation de la minuterie L’appareil est mis automatiquement hors tension après l’écoulement de la durée définie. Appuyez plusieurs fois de suite sur SNOOZE/ SLEEP pour régler le délai avant la mise hors tension de l’appareil. Si vous appuyez sur SNOOZE/SLEEP quand la minuterie est active, le réglage de minuterie est annulé. Utilisation de la fonction d’alarme Le son interne (mélodie), puis la source audio sélectionnée, sont reproduits à l’heure de réveil programmée.
FONCTIONS UTILES Réglage de l’alarme Réglage de l’heure et de la source d’alarme (menu Option) Quand l’appareil est en mode de veille ECO, l’alarme ne fonctionne pas. Pour utiliser l’alarme, réglez le paramètre POWER SAVING du menu Option sur NORMAL (☞ P. 14). 1 Appuyez sur OPTION. Le menu Option s’affiche. 2 Appuyez sur S / T pour sélectionner « ALARM SET », puis appuyez sur ENTER. 1 2 3 L’indicateur d’alarme ( clignoter. ) et la valeur numérique à régler se mettent à 3 Réglez l’alarme.
FONCTIONS UTILES Activation/Désactivation de l’alarme Appuyez sur ALARM pour activer/désactiver l’alarme. ) Si l’option POWER SAVING du menu Option est réglée sur ECO, l’alarme ne fonctionnera pas (☞ P. 14). Opérations disponibles quand l’alarme retentit Quand l’heure programmée arrive, le son d’alarme défini retentit. Les opérations suivantes sont disponibles pendant la lecture. Interrompre momentanément l’alarme (Snooze) Appuyez sur SNOOZE/SLEEP.
GUIDE DE DÉPANNAGE Si cet appareil ne semble pas fonctionner normalement, vérifiez les points de la liste suivante. Si l’anomalie constatée n’est pas mentionnée, ou bien si les mesures suggérées sont sans effet, mettez l’appareil hors tension, débranchez le cordon d’alimentation et adressez-vous au revendeur ou service après-vente Yamaha le plus proche. Généralités Anomalies Les haut-parleurs n’émettent aucun son. Le son est subitement coupé.
GUIDE DE DÉPANNAGE Lecture de CD Anomalies Certaines touches ne fonctionnent pas. Solution Utilisez un disque pris en charge par l’appareil (☞ P. 21). Il se peut que le disque soit sale. Essuyez le disque (☞ P. 21). Il se peut que le disque posé dans l’appareil ne soit pas compatible. Utilisez un disque pris en charge par l’appareil (☞ P. 21). Si l’appareil a été déplacé d’un endroit froid à un endroit chaud, de la condensation a pu se former sur la lentille de lecture de disque.
GUIDE DE DÉPANNAGE Bluetooth Anomalies Impossible de coupler cet appareil avec le dispositif Bluetooth. Impossible d’établir une connexion Bluetooth. Absence de son ou coupure de son pendant la lecture. Causes possibles Solution Le dispositif Bluetooth ne prend pas en charge A2DP. Effectuez le couplage avec un dispositif prenant en charge A2DP. Un adaptateur Bluetooth, etc. que vous tentez de coupler à cet appareil a un mot de passe autre que « 0000 ». Utilisez un adaptateur Bluetooth, etc.
REMARQUES SUR LES DISQUES ET DISPOSITIFS USB Informations sur les CD Cet appareil est conçu pour lire des CD audio, CD-R*, et CD-RW* comportant les logos suivants. De façon générale, cet appareil est capable de lire les disques portant les logos ci-dessus. Les logos sont imprimés sur les disques et sur leur pochette. • Ne posez pas d’autres types de disques dans cet appareil. Vous risqueriez sinon de l’endommager. • Les CD-R/RW ne peuvent être lus que s’ils ont été clôturés.
CARACTÉRISTIQUES TECHNIQUES SECTION LECTEUR SECTION RADIO CD Plage de syntonisation • Supports ....................................................................... CD, CD-R/RW • FM [Modèle pour l’Amérique du Nord] .................... 87,50 à 107,90 MHz [Autres modèles] ................................................. 87,50 à 108,00 MHz • Format audio ................................................... CD audio, MP3, WMA USB • Format audio .....................................................
En cas de déformation des couleurs ou de bruit lorsque cet appareil est utilisé près d’un téléviseur, éloignez l’appareil du téléviseur. Ne pas utiliser cet appareil à moins de 22 cm de personnes ayant un stimulateur cardiaque ou un défibrillateur. Français Les ondes radio peuvent avoir une incidence sur les équipements électroniques médicaux. N’utilisez pas cet appareil à proximité d’équipements médicaux ou à l’intérieur d’institutions médicales.
PRECAUCIONES DE SEGURIDAD IMPORTANTES CAUTION RISK OF ELECTRIC SHOCK DO NOT OPEN PRECAUCIÓN: PARA REDUCIR EL RIESGO DE DESCARGA ELECTRICA, NO QUITE LA CUBIERTA. EL USUARIO NO DEBERA DAR NINGUN TIPO DE SERVICIO A NINGUNA PARTE INTERNA. DEBERA SER REALIZADO SOLO POR PERSONAL DE SERVICIO CALIFICADO.
Información de la Comisión Federal de las Comunicaciones (FCC) (para los consumidores de EE. UU.) 1 AVISO IMPORTANTE: ¡NO MODIFIQUE ESTA UNIDAD! Este producto, cuando se instale según se indica en las instrucciones que contiene este manual, satisface los requisitos de la FCC. Las modificaciones no aprobadas expresamente por Yamaha podrían invalidar la autoridad del usuario, concedida por la FCC, para usar el producto.
PRECAUCIÓN: LEA LAS INDICACIONES SIGUIENTES ANTES DE UTILIZAR ESTE APARATO. 1 Para asegurar el mejor rendimiento de este aparato, lea atentamente este manual. Y luego guárdelo en un lugar seguro para poder consultarlo en el futuro en caso de ser necesario. 2 Instale esta unidad en un lugar bien ventilado, fresco, seco y limpio, alejado de la luz directa del sol, fuentes de calor, vibración, polvo, humedad y frío.
CONTENIDO NOMBRES DE LAS PARTES Y SUS FUNCIONES..............................................................2 Panel superior/Panel frontal...........................................2 Pantalla del panel frontal................................................2 Mando a distancia ..........................................................3 CONEXIONES ...........................................................4 Conexión de los altavoces y la antena...........................
NOMBRES DE LAS PARTES Y SUS FUNCIONES Panel superior/Panel frontal 1 (Alimentación) 5 Puerto USB Pulse este botón para encender o apagar la unidad (modo de espera). Hay dos tipos de estados de espera (☞ P. 5). Conecte su dispositivo USB (☞ P. 5, 8). Cuando no utilice el dispositivo USB, coloque la tapa del puerto USB en su lugar para proteger el conector. 2 SOURCE Cambie la fuente de audio que va a reproducir. Si pulsa varias veces cambiará la selección en el orden siguiente.
NOMBRES DE LAS PARTES Y SUS FUNCIONES Mando a distancia 1 Transmisor de señales del mando a distancia 2 (Alimentación) Pulse este botón para encender o apagar la unidad (modo de espera). Hay dos tipos de estados de espera (☞ P. 5). 3 Botones de fuente 4 OPTION Muestra el menú de opciones (☞ P. 14). 5 Botones de operaciones FOLDER S/T: Cambie de carpeta de reproducción y seleccione elementos o edite valores numéricos al reproducir música de CD de datos o dispositivos USB.
CONEXIONES Conexión de los altavoces y la antena Conecte los altavoces y la antena. No conecte el cable de alimentación de esta unidad hasta que haya terminado de conectar todos los cables. Si la recepción de radio es deficiente, pruebe a cambiar la altura, la dirección o la colocación de la antena para encontrar una ubicación que proporcione una mejor recepción. Si utiliza una antena exterior de venta en tiendas en lugar de la antena incluida, la recepción puede ser mejor.
CONEXIONES Conexión del cable de alimentación Una vez finalizadas todas las conexiones, conecte el cable de alimentación suministrado a la toma AC IN y conecte el conector del cable a una toma de CA. Panel posterior A la toma de CA Otras conexiones Conecte el dispositivo USB al puerto USB en el panel superior. Para obtener información sobre los archivos reproducibles, consulte “NOTAS SOBRE LOS DISCOS Y LOS DISPOSITIVOS USB” (☞ P.21).
AJUSTE DEL RELOJ (MENÚ DE OPCIONES) Debe utilizar el menú de opciones (☞ P. 14) para establecer la fecha y hora de esta unidad. 1 Pulse para encender la unidad. 2 Pulse OPTION. 1 Aparecerá el menú de opciones. 3 Pulse S / T para seleccionar “CLOCK SET” y, a continuación, pulse ENTER. 2 3 La pantalla indicará “CLOCK YEAR” y el valor numérico que se va a configurar parpadeará. 4 4 Ajuste la fecha y la hora.
ESCUCHAR CD Y DISPOSITIVOS USB La unidad funcionará del siguiente modo al reproducir pistas o archivos de CD/dispositivos de USB. • Si se detiene el CD/dispositivo de USB que se está reproduciendo, la pista que estaba escuchando empezará a reproducirse desde el principio la próxima vez que la reproduzca. • Si pulsa con la reproducción detenida, las pistas se reproducirán de la siguiente forma la próxima vez que se inicie la reproducción: − CD de audio: desde la primera pista del CD.
ESCUCHAR CD Y DISPOSITIVOS USB Escuchar un dispositivo USB 1 Pulse el botón de fuente USB para cambiar la fuente de audio a USB. 1 Si ya hay un dispositivo USB conectado, se iniciará la reproducción. 2 Conecte un dispositivo USB al puerto USB. La reproducción empezará automáticamente. La reproducción puede controlarse con el mando a distancia o el panel superior de esta unidad (☞ P. 2, 3). 2 Las carpetas y archivos se reproducirán en el orden en que se grabaron.
ESCUCHAR MÚSICA DEL DISPOSITIVO Bluetooth Esta unidad ofrece la funcionalidad de Bluetooth. Puede disfrutar de la reproducción de música inalámbrica de su dispositivo Bluetooth (teléfono móvil, reproductor de audio digital, etc.). Consulte también el manual de instrucciones de su dispositivo Bluetooth.
ESCUCHAR MÚSICA DEL DISPOSITIVO Bluetooth Conexión de un dispositivo ya vinculado por Bluetooth Una vez finalizada la vinculación, la conexión de un componente Bluetooth resultará sencilla a partir de entonces. Conexión desde esta unidad Pulse el botón de fuente BLUETOOTH para seleccionar Bluetooth como fuente de audio.
ESCUCHAR EMISORAS DE FM/AM La radio AM solo está disponible para el modelo de Norteamérica. Selección de una emisora FM/AM Para escuchar la emisora FM/AM, conecte la antena como se describe en “Conexión de los altavoces y la antena” (☞ P. 4). 1 Pulse el botón de fuente RADIO para cambiar la fuente de audio a FM o AM. 2 Sintonice las emisoras FM/AM. Español 1 Sintonización automática: mantenga pulsado TUNING / . Sintonización manual: pulse TUNING / varias veces.
ESCUCHAR EMISORAS DE FM/AM Presintonización de emisoras FM/AM (solo con el mando a distancia) Use la función de presintonización para guardar sus 30 emisoras favoritas. En primer lugar, pulse el botón de fuente RADIO para cambiar la fuente de audio a FM o AM. Presintonización automática Este método permite sintonizar y presintonizar de forma automática únicamente las emisoras con buena recepción. 1 Mantenga pulsado MEMORY. 1 2 “AUTO PRESET” aparecerá y “Press MEMORY” parpadeará. 2 Pulse MEMORY.
ESCUCHAR EMISORAS DE FM/AM Selección de emisoras FM/AM presintonizadas 1 Pulse el botón de fuente RADIO para cambiar la fuente de audio a FM o AM. 2 Pulse PRESET / para seleccionar la emisora FM/AM que desee escuchar. 1 Solo puede seleccionar presintonías que haya guardado. Español 2 ESCUCHAR UNA FUENTE EXTERNA Panel posterior 1 Con un cable con miniconector estéreo de 3,5 mm de venta en tiendas, conecte el dispositivo externo al conector AUX en la parte posterior de esta unidad.
FUNCIONES ÚTILES Uso del menú de opciones Al pulsar OPTION aparecerá el menú de opciones en la pantalla del panel frontal, que le permite realizar los ajustes siguientes. (botón de expulsión) no se puede utilizar cuando se muestra el menú de opciones. Menú de opciones Consult e la página Ajuste o rango PRESET DELETE Elimina una presintonía guardada (solo se muestra si la fuente de audio es FM/AM*1). 12 DIMMER – Ajusta el brillo de la pantalla del panel frontal (1*2: brillante, 2: medio, 3: tenue).
FUNCIONES ÚTILES Uso del temporizador de apagado Una vez transcurrido el tiempo especificado, la unidad se apagará automáticamente. Pulse SNOOZE/SLEEP varias veces para especificar el tiempo que debe transcurrir hasta que la unidad se apague. Puede especificar 30, 60, 90, 120 u OFF. Cuando selecciona un tiempo, el temporizador de apagado se activa y el indicador de temporización de apagado ( ) se muestra en la pantalla del panel frontal.
FUNCIONES ÚTILES Configuración de la alarma Ajuste de la hora y de la fuente de alarma (menú de opciones) Si la unidad se encuentra en el modo de espera ECO, la alarma no funcionará. Para utilizar la función de alarma, configure el elemento del menú de opciones POWER SAVING en NORMAL (☞ P. 14). 1 Pulse OPTION. Aparecerá el menú de opciones. 2 Pulse S / T para seleccionar “ALARM SET” y, a continuación, pulse ENTER. 1 2 3 El indicador de alarma ( parpadearán.
FUNCIONES ÚTILES Activación/desactivación de la alarma Pulse ALARM para encender o apagar la alarma. Cuando la alarma está activada, el indicador de alarma ( ) se iluminará y la hora de alarma se mostrará. Si pulsa ALARM de nuevo, se desactivarán el indicador de alarma ( ) y la alarma. Si el elemento del menú de opciones POWER SAVING está establecido en ECO, la alarma no funcionará (☞ P. 14). A la hora programada, se reproducirá el sonido de alarma definido.
RESOLUCIÓN DE PROBLEMAS Si tiene algún problema con la unidad, compruebe primero la siguiente lista. Si no puede solucionar su problema con las siguientes soluciones o si el problema no está en la lista, apague y desenchufe la unidad y, a continuación, consulte al distribuidor o centro de servicio Yamaha autorizado más cercano. General Problema Los altavoces no emiten ningún sonido. Causa Solución Es posible que el volumen esté ajustado al mínimo o silenciado. Ajuste el nivel del volumen.
RESOLUCIÓN DE PROBLEMAS Reproducción de CD Problema Algunas operaciones que se realizan con los botones no funcionan. La reproducción no empieza inmediatamente tras pulsar (se detiene inmediatamente). Causa Es posible que el disco introducido en la unidad no sea compatible. Solución Utilice un disco compatible con la unidad (☞ P. 21). Limpie el disco (☞ P. 21). Utilice un disco compatible con la unidad (☞ P. 21).
RESOLUCIÓN DE PROBLEMAS Bluetooth Problema Esta unidad no puede vincularse con el dispositivo Bluetooth. No se puede establecer una conexión Bluetooth. Durante la reproducción no se produce sonido o éste se interrumpe. Causa Solución El dispositivo Bluetooth no es compatible con A2DP. Realice las operaciones de vinculación con un dispositivo compatible con A2DP. El adaptador Bluetooth, etc. que desea vincular con esta unidad tiene una contraseña que no es “0000”.
NOTAS SOBRE LOS DISCOS Y LOS DISPOSITIVOS USB Información sobre CD Esta unidad está diseñada para CD, CD-R* y CD-RW* de audio con los siguientes logotipos. * CD-R/RW formato ISO 9660 • No cargue ningún otro tipo de disco en esta unidad. Podría dañarla. • Los CD-R/RW no pueden reproducirse si no están finalizados. • Algunos discos no se pueden reproducir debido a las características del disco o a las condiciones de grabación. • No utilice discos con formas extrañas, como por ejemplo, en forma de corazón.
ESPECIFICACIONES SECCIÓN DEL REPRODUCTOR SECCIÓN DEL SINTONIZADOR CD Margen de sintonía • Multimedia ................................................................... CD, CD-R/RW • Formato de audio ....................................... CD de audio, MP3, WMA • FM [Modelo para Norteamérica] .........................De 87,50 a 107,90 MHz [Otros modelos] .............................................De 87,50 a 108,00 MHz USB • AM (solo para el modelo de Norteamérica) .........
Si se producen manchas de color o ruido cuando se utiliza cerca de un televisor, aleje esta unidad del televisor cuando la utilice. No utilice esta unidad a menos de 22 cm de personas que tengan implantado un marcapasos o un desfibrilador. Las ondas de radio pueden afectar a los dispositivos médicos electrónicos. No utilice esta unidad cerca de dispositivos médicos o en el interior de instalaciones médicas.
The laser component in this product is capable of emitting radiation exceeding the limit for Class 1. LASER RADIATION WHEN OPEN CAUTION : INVISIBLE DO NOT STARE INTO BEAM Le laser de cet appareil peut émettre un rayonnement dépassant les limites de la classe 1. DANGER : INVISIBLE LASER RADIATION WHEN OPEN AVOID DIRECT EXPOSURE TO THE BEAM El componente láser de este producto es capaz de emitir radiación que sobrepasa el límite establecido para la clase 1.
Printed in China MCR-B020/ULV