B RECEIVER/CD PLAYER OWNER'S MANUAL
CAUTION: READ THIS BEFORE OPERATING YOUR UNIT. 1 2 3 4 5 6 7 8 9 10 11 12 13 14 15 16 17 18 19 To assure the finest performance, please read this manual carefully. Keep it in a safe place for future reference. Install this unit (RX-E410 and CDX-E410) in a well ventilated, cool, dry, clean place with at least 10 cm on the top (except for CDX-E410), 10 cm on the left and right, and 10 cm at the back of this unit — away from direct sunlight, heat sources, vibration, dust, moisture, and/or cold.
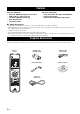
Contents OTHER OPERATIONS Features .................................................................. 2 Supplied Accessories ............................................. 2 Controls and Functions ......................................... 3 Setting the Timer.................................................. 32 Receiver (RX-E410) .................................................. 3 CD player (CDX-E410)............................................. 6 Remote control............................................
FEATURES Features Receiver (RX-E410) • Maximum RMS output power per channel 65W + 65W (1% THD, 1 kHz, 6Ω) • 40-station FM/AM preset tuning • iPod dock terminal • Pure Direct mode CD player (CDX-E410) • Plays Audio CDs, MP3 CDs, and WMA CDs. • CD Text data display • Optical and coaxial digital output jacks ■ About this manual • In this manual, “RX-E410” is described as “receiver” and “CDX-E410” is described as “CD player”.
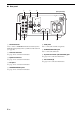
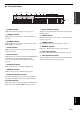
Controls and Functions INTRODUCTION Receiver (RX-E410) ■ Front panel 1 2 3 45 6 7 8 9 NATURAL SOUND STEREO RECEIVER RX-E410 PURE DIRECT DISPLAY TIMER MEMORY AUTO/MAN'L TIME ADJ TIMER PRESET/BAND PRESET/TUNING VOLUME BASS STANDBY/ON TREBLE HOUR MIN INPUT BALANCE PHONES L R MIN 0 A B C 1 STANDBY/ON Turns the receiver on or sets it to the standby mode. 2 Remote control sensor Receives signals from the remote control.
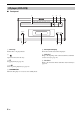
Controls and Functions ■ Rear panel 1 2 3 ANTENNA 75 UNBAL. SPEAKERS (Europe model) MAINS 6 MIN / SPEAKER DOCK FM CD AC OUTLETS SWITCHED R L GND IN OUT TAPE/MD AM SUBWOOFER OUT TO CDX-E410 AUX R 4 5 100W MAX. TOTAL L 6 1 DOCK terminal Use to connect a YAMAHA iPod universal dock (such as YDS-10 sold separately) where your iPod can be stationed (see page 16). 2 Antenna terminals See page 14 for connection information. 3 Speaker terminals See page 13 for connection information.
Controls and Functions ■ Front panel display 2 3 4 SLEEP PRESET STEREO AUTO TIMER TUNED MEMORY 5 6 7 8 INTRODUCTION 1 DOCK SHUFFLE REPEAT PS PTY RT CT PTY HOLD PLAYLISTS ARTISTS ALBUMS SONGS GENRES D 9 0 A B 1 SLEEP indicator Lights up when the sleep timer is on (see page 33). 2 PRESET indicator Lights up when you preset radio stations manually (see page 27). 3 STEREO indicator Lights up when the receiver is receiving a strong signal from an FM stereo broadcast.
Controls and Functions CD player (CDX-E410) ■ Front panel 1 2 NATURAL SOUND COMPACT DISC PLAYER 3 4 CDX-E410 STANDBY/ON 5 1 Disc tray Holds a disc to be played back. 2 Opens and closes the disc tray. 3 s Stops playback (see page 21). 4 h/e Starts or pauses playback (see page 21). 5 STANDBY/ON Turns the CD player on or sets it to the standby mode. 6 En 6 7 8 6 Front panel display Shows the current status of the CD player. 7 b/w Skips to the begining of the current track.
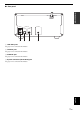
Controls and Functions ■ Rear panel INTRODUCTION MAINS LINE OUT DIGITAL OUT L OPTICAL COAXIAL 2 3 TO RX-E410 R 1 4 1 LINE OUT jacks See page 12 for connection information. 2 OPTICAL jack See page 15 for connection information. 3 COAXIAL jack See page 15 for connection information. 4 System connector (TO RX-E410) jack See page 12 for connection information.
Controls and Functions Remote control INPUT This remote control can operate the PianoCraft system components (including tuner functions) and an iPod stationed in a YAMAHA iPod universal dock connected to the receiver. To operate the CD player, tuner functions, or an iPod using the remote control, you need to set the receiver to the corresponding input mode.
Controls and Functions ■ CD mode Operations available in CD mode STANDBY/ON 1 1 2 3 4 5 6 7 8 9 0 y Press CD to set the receiver to the CD mode before carrying out the following operations. DIMMER 2 3 4 5 FREQ/TEXT PROG REPEAT MODE PTY SEEK START RANDOM TIME/INFO FOLDER/PRESET FILE /A-E ENTER INPUT 6 7 8 9 MENU FILE /A-E VOLUME DISPLAY SLEEP CD TUNER BAND TAPE/MD AUX/TV DOCK 0 1 Number keys (1 to 9, 0) Input numerals to specify track numbers.
Controls and Functions ■ TUNER mode Operations available in TUNER mode The following operations are available for the receiver. y Press TUNER to set the receiver to the TUNER mode before carrying out the following operations. STANDBY/ON 1 2 3 4 5 6 7 8 9 0 1 DIMMER 1 Number keys (1 to 8) Selects preset station number (see page 28).
Controls and Functions ■ Installing the batteries in the remote control ■ Using the remote control NATURAL SOUND STEREO RECEIVER RX-E410 PURE DIRECT DISPLAY TIMER MEMORY AUTO/MAN'L PRESET/BAND PRESET/TUNING VOLUME TIME ADJ BASS STANDBY/ON TIMER TREBLE HOUR MIN INPUT BALANCE PHONES Press Within 6 m (20 feet) L MIN 30˚ 1 Press the mark on the battery cover and open the cover. 2 Insert the two supplied batteries (AA, R06, UM-3) into the battery compartment.
CONNECTING THE SYSTEM Connecting the System Make sure you read the following procedure and notes carefully before connecting the system. For information on the speakers (NX-E800), refer to the owner’s manual supplied with it. Note Do not connect the power cable of the receiver, CD player, or other components to the wall outlet until all cable connections are completed. Right speaker (NX-E800) Left speaker (NX-E800) 3 3 MAINS ANTENNA 75 UNBAL.
Connecting the System ■ Connecting the speaker cable 4 Tighten the knob to secure the wire. Notes 1 Red: positive (+) Black: negative (–) PREPARATION • Be sure to connect the left channel (L), right channel (R), “+” (red) and “–” (black) properly. If the connections are faulty, no sound will be heard from the speakers, and if the polarity of the speaker connections is incorrect, the sound will be unnatural and lack bass.
CONNECTING ANTENNAS Connecting Antennas To enjoy radio on the receiver, connect the supplied AM and FM antennas to the designated terminals. If there is a problem of weak radio wave reception in your area or you want to improve radio reception, we recommend that you use optional outdoor antennas. For details, consult the nearest authorized YAMAHA dealer or service center. AM loop antenna (supplied) 3 Insert the AM loop antenna lead wires into the AM terminal. 4 Replace the tab back to secure the wire.
CONNECTING EXTERNAL COMPONENTS Connecting External Components You can connect various audio components, such as an MD player, a tape deck or a YAMAHA iPod universal dock to the receiver. Also you can connect an MD recorder or a CD recorder to the CD player using the DIGITAL OUT jacks. For information on your external component, refer to the owner’s manual supplied with each component.
Connecting External Components Connecting a YAMAHA iPod universal dock The receiver (RX-E410) is equipped with the DOCK terminal on the rear panel that allows you to connect a YAMAHA iPod universal dock (such as YDS-10 sold separately) where you can station your iPod and control playback of your iPod using the supplied remote control. Connect a YAMAHA iPod universal dock (such as YDS-10 sold separately) to the DOCK terminal on the rear of the receiver using its dedicated cables.
CONNECTING THE POWER CABLES Connecting the Power Cables Once all connections are complete, connect the power cable of the CD player to the AC OUTLET(S) terminal on the rear of the receiver (or the AC wall outlet if the AC OUTLET(S) terminal is not available), and then plug the power cable of the receiver into the AC wall outlet. MAINS ANTENNA 75 UNBAL.
ADJUSTING THE CLOCK Adjusting the Clock Before starting playback operation, follow the procedure below to adjust the clock setting of the receiver. 5 HOUR MIN DISPLAY NATURAL SOUND STEREO RECEIVER RX-E410 PURE DIRECT TIMER DISPLAY STANDBY/ON BASS MEMORY AUTO/MAN'L PRESET/BAND To set the minute setting ahead, press MIN repeatedly. To set the minute setting backward, press MIN repeatedly while holding down PRESET/BAND.
Basic Receiver Operations Basic Receiver Operations Follow the procedure below to select an input source and adjust the sound settings on the receiver. 3 Start playback on the selected source component or select a broadcast station. For information on the disc playback, see page 21, and for information on tuning, see page 26. 4 Press VOLUME +/– to adjust the volume to the desired output level. 5 Rotate BASS, TREBLE, or BALANCE on the front panel of the receiver to adjust the following settings.
Basic Receiver Operations Changing the front panel display settings Follow the procedure below to change the settings of the receiver’s front panel display. ■ To switch the display mode You can switch the information displayed in the receiver’s front panel display between the current input and clock. STANDBY/ON 1 2 3 5 6 7 4 Note 8 DIMMER 9 DIMMER 0 You cannot display the clock unless you adjust it (see page 18).
Basic Disc Playback Operations Basic Disc Playback Operations You can enjoy playback of audio CDs, MP3 CDs, and WMA CDs with the CD player. However, depending on a disc format, some discs may not be compatible with the CD player. Before loading a disc into the CD player, be sure to check the disc compatibility of the CD player (see page 42). To skip tracks Note Depending on the disc, some operations may be different or restricted. To skip to the start of the current track, press b.
Basic Disc Playback Operations Switching the playback information display You can switch the disc playback information shown in the CD player’s front panel display. Available information differs depending on a disc type. Press TIME/INFO repeatedly while playing back a disc. Each time you press the key, the information display STANDBY/ON changes as described in “Playback information for audio CDs” and “Playback information for MP3 and WMA discs”.
Basic Disc Playback Operations ■ Playback information for MP3 and WMA discs The following information is available during playback of an MP3 or WMA disc. 1 Scrolling display (Default) 9 Comment MP3 MP3 8 Year 2 Elapsed time of the current file MP3 MP3 7 Album name 3 Remaining time of the current file MP3 MP3 4 File name 6 Artist name MP3 MP3 5 Song title BASIC OPERATIONS MP3 y Scrolling display shows the song title, artist name, and album name of the selected item in sequence.
Basic Disc Playback Operations Repeating playback (Repeat Play) Playing back randomly (Random Play) You can repeat the playback of the selected item in a disc. You can play back tracks in the disc in random order. Note When playing back an audio CD with Random Play, the remaining time of the disc cannot be displayed.
Basic Disc Playback Operations Customizing playback order (Program Play) In case of MP3 or WMA disc PROG. You can customize the playback order for 40 tracks stored in the disc. Note The total number of programmed tracks and the total time of programmed tracks are not displayed for MP3 or WMA disc. STANDBY/ON y Number keys 1 2 3 4 5 6 7 8 9 0 The track number for an MP3 or WMA disc is recognized per disc, not per folder. The number assigned to each track corresponds to sequence of a disc.
FM/AM Tuning FM/AM Tuning There are 2 tuning methods: automatic and manual. Automatic tuning is effective when station signals are strong and there is no interference. If the signal from the station you want to select is weak, tune into it manually. You can also use the automatic and manual preset tuning features to store up to 40 stations (A1 to E8: 8 preset station numbers in each of the 5 preset station groups).
FM/AM Tuning Automatic preset tuning Manual preset tuning Follow the procedure below to preset radio stations automatically. You can also store up to 40 stations (A1 to E8: 8 preset station numbers in each of the 5 preset station groups) manually.
FM/AM Tuning Selecting preset stations You can tune into any desired station simply by selecting the preset station group and number under which it was stored (see page 27).
Radio Data System Tuning (U.K. and Europe Models Only) Radio Data System (U.K. and Europe models only) is a data transmission system used by FM stations in many countries. The Radio Data System function is carried out among the network stations. This unit can receive various Radio Data System data such as PS (program service), PTY (program type), RT (radio text), CT (clock time), and EON (enhanced other networks) when receiving Radio Data System broadcasting stations.
Radio Data System Tuning (U.K. and Europe Models Only) 4 Press PTY SEEK START to start searching for available Radio Data System preset stations. If a station broadcasting the selected program type is found, the receiver stops searching, and then program service name and the PTY HOLD indicator lights up in the front panel display. If there is no station broadcasting the selected program type, the frequency currently selected appears.
Radio Data System Tuning (U.K. and Europe Models Only) ■ Additional CT (clock time) settings You can use CT information received from the Radio Data System stations to adjust the built-in clock of the receiver. 3 Press PTY SEEK MODE repeatedly to select “CT→Clock” or “Local CT”, and then press PTY SEEK START to switch the setting between “ON” and “OFF”.
SETTING THE TIMER Setting the Timer The receiver is equipped with 2 types of timer functions: clock timer and sleep timer. The clock timer automatically turns the receiver on or sets it to the standby mode at the specified time. The sleep timer sets the receiver to the standby mode after the specified time elapses. The CD player also turns on or sets to the standby mode automatically by the system control connection (see page 12).
Setting the Timer Setting the sleep timer The sleep timer sets the receiver to the standby mode after the specified time elapses. FOLDER/PRESET FILE /A-E ENTER INPUT MENU FILE /A-E VOLUME DISPLAY SLEEP SLEEP CD TUNER BAND TAPE/MD AUX/TV DOCK Press SLEEP repeatedly to select the desired duration. Each time you press the key, the duration changes as follows. The SLEEP indicator lights up in the front panel display. SLEEP 120 min. SLEEP 90 min. SLEEP 60 min. SLEEP 30 min.
SETTING THE AUTO-STANDBY MODE Setting the auto-standby mode You can turn on/off the auto-standby feature which automatically set the system to the standby mode if you do not operate the system for 30 minutes while the receiver is set to the CD input mode. (The default setting is “AUTO STANDBY ON”.) Notes • Unless you connect the receiver and the CD player with the supplied system control cable properly (see page 12), this feature does not function for the system.
Controlling iPod In addition to controlling the receiver (RX-E410) and CD player (CDX-E410), you can operate your iPod stationed in a YAMAHA iPod universal dock connected to the receiver using the supplied remote control. Available iPod operations Operations available in DOCK mode The following operations are available for the iPod connected with a YAMAHA iPod universal dock (such as YDS-10 sold separately). For details on iPod operations, see “Using iPod” on page 36.
Controlling iPod Using iPod Once you have stationed your iPod in a YAMAHA iPod universal dock (such as YDS-10 sold separately) connected to the DOCK terminal of the receiver (see page 16), you can enjoy playback of your iPod using the supplied remote control. The operations of your iPod are available with the aid of the receiver’s front panel display (menu browse mode) or without it (simple remote mode). Notes • Only iPod (Click and Wheel), iPod nano, and iPod mini are supported.
Controlling iPod ■ Menu browse mode In the menu browse mode, you can operate the iPod menu using the receiver’s front panel display. Also you can configure the “Setup” parameters with the menu browse mode. 2 Note Press or to select the menu, and then press or ENTER to enter the selected menu. The name of the first item stored in the selected menu appears. There are some characters that cannot be displayed in the front panel display of the receiver. Those characters are replaced with underscore “_”.
TROUBLESHOOTING Troubleshooting Refer to the table below when this unit does not function properly. If the problem you are experiencing is not listed below or if the instruction below does not help, turn off this unit, disconnect the power cable, and contact the nearest authorized YAMAHA dealer or service center. Receiver (RX-E410) ■ General Problem Cause Remedy See page The receiver fails to turn on or enters the standby mode soon after the power is turned on.
Troubleshooting ■ Tuner Problem FM stereo reception is noisy. FM AM Cause The characteristics of FM stereo broadcasts may cause this problem when the transmitter is too far away or the antenna input is poor. Remedy See page Check the antenna connections. 14 Try using a high-quality directional FM antenna. — Use the manual tuning method. 26 There is distortion, and clear reception cannot be obtained even with a good FM antenna. There is multi-path interference.
Troubleshooting ■ iPod Note In case of a transmission error without a status message appearing in the front panel of the receiver, check the connection to your iPod (see page 16). Status message Loading... Cause Remedy See page The receiver is in the middle of recognizing the connection with your iPod. The receiver is in the middle of acquiring song lists from your iPod. Connect error There is a problem with the signal path from your iPod to the receiver.
Troubleshooting CD player (CDX-E410) Problem Cause Remedy See page Power turns on but immediately shuts off. The power cable is not connected or the plug is not completely inserted. Connect the power cable firmly. 17 Power immediately shuts off during playback. Auto-standby function of the receiver works when the receiver can not receive the playing signal transmitted from the CD player with the system control cable for 30 minutes.
NOTES ON DISCS Notes on Discs Disc information The following tables explain the disc types supported by the CD player. Also, the CD player can play back 8-cm (3-inch) compact discs. y Disc logo marks are printed on the disc and the disc jacket. Handling a disc • Do not touch the surface of the disc. Hold a disc by its edge and center hole. • Do not leave a disc in the tray when you are not playing it. • Do not write on the disc with a pencil or other marker.
Glossary Audio information ■ MP3 (MPEG Audio Layer-3) One of the audio compression methods used by MPEG. It employs the irreversible compression method, which achieves a high compression rate by thinning out the data of hardly audible part to the human ears. It is said to be capable of compressing the data quantity by about 1/11 (128 kbps) while maintaining a similar audio quality to music CD.
SPECIFICATIONS Specifications ■ RX-E410 ■ CDX-E410 AMPLIFIER SECTION PLAYBACK SYSTEM • Minimum RMS output power per channel (6 Ω , 1 kHz, 0.1% THD).......................................... 55 W + 55 W • Maximum RMS output power per channel (6 Ω , 1 kHz, 1% THD)............................................. 65 W + 65 W • Input sensitivity/Impedance CD/TAPE/MD/AUX etc.......................................... 150 mV/47 kΩ • Frequency Response CD etc. ...................................................
CLASS 1 LASER PRODUCT LASER KLASSE 1 PRODUKT LUOKAN 1 LASERLAITE KLASS 1 LASER APPARAT PRODUIT LASER DE CLASSE 1 CAUTION INVISIBLE LASER RADIATION WHEN OPEN AND INTERLOCKS DEFEATED. AVOID EXPOSURE TO BEAM.
© 2006 YAMAHA ELECTRONICS CORPORATION, USA 6660 ORANGETHORPE AVE., BUENA PARK, CALIF. 90620, U.S.A. YAMAHA CANADA MUSIC LTD. 135 MILNER AVE., SCARBOROUGH, ONTARIO M1S 3R1, CANADA YAMAHA ELECTRONIK EUROPA G.m.b.H. SIEMENSSTR. 22-34, 25462 RELLINGEN BEI HAMBURG, GERMANY YAMAHA ELECTRONIQUE FRANCE S.A. RUE AMBROISE CROIZAT BP70 CROISSY-BEAUBOURG 77312 MARNE-LA-VALLEE CEDEX02, FRANCE YAMAHA ELECTRONICS (UK) LTD. YAMAHA HOUSE, 200 RICKMANSWORTH ROAD WATFORD, HERTS WD18 7GQ, ENGLAND YAMAHA SCANDINAVIA A.B.