AB Micro Component System MCR-B142 27 May OWNER’S MANUAL
CAUTION: READ THIS BEFORE OPERATING YOUR UNIT. 1 To assure the finest performance, please read this manual carefully. Keep it in a safe place for future reference. 2 Install this unit in a well ventilated, cool, dry, clean place away from direct sunlight, heat sources, vibration, dust, moisture and cold. For proper ventilation, allow the following minimum clearances.
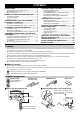
CONTENTS CONNECTIONS ........................................................2 NAMES OF PARTS AND THEIR FUNCTIONS ........4 Top panel/Front panel ....................................................4 Front panel display.........................................................4 Remote control...............................................................5 Playing music from your iPod.........................................7 Using repeat/shuffle playback (remote control only) ......
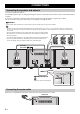
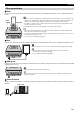
CONNECTIONS Connecting the speakers and antenna Connect the speakers and antenna. If DAB/FM reception is poor, try changing the height or direction or placement of the antenna to find a location that has better reception. If you use a commercially available outdoor antenna instead of the supplied antenna, reception may be better. Do not connect this unit’s power cable until you’ve finished connecting all cables.
CONNECTIONS Other connections iPod iPod dock • Be sure to use a dock adaptor that is compatible with your iPod. If you do not use the adaptor or the adaptor is not compatible, the connection could be loose or poor, which could cause damage to the connector. For details on dock adaptor information, please visit Apple’s official website. • If an iPod in a protective case is forcibly connected, the connector may be damaged. Remove the protective case before connection.
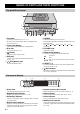
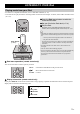
NAMES OF PARTS AND THEIR FUNCTIONS Top panel/Front panel 1 2 k 3 4 5 6 7 a iPod dock 8 9 j g SOURCE Connect your iPod here (☞ P. 3, 6, 7). Be sure to use a dock adaptor that is compatible with your iPod (☞ P. 3). Switch the audio source to be played. Pressing this repeatedly will change the selection in the following order. CD iPod USB DAB FM BT AUX back to CD b Front panel display The clock and other information is displayed here. h VOLUME knob c Disc slot Adjust the volume.
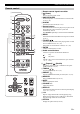
NAMES OF PARTS AND THEIR FUNCTIONS Remote control a Remote control signal transmitter English 1 (Power) b Press to turn the system on/off. 2 c SNOOZE/SLEEP Set the sleep timer or switch the alarm to snooze mode (☞ P. 21, 23). 3 Français d ALARM 4 Switches the alarm on/off (☞ P. 23). e Source buttons 6 7 8 r q f MENU Switch the iPod menu item/Return to the previous menu (☞ P. 7). g FOLDER / Switch the playback folder when playing music on data CDs or USB devices (☞ P. 9, 10).
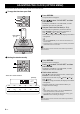
ADJUSTING THE CLOCK (OPTION MENU) You’ll use the option menu (☞ P. 20) to set this unit’s date and time. To copy the time from your iPod 1 Press OPTION. The option menu will appear. 1 2 Press / to select “CLOCK SET,” and then press ENTER. 2 The display will indicate “CLOCK YEAR,” and the numerical value to be set will blink. 3 Set your iPod in the iPod dock (☞ P. 3). The time will be copied from your iPod to this unit. Press ENTER to confirm the items in the order of year month day hour minute.
?? LISTENING TO YOUR iPod Playing music from your iPod English • For details on compatible iPod models, refer to “SPECIFICATIONS” (P. 30). • Your iPod can also play back music and charge while connected to the USB port. To do this, select USB as the audio source (☞ P. 10). 1 Press the iPod source button to switch the audio source to iPod. 1 3 Play the iPod. Playback can be controlled with either the remote control, iPod or the front panel on this unit (☞ P. 4, 5).
LISTENING TO YOUR iPod Using repeat/shuffle playback (remote control only) The playback status is shown by the repeat/shuffle indicator in the front panel display. Repeat playback Shuffle playback Press (repeat) repeatedly to select one of the following playback modes. No display: : Off One : All Repeat/shuffle may not operate or be displayed shown above depending on the type of iPod used. 8 En Press (shuffle) repeatedly to select one of the following playback modes.
LISTENING TO CD AND USB DEVICES − Audio CD: from the first track of the CD. − Data CD*/USB device: from the first track of the folder contains the track you listened to last time. Français • This unit automatically turns off the system if no operation has been performed for 60 minutes after CD/USB device playback is stopped. English The unit will operate as follows when playing back tracks/files on CD/USB devices.
LISTENING TO CD AND USB DEVICES Listening to a USB device 1 Press the USB source button to switch the audio source to USB. 1 If a USB device is already connected, playback will start. 2 Connect a USB device to the USB port. Playback starts automatically. Playback can be controlled using either the remote control, the front panel on this unit, or the USB device (☞ P. 4, 5). • Folders and files will play in the order in which they were written.
LISTENING TO MUSIC FROM YOUR Bluetooth COMPONENT This unit provides Bluetooth functionality. You can enjoy wireless music playback from your Bluetooth component (mobile phone, digital audio player, etc.). Please also refer to the owner’s manual of your Bluetooth component. • This unit can be paired with up to eight other components. When pairing with the ninth component has succeeded, pairing data for the component with the oldest connection date will be deleted.
LISTENING TO MUSIC FROM YOUR Bluetooth COMPONENT Listening to a Bluetooth component 1 Press the source button to switch the audio source to Bluetooth. 2 Connect this unit and your other component via Bluetooth. 3 Play back music from your Bluetooth component. Take care that the volume setting of this unit is not too high. We recommend that you adjust the volume on the other component.
LISTENING TO DAB STATIONS Disconnecting a Bluetooth connection • Hold down on the remote control or SOURCE on this unit. • Turn the system off. • Turn off the Bluetooth setting of the other component. Before tuning into DAB stations, an initial scan must be performed. When you select the DAB for the first time, the initial scan is performed automatically. To listen to a DAB station, connect the antenna as described in “Connecting the speakers and antenna” (P. 2).
LISTENING TO DAB STATIONS Selecting DAB stations 1 Press the RADIO source button to switch the audio source to DAB. 2 Press TUNING station. / to select the DAB While receiving DAB, DAB station information is shown on the front panel display. If the unit does not receive a DAB signal, “Off Air” is displayed instead of the DAB station name. 1 a Secondary indicator: Some stations have sub (secondary) stations. If a secondary station is playing, the secondary indicator is displayed.
LISTENING TO DAB STATIONS Presetting DAB stations (remote control only) Use the preset function to store your favorite 30 stations. to select a station that English 1 Press TUNING / you want to preset. 1 2 Press MEMORY. 2 4 The display will indicate “PRESET MEMORY,” and the preset number will blink. 3 Press PRESET / to select the preset number that you want to store. • The lowest preset number that has not been stored will be selected first. • If you want to cancel the presetting, press .
LISTENING TO DAB STATIONS Selecting preset DAB stations 1 Press the RADIO source button to switch the audio source to DAB. 2 Press PRESET / to select the DAB station that you want to hear. 1 You can only select presets that have been stored. 2 Checking the signal strength of DAB stations (Option menu) 1 Press the RADIO source button to switch the audio source to DAB. 1 2 Press OPTION. The option menu will appear. 2 5 3 4 3 Press / to select TUNE AID, and then press ENTER.
LISTENING TO FM STATIONS Selecting an FM station 1 Press the RADIO source button to switch the audio source to FM. English To listen to an FM station, connect the antenna as described in “Connecting the speakers and antenna” (P. 2). 2 Tune FM stations 1 Français Automatic tuning: Press and hold TUNING / . Manual tuning: Press TUNING / repeatedly. If you tune to a station manually while receiving FM, the sound will be monaural.
LISTENING TO FM STATIONS Presetting FM stations (remote control only) Use the preset function to store your favorite 30 stations. Auto preset This method tunes automatically, and automatically presets only the stations that have good reception. 1 Press and hold down MEMORY. 1 2 “AUTO PRESET” will appear and “Press MEMORY” will blink. 2 Press MEMORY. Auto preset will begin. When presetting has finished, the display will indicate “Completed!”.
LISTENING TO EXTERNAL SOURCES Selecting preset FM stations 2 Press PRESET / to select the FM station that you want to hear. Français You can only select presets that have been stored. 1 English 1 Press the RADIO source button to switch the audio source to FM. 2 Deutsch Svenska LISTENING TO EXTERNAL SOURCES 1 Using a commercially available 3.5 mm miniplug cable, connect your external device to the AUX jack on the rear panel of this unit.
USEFUL FUNCTIONS Using the Option menu When you press OPTION, the option menu will appear in the front panel display, allowing you to make the following settings. (eject button) cannot be operated while the option menu is displayed. Option menu Setting or range PRESET DELETE Deletes a stored preset (shown only if the audio source is DAB/FM). See page 15, 18 DAB INIT SCAN Performs the initial scan (shown only if the audio source is DAB).
USEFUL FUNCTIONS Using the sleep timer When the specified time has elapsed, the system will turn off automatically. Press SNOOZE/SLEEP repeatedly to specify the time after which the system will turn off. English Press repeatedly You can specify 30, 60, 90, 120 or OFF. When you select a time, the sleep timer is turned on, and the sleep indicator ( ) is shown in the front panel display. Deutsch Using the alarm function 3 types of alarms Select from 3 alarm types, combining music and beep sounds.
USEFUL FUNCTIONS Setting the alarm Setting the alarm time and alarm type (Option menu) The alarm will not function when the unit is in power saving (☞ P. 20). To use the alarm function, set the Option menu item POWER SAVING to NORMAL. 1 Press OPTION. The option menu will appear. 1 2 Press to select “ALARM SET”, and then press ENTER. / The alarm indicator ( 2 3 ) and numerical value you’re setting will blink. 3 Set the alarm. Set items 1-5 described below.
USEFUL FUNCTIONS Switching the alarm on/off Press ALARM to turn the alarm on/off. Français If the Option menu item POWER SAVING is set to ECO, the alarm will not function (☞ P. 20). English When the alarm is on, the alarm indicator ( ) will light, and the alarm time will be shown. If you press ALARM again, the alarm indicator ( ) and the alarm will turn off. Operations while the alarm sound is playing To pause the alarm (Snooze) Deutsch When the set time arrives, the selected alarm sound will play.
USING THE “DTA Controller” APPLICATION FOR THE iPod/iPhone/iPad By using the free “DTA Controller” application for the iPod touch/iPhone/iPad, you can control this unit by the application and make detailed alarm settings. For example, for each day of the week, you can specify the alarm time (Weekly Alarm) and adjust the IntelliAlarm as desired. The front panel display shows information for the weekly alarm you’ve set.
TROUBLESHOOTING General Problem Cause Solution The volume might be set to the minimum level, or muted. Adjust the volume level. The source may be incorrect. Select the correct source. The speakers may not be connected securely. Check the connections (☞ P. 2). Headphones are connected. Remove the headphones. The volume of a connected external device is not loud enough. Raise the volume of the external device. The sleep timer may be set (☞ P. 21). Turn the system on and play the source again.
TROUBLESHOOTING iPod Problem No sound. The iPod does not charge up. The front panel display indicates “iPod Unknown” when you connect the iPod. Cause Solution The iPod is not set in the iPod dock firmly. Remove the iPod from the unit, and then set it in the iPod dock again (☞ P. 3). The headphones of the iPod are connected. Remove the Headphones. The iPod software version has not been updated. Download the latest iTunes software to update the iPod software version to the latest.
TROUBLESHOOTING Bluetooth Problem Cause Solution A Bluetooth adaptor, etc. that you want to pair with this unit has a password other than “0000”. Use a Bluetooth adaptor, etc. whose password is “0000”. This unit and the other component are too far apart. Move the other component closer to this unit. There is a device (microwave oven, wireless LAN, etc.) outputs signals in the 2.4 GHz frequency band nearby. Move this unit away from the device that is emitting radiofrequency signals.
TROUBLESHOOTING FM reception Problem Too much noise. Cause Solution The antenna may be connected improperly. Make sure the antenna is connected properly (☞ P. 2) or use a commercially available outdoor antenna. The antenna is too close to the unit or to an electronic device. Position the antenna as far away as possible from the unit or the electronic device. Too much noise during stereo broadcast.
NOTES ON DISCS AND USB DEVICES CD information File Bitrate (kbps) Sampling frequency (kHz) MP3 8-320** 16-48 WMA 16-320** 22.05-48 ** Both constant and variable bitrates are supported. • The maximum numbers of files/folders that can be played on the unit are as follows. Data CD USB Maximum total number of file 512 9999 Maximum folder number 255 999 Maximum file number per folder 511 255 Nederlands • Copyright-protected files cannot be played back.
SPECIFICATIONS PLAYER SECTION AMPLIFIER SECTION [As of July, 2012] • Maximum output power ..........15 W + 15 W (6 Ω 1 kHz, 10 % THD) • Compatible iPod models ..................................... iPod touch (1st, 2nd, 3rd and 4th generations) iPod nano (2nd, 3rd, 4th, 5th and 6th generations) • Headphones ................ 3.5 mm (1/8") STEREO mini jack (Impedance 16 to 32 Ω) iPod (Digital connection) • Compatible iPhone models .........................
Bluetooth Handling Bluetooth communications Do not use this unit within 22 cm (9 inches) of persons with a heart pacemaker implant or defibrillator implant. Radio waves may affect electro-medical devices. Do not use this unit near medical devices or inside medical facilities. We, Yamaha Music Europe GmbH hereby declare that this unit is in compliance with the essential requirements and other relevant provisions of Directive 1999/5/EC.
■ For U.K. customers If the socket outlets in the home are not suitable for the plug supplied with this appliance, it should be cut off and an appropriate 3 pin plug fitted. For details, refer to the instructions described below. The plug severed from the mains lead must be destroyed, as a plug with bared flexible cord is hazardous if engaged in a live socket outlet. ■ Special Instructions for U.K.
© 2012 Yamaha Corporation Printed in Malaysia ZD94990