
User Manual


B
B
A
A
B
A
B
A
MKH-4200/8200+
MXL-25A,32A,32AF
MBL-32A,832A
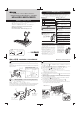
2.マーチングベルを支えて、キャリアフレームのピボットホルダーのネジCを付属の六角
棒スパナを使ってしっかりと締め付けます。
2.
Support the marching bells/xylophone and securely tighten the carrier frame pivot
holder screws
C using the hexagonal wrench provided.
組み立て手順/ASSEMBLY PROCEDURE
音板の高さが演奏しやすい位置になるように、アームのネジDを緩めアームを上下させて
調整します。(4参照)
調整後は、付属の六角棒スパナを使ってしっかりとネジを締め付けてください。
To adjust for a comfortable playing height, loosen the arm screws D and raise or lower
the arms as required. (Refer to
4 .)
After adjustment, securely tighten the screws using the hexagonal wrench provided.
5
音板の高さ調整/Tone Bar Height Adjustment
キャリアフレームのピボットホルダーにアームを差し込み、アームの位置を決め付属の六角
棒スパナでしっかりと固定し、キャリアフレームを取り外します。
キャリアフレームに本体が取り付いた状態で行なってください。
Insert the arms into the carrier frame pivot holders and decide the arm position, then
securely tighten the screws using the hexagonal wrench provided. Remove the carrier
frame after adjustment. Make sure that the instrument is attached to the carrier frame.
3
アームの位置決め/Arm Position Setup
1.マーチングベル・シロフォン本体を裏返します。
2.キャリアフレームの
Aのネジを六角棒スパナで緩めて、本体固定プレートをスライドで
きる状態にします。
3.キャリアフレームを右上図の様に本体にセットし、本体側のキャリア取付けプレートにキ
ャリアフレーム側の本体固定プレートをスライドさせ、位置を合わせます。
4.4箇所の本体固定蝶ボルト
Bをそれぞれを少しずつ締めてゆき、固定させます。
5.キャリアフレームの
Aのネジを六角棒スパナで締めて固定します。
※取り外す場合は、本体固定蝶ボルトのみを緩めれば取り外すことができます。
※取り外したキャリアフレームを再度本体にセットする時、取付けがうまく行かない時は再度上記
の取付け方法にしたがって行なってください。
1. Lay the Marching Bells/Xylophone face down.
2. Use a hexagonal wrench to loosen the four screws A on the carrier frame so that the
brackets can slide.
3. Set the carrier frame on the instrument, as shown in the illustration at the upper right,
and slide the brackets on the carrier frame so that they align with the carrier mounting
plates on the bottom of the instrument.
4. Use the four fixing bolts B on the brackets to attach the carrier frame to the instru-
ment. Tighten the four bolts little by little and secure.
5. Use the hexagonal wrench to firmly tighten the carrier frame’s screws A .
※ To remove the carrier frame, loosen the fixing wing bolts only.
※ If you are having trouble reattaching the carrier frame after it has been removed,
go through the same procedure as described above.
2
楽器本体の取り付け/Attach the Instrument
1.キャリングホルダーのアームをキャリアフレームのピボットホルダーにはめ込みます。
1.
Insert the arms on the carrying holder into the carrier frame pivot holders.
4
キャリングホルダーへの取付け/Attaching to the Carring Holder
ここからの作業は、必ず2人以上で行なってください。
Assembly should be performed by at least 2 persons on a flat surface.
MKH-4200 MKH-8200
付属の六角棒スパナを
お使いください。
Use the hexagonal
wrench provided.
付属の六角棒スパナを
お使いください。
Use the hexagonal
wrench provided.
MKH-4200/8200+
MXL-25A,32A,32AF
MBL-32A,832A
組み立て手順/ASSEMBLY PROCEDURE
アームをピボット
ホルダーにはめ込む。
Insert the arms into the
frame pivot holders.
ホルダー上部を演奏しやすい位置でホルダー下部に取り付け、蝶ナットでしっかりと固定し
てください。
Attach the upper part of the holder to the lower part in a suitable position, and tighten the
wing nuts securely.
1
キャリングホルダーの組み立て/Carrying Holder Setup
●肩幅および肩掛けの高さの調整
Shoulder Hook Spacing and Length Adjustment
ホルダー上部
Holder (Upper)
蝶ナット
Wing nut
蝶ナット
Wing nut
ホルダー下部
Holder (Lower)
蝶ナットで
しっかりと
固定する。
Tighten the
wing nuts
securely.
中央の穴は、
使用しないで
ください。
Do not use
this hole.
※この穴は使用しないで
ください。
※
Do not use this hole.
○どちらの穴でも使えます。
○ Use either hole.
○
どちらの穴でも使えます。
○ Use either hole.
キャリアフレーム
Carrier Frame
キャリア取付けプレート
Carrier mounting plate
本体固定蝶ボルト
Fixing wing bolt
ピボットホルダー
Pivot holder
本体固定プレート
Brackets with
wing bolts
本体固定蝶ボルト
Fixing wing bolt
キャリア
フレーム
Carrier
Frame
キャリア
フレーム
Carrier
Frame
差し込む
差し込む
MKH-4200 MKH-8200
差し込む
差し込む
Insert
Insert
Insert
Insert
キャリングホルダー キャリングホルダー
Carrying holderCarrying holder
アームをピボット
ホルダーにはめ込む。
Insert the arms into the
frame pivot holders.
付属の六角棒スパナをお使いください。
Use the hexagonal wrench provided.
キャリングホルダー
Carrying holder
C
D
締める
Tighten
製品の機能や取り扱いについては、最寄りのヤマハ特約楽器店、または下記ヤマハお客様コミュニケーショ
ンセンターにお問い合わせください。
お客様コミュニケーションセンター管弦打楽器ご相談窓口
0570-013-808
※固定電話は、全国市内通話料金でご利用いただけます。
通話料金は音声案内で確認できます。
上記番号でつながらない場合は、下記番号におかけください。
053-411-4744
営業時間: 月曜日〜金曜日 10:00〜17:00
(土曜、日曜、祝日およびセンター指定の休日を除く)
ホームページ: http://jp.yamaha.com/support/
※都合により、住所、電話番号、名称、URL が変更になる場合がございますが、あらかじめご了承ください。
ご相談窓口のご案内
ナビダイヤル
(全国共通番号)