Manual do Proprietário
MENSAGEM ESPECIAL Este produto utiliza baterias ou uma fonte de alimentação externa (adaptador AC). NÃO CONECTE este produto a qualquer outra fonte de alimentação ou adaptador AC que não seja igual ao descrito neste manual, na placa de identificação, ou recomendado especificamente pela Yamaha. Este produto deve ser usado somente com os componentes que o acompanham, ou com suportes recomendados pela Yamaha.
MM6 Manual do Proprietário 3
PRECAUÇÕES FAVOR LER COM ATENÇÃO ANTES DE PROSSEGUIR Guarde este manual em lugar seguro para o caso de necessitar no futuro. AVISO Siga sempre as precauções básicas listadas abaixo para evitar a possibilidade de prejuízos sérios ou mesmo morte por choque elétrico, curto-circuito, danos, incêndio, ou outros riscos.
Conexões • Desligue todos os equipamentos antes de conectar o instrumento a outros equipamentos. Antes de ligar os equipamentos, ajuste seus volumes para o mínimo. Aumente os volumes gradualmente enquanto toca o instrumento até obter o volume desejável. • Não use o instrumento com volume alto ou desconfortável durante longo período de tempo, pois isso pode causar perda permanente da audição. Caso você perceba perda de audição ou zumbido nos ouvidos, consulte um médico.
Este produto incorpora software para computador do qual a Yamaha possui direitos autorais ou possui licença dos direitos autorais de terceiros. Este material inclui, sem limitação, todos os softwares de computador, arquivos de estilos, arquivos MIDI, dados WAVE, partituras musicais e gravações sonoras. O uso não autorizado desses softwares e conteúdos além do uso pessoal não é permitido, sob penas legais. Qualquer violação de direitos autorais tem conseqüências legais.
Parabéns, e obrigado por escolher o Yamaha MM6 Music Synthesizer! Por favor, leia este manual com atenção antes de usar o instrumento para poder aproveitar todos os diversos recursos. Depois de ler o manual, guarde-o em um lugar seguro e de fácil acesso, para consultá-lo quando precisar entender melhor uma operação ou função. Acessórios Junto com o instrumento vieram os seguintes itens. Favor verificar se todos vieram na embalagem.
Recursos Principais do MM6 Timbres de alta qualidade para performance Página 15 O MM6 contém uma ampla gama de timbres de alta qualidade (muitos baseados nos timbres da série Motif), compreendendo desde instrumentos acústicos até sons sintéticos. Use a função Category Search para chamar rapidamente os timbres desejados, conforme o tipo de instrumento.
Conteúdo Acessórios .............................................................................. 7 Recursos Principais do MM6 .................................................. 8 Iniciando 10 Conexões de Alimentação..................................................... 10 Presilha do cabo ................................................................... 10 Usando Fones de Ouvido ..................................................... 10 Conectando a um Computador (porta USB) ..........................
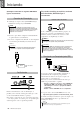
Iniciando Certifique-se de fazer o seguinte ANTES de ligar o instrumento: Faça todas conexões necessárias, conforme descrito abaixo, ANTES de ligar o instrumento. Conexões de Alimentação Usando Fones de Ouvido 1 Certifique-se de que a chave [STANDBY/ON] do instrumento está na posição STANDBY. AVISO • Use somente o adaptador AC Yamaha PA-5D (ou outro adaptador recomendado especificamente pela Yamaha) para alimentar seu instrumento pela rede elétrica.
Iniciando Ligando o Instrumento Ajustando o Volume e o Contraste da Tela Diminua o volume girando o controle [MASTER VOLUME] para a esquerda e pressione a chave [STANDBY/ON] para ligar o instrumento. Para desligar pressione novamente a chave [STANDBY/ON]. Ajuste o volume do MM6 e dos equipamentos externos para os níveis apropriados. Se for preciso, ajuste o contraste da tela de LCD usando o controle LCD CONTRAST. Gire o controle [MASTER VOLUME] [STANDBY/ON] no sentido anti-horário. Pressione a chave.
Controles do Painel e Conexões Painel Frontal 3 1 4 14 2 5 6 7 12 Painel Frontal 1 Roda [PITCH BEND] .................... página 40 2 Roda [MODULATION] .................. página 40 3 Botão [MASTER VOLUME] .. páginas 14, 36 4 Botões [CUTOFF], [RESONANCE], [ATTACK], [RELEASE] ............... página 41 5 Tecla [METRONOME] ................. página 45 6 Tecla [TAP TEMPO] . ................... página 47 7 Teclas TEMPO [+], [-].................... página 45 8 SONG Tecla [SONG].............................
Controles do Painel e Conexões 18 20 19 16 21 15 23 30 25 26 17 22 24 27 28 29 Painel Traseiro 31 32 33 34 35 36 37 38 39 20 Tecla [ARPEGGIO ON/OFF] ........ página 20 Painel Traseiro 31 Chave [STANDBY/ON] .................página 14 21 Teclas TRANSPOSE [+], [-] ......... página 49 32 Conector DC IN.............................. página 10 22 Teclas OCTAVE [UP], [DOWN].... página 50 33 Conector PHONES.........................página 10 23 Tecla [DUAL] ...................................
Guia Quick Rápido Guide Ouvindo a Música de Demonstração Este instrumento inclui uma música que demonstra algumas das possibilidades e recursos do instrumento. Vamos então ouvir a música de demonstração. 1 Pressione a tecla [STANDBY/ON] até que ela trave na posição ON. A janela principal (Main) aparecerá na tela. nome do timbre (VOICE) nome do padrão (PATTERN) nome da música (SONG) nome do arpejo (ARPEGGIO) 2 3 14 Pressione a tecla [SONG] e a tecla [PATTERN] simultaneamente.
Guia Rápido Tocando o Instrumento Além dos timbres de piano, órgão e outros timbres de teclado, este instrumento possui uma ampla gama de timbres realísticos — incluindo violão, baixo, cordas, sax, trompete, bateria e percussão, efeitos sonoros, e uma grande variedade de timbres musicais. Selecionando o Timbre Principal Selecione o timbre principal (Main Voice) e toque-o pelo teclado. 1 Pressione uma das teclas de CATEGORY SEARCH. Aparecerá a janela Main Voice.
Tocando o Instrumento Combinando Timbres — Dual Você pode selecionar um segundo timbre para soar junto com o principal quando você tocar no teclado. O segundo timbre é chamado de “dual”. Dois timbres soando ao mesmo tempo. 1 2 Pressione a tecla [DUAL]. O timbre dual selecionado soará junto com o timbre principal quando você tocar no teclado. Pressione e mantenha pressionada a tecla [DUAL] por mais de um segundo. Aparecerá a janela Dual Voice.
Tocando o Instrumento 4 5 Selecione o timbre que deseja tocar. Use o dial para selecionar o timbre desejado. Os timbres disponíveis serão selecionados e mostrados em seqüência. O timbre selecionado aqui se torna o timbre dual (Dual Voice). Para este exemplo, experimente selecionar “057 Twinkle”. Toque no teclado. Experimente selecionar e tocar outros timbres dual. Pressione a tecla [EXIT] para retornar à janela Main.
Tocando o Instrumento 2 Pressione e mantenha pressionada a tecla [SPLIT] por mais de um segundo. Aparecerá a janela Split Voice. O nome da categoria selecionada, o nome e o número do timbre (voice) serão realçados na tela. janela do timbre split (Split Voice) categoria selecionada Mantenha pressionada por mais de 1 segundo 3 4 5 Pressione a tecla da categoria desejada na seção CATEGORY SEARCH. NOTA • Para alterar a categoria de timbre (Voice), pressione outra tecla CATEGORY SEARCH.
Tocando o Instrumento Selecionando um Kit de Bateria Os kits de bateria são conjuntos de instrumentos de percussão. 1 2 3 Pressione a tecla [DRUM/PERC/SE]. Aparecerá na tela a categoria DRUM. Use o dial para selecionar o kit que deseja tocar (001–023). NOTA Toque cada nota do Kit. • Veja a Lista de Kits de Bateria na página 90.
Tocando o Instrumento Usando o Arpejo A função de arpejo permite a você criar arpejos (acordes dedilhados) simplesmente tocando as notas no teclado. Por exemplo, você pode tocar as notas de uma tríade — tônica, terça e quinta — e a função do arpejo cria automaticamente uma variedade de frases arpejadas interessantes. Alterando o tipo de arpejo e as notas que você toca, é possível criar uma ampla gama de padrões e frases que podem ser usadas para composição musical e também ao vivo.
Tocando o Instrumento Alterando o tipo de arpejo O tipo de arpejo mais adequado é selecionado automaticamente quando você escolhe um timbre, mas você pode selecionar facilmente qualquer outro tipo de arpejo. 1 Pressione e mantenha pressionada a tecla [ARPEGGIO ON/OFF] por mais de um segundo. Aparecerá na tela a janela de seleção de tipo de arpejo. Mantenha pressionada por mais de 1 segundo 2 Use o dial para selecionar o tipo de arpejo desejado.
Guia Rápido Executando Padrões Este instrumento possui um recurso de auto-acompanhamento que produz acompanhamento (ritmo + baixo + acorde) no padrão que você escolher para os acordes que tocar com a mão esquerda. Há uma ampla variedade de padrões com diferentes arranjos e compassos (consulte a Lista de Padrões na página 97). Nesta seção aprenderemos a usar os recursos de auto-acompanhamento. Ouvindo o Padrão de Ritmo A maioria dos padrões inclui uma parte de ritmo.
Executando Padrões Tocando Junto com um Padrão Na página anterior você aprendeu como selecionar um padrão de ritmo. Aqui veremos como adicionar acompanhamento de baixo e acorde no ritmo básico para produzir um acompanhamento completo para que você possa tocar junto com ele. 1 2 Selecione o padrão que deseja tocar (página 22, passos 1–2). Pressione a tecla [EXIT] para retornar à janela principal (Main). Ligue a tecla FINGER. Pressione a tecla [FINGER].
Executando Padrões 4 Toque um acorde com a mão esquerda para iniciar o padrão. Se você ainda não sabe como tocar qualquer acorde, experimente tocar qualquer coisa no teclado. Consulte a página 25 para informações sobre como tocar acordes. O acompanhamento mudará conforme as notas que você tocar com a mão esquerda. ponto de divisão (split point) 5 Toque uma variedade de acordes com a mão esquerda enquanto toca uma melodia com a mão direita.
Executando Padrões Tocando Acordes de Auto-acompanhamento Existem dois tipos de acordes de auto-acompanhamento: Acordes facilitados (Easy Chords) Acordes normais (Standard Chords) O instrumento irá automaticamente reconhecer os tipos diferentes de acordes. Esta função é conhecida como Multi Fingering. A região da esquerda do ponto de divisão do teclado (padrão: 54/F#2) se torna a “área de acompanhamento”. Toque os acordes de acompanhamento nesta área do teclado.
Guia Rápido Usando Músicas Neste instrumento, o termo “música” se refere aos dados que formam uma composição. Nesta seção aprenderemos como selecionar e tocar músicas. Selecionando e Ouvindo uma Música 1 Selecione e pressione a tecla de categoria da seção SONG que corresponda ao tipo de música que você quer ouvir. [PRESET] : Acessa as três músicas internas pré-gravadas. [USER] : Acessa as músicas que você próprio gravou e as músicas gravadas de um computador.
Usando Músicas 3 Ouça a música. Pressione a tecla [START/STOP] para iniciar a reprodução da música selecionada. Você pode interromper a reprodução a qualquer momento pressionando novamente a tecla [START/STOP]. inicia a música Avançando, Retornando e Pausando a Música Estes são como os controles de execução de um toca-discos de CD, permitindo a você avançar [ retroceder [ ] e pausar [ ] a reprodução da música.
Usando Músicas Tipos de Música Os seguintes tipos de música podem ser usados neste instrumento: Preset (as três músicas pré-gravadas internamente no instrumento) ................................. números 001–003. User (gravações de suas próprias execuções) .................................................................... números 001–005. USB (músicas armazenadas no dispositivo USB)................................................................
Guia Rápido Gravando a sua Execução Você pode gravar até cinco de suas próprias execuções ao teclado e salvá-las nas músicas do usuário (User Songs) 001 a 005. Essas músicas podem ser reproduzidas da mesma maneira que as músicas internas pré-gravadas (Preset Songs). Depois de salvar sua execução como uma música do usuário, ela pode ser convertida para o formato SMF (Standard MIDI File) e salva no dispositivo USB de armazenamento (página 70).
Gravando a sua Execução Procedimento de Gravação Comece a gravar depois de selecionar o número da música do usuário, a pista e a parte que quer gravar. 1 2 3 Na janela principal (Main), pressione a tecla [USER], e então use o dial para selecionar o número de música do usuário (001–005) que você deseja gravar. Pressione a tecla [REC]. A tecla [REC] se acenderá. Selecione a pista de gravação.
Gravando a sua Execução Pista dos padrões (Pattern Track) selecionada para gravação Pressione a tecla TRACK [PATTTERN] enquanto mantém pressionada a tecla [TRACK SELECT/MUTE]. A pista dos padrões ficará realçada e será ativado o modo de espera de gravação. NOTA • Para cancelar a gravação na pista selecionada, pressione outra vez a tecla daquela pista. O modo FINGER não pode ser ligado ou desligado depois de começar a gravação. A pista dos padrões aparece realçada.
Gravando a sua Execução Para gravar outras pistas Repita os passos 2 a 5 para gravar as demais pistas. Pressionando as teclas TRACK [1]–[8] e/ou a tecla [PATTERN] permite monitorar as pistas previamente gravadas (mostradas com uma moldura em volta do número) enquanto se grava uma nova pista. As pistas previamente gravadas também podem ser silenciadas (mostradas sem a moldura em volta do número) enquanto se grava uma nova pista (página 58).
Gravando a sua Execução Song Clear — Apagando Músicas do Usuário Esta função apaga toda a música do usuário (todas as pistas). 1 2 Na janela principal (Main), selecione a música do usuário (001 to 005) que você quer apagar. NOTA • Se você quiser apagar só uma determinada pista de uma música do usuário, use a função Track Clear. Pressione e mantenha pressionada a tecla [TRACK SELECT/MUTE] por mais de um segundo enquanto mantém pressionada a tecla [STORE].
Gravando a sua Execução Track Clear — Apagando uma Pista da Música do Usuário Esta função permite a você apagar uma determinada pista (track) de uma música do usuário. 1 2 Na janela principal (Main), selecione a música do usuário (001 to 005) que contém a pista que você quer apagar. Pressione a tecla TRACK [1] a [8] correspondente à pista que você quer apagar enquanto mantém pressionada a tecla [TRACK SELECT/MUTE].
Dados memorizados e Inicialização Dados Memorizados As seguintes configurações são sempre memorizadas, e são preservadas mesmo quando o instrumento é desligado. Se você quiser inicializar essas configurações, use a função Initialize, explicada a seguir.
Operações e Janelas Básicas Operações Básicas O controle geral do MM6 é baseado nas seguintes operações: 1 Pressionar uma tecla para selecionar uma função básica. 2 Usar o dial para selecionar um item. 3 Iniciar/parar uma função. 1 Categoria de música 3 Tela (página 38, 39) 2 1 Categoria de timbres Ajuste de volume Ajusta o volume do som ouvido no sistema de áudio onde está conectada a saída OUTPUT ou no fone de ouvido conectado à saída PHONES.
Operações e Janelas Básicas Exemplo: janela de seleção de timbres CATEGORY [INC]/[DEC] Você pode selecionar rapidamente uma categoria diferente depois de ter selecionado uma categoria de músicas, padrões ou timbres. Essas teclas podem ser usadas para passar seqüencialmente pelas categorias. Categoria anterior Categoria seguinte 2 Use o dial para selecionar um item.
Operações e Janelas Básicas Janelas Nomes das janelas A tela fornece todas as informações que você precisa para operar facilmente o instrumento. O nome da janela atual aparece no alto da tela. Por exemplo, aparece “MAIN” no alto da janela principal. Janela MAIN Título Chamando a janela principal A maioria das operações básicas são executadas a partir da janela principal (MAIN) do instrumento.
Operações e Janelas Básicas Itens da Janela Principal (MAIN) A janela principal mostra todas as configurações básicas da música, padrão e timbre atuais. Ela também inclui uma gama de indicadores que mostram os estados (ligado/desligado) de diversas funções. Como essa janela permite a você visualizar todas as configurações básicas atuais em uma área centralizada, é uma boa idéia tê-la visível enquanto você toca. Transposição (página 49) No.
Usando os Controles do MM6 Você pode controlar tonalidade, volume, afinação e outros parâmetros usando os controles do painel frontal, bem como usando controles externos conectados às entradas no painel traseiro. Controles do Painel do MM6 roda de Pitch Bend roda de Modulação Botões rotativos Roda de Pitch Bend Use a roda de Pitch Bend para subir (empurre a roda) ou descer (puxe a roda para você) a altura das notas enquanto toca no teclado.
Usando os Controles do MM6 Botões rotativos Você pode alterar o brilho e as características de tonalidade do timbre principal (Main Voice) e do timbre dual (Dual Voice) em tempo real, girando os botões enquanto toca. Gire o botão para a direita para aumentar o valor, e para a esquerda para diminuir. aumenta o valor diminui o valor CUTOFF Aumenta ou diminui a freqüência de corte do filtro, para ajustar o brilho do som. RESONANCE Ajusta o nível de pico nas proximidades da freqüência de corte.
Melhorando o Som com Reverb, Chorus e Efeitos de DSP Selecionando um tipo de Reverb O reverb permite a você tocar com a ambiência de uma sala de concerto. Quando você seleciona um padrão ou uma música, é selecionado automaticamente o tipo de reverb para o timbre que está sendo usado. Para selecionar um tipo diferente de reverb, use o procedimento descrito abaixo. 1 Pressione a tecla [UTILITY] para acessar a janela UTILITY. 3 Use o dial para selecionar o tipo de reverb.
Melhorando o Som com Reverb, Chorus e Efeitos de DSP Selecionando um tipo de Chorus O efeito de chorus cria um som encorpado, como se vários timbres semelhantes estivessem soando em uníssono. Quando você seleciona um padrão ou uma música, é selecionado automaticamente o tipo de chorus para o timbre que está sendo usado. Para selecionar um tipo diferente de chorus, use o procedimento descrito abaixo. 1 Pressione a tecla [UTILITY] para acessar a janela UTILITY.
Melhorando o Som com Reverb, Chorus e Efeitos de DSP Aplicando Efeitos de DSP Estes efeitos podem ser usados para adicionar profundidade e enriquecer os timbres tocados no teclado (principal, dual e split). NOTA • DSP significa “Digital Signal Processor”, que é um processador especial projetado para processar e adicionar efeitos aos sinais de áudio digital. 1 Pressione a tecla [UTILITY] para acessar a janela UTILITY.
Recursos Úteis de Performance Usando o Metrônomo Este instrumento inclui um metrônomo com andamento e compasso ajustáveis. Use-o para ajustar o andamento mais confortável para você tocar a música. Inicie o metrônomo Inicie o metrônomo pressionando a tecla [METRONOME]. Para parar o metrônomo, pressione de novo a tecla [METRONOME]. Ajustando o andamento Veja como você pode ajustar o andamento do metrônomo.
Recursos Úteis de Performance Configurando o número de tempos por compasso, e a figura de tempo 4 Use o dial para selecionar a figura de tempo. Selecione a figura de tempo desejada: 2,4,8 ou 16 (mínima, semínima, colcheia ou semicolcheia). Para este exemplo, selecione 8. O compasso será então definido como 3/8. Neste exemplo vamos definir um compasso de 3/8. 1 Mantenha pressionada a tecla [METRONOME] por mais de um segundo. A fórmula de compasso será mostrada na tela.
Recursos Úteis de Performance Ajustando o Andamento Se a execução de uma música ou de um padrão ficar muito rápida ou muito devagar, experimente alterar o andamento. Pressione a tecla TEMPO [+] ou [-]. Aparecerá na tela o parâmetro “Tempo”. Use as teclas TEMPO [+] e [-] para ajustar o andamento dentro da faixa de 11 a 280 tempos por minuto. Você pode retornar ao andamento original pressionando simultaneamente as teclas [+] e [-].
Recursos Úteis de Performance Selecionando um Ajuste de EQ Existem cinco configurações diferentes para o Master EQ, permitindo a você obter a melhor sonoridade para uma variedade de situações — como ao ouvir com fones de ouvido, por exemplo. 1 Pressione a tecla [UTILITY] para acessar a janela UTILITY. Aparece na tela a função selecionada. Tipo de Master EQ selecionado 2 Use as teclas CATEGORY [DEC] / [INC] para selecionar o item Master EQ Type. Aparece na tela o tipo de EQ selecionado.
Recursos Úteis de Performance Transpondo o Teclado Alteração de altura em passos de semitom (transposição) A afinação global do instrumento pode ser deslocada para cima ou para baixo até um máximo de uma oitava, em passos de semitom. Ajuste fino da altura (afinação) A afinação global do instrumento pode ser deslocada para cima ou para baixo até um máximo de 1 semitom, em passos de aproximadamente 0,2 Hz. O ajuste padrão é 440Hz. 1 Pressione uma das teclas TRANSPOSE 1 [+] / [-].
Recursos Úteis de Performance Transpondo o Teclado em Oitavas Às vezes você pode querer tocar em uma região mais alta ou mais baixa. Por exemplo, você pode querer deslocar a afinação para baixo para atingir notas bem mais graves, ou para cima, para obter notas mais agudas em solos. As teclas OCTAVE [UP] / [DOWN] permitem a você fazer isso rápida e facilmente. A cada vez que você pressiona a tecla OCTAVE [UP] no painel, a afinação geral do timbre sobe uma oitava.
Funções dos Padrões As operações básicas do recurso de padrões (auto-acompanhamento) são descritas na página 22. Apresentaremos aqui algumas outras maneiras de você executar os padrões, ajustar o volume, tocar acordes usando os padrões, etc. Variações de Padrões (Seções) Para permitir algumas variações na execução dos padrões, cada padrão inclui um número de “seções” que podem ser selecionadas e executadas conforme desejado.
Funções dos Padrões 5 Pressione uma tecla da seção principal: Ponto de divisão (split point) [A]–[D]. O indicador acima à esquerda da tecla da seção principal ativa se acenderá. região de acompanhamento 7 Pressione qualquer das teclas da seção principal, [A]–[D], como desejar. 6 A seção principal do padrão selecionado iniciará assim que você tocar um acorde com a mão esquerda. Para este exemplo, toque um acorde de dó maior (como mostrado a seguir).
Funções dos Padrões Tocando um Padrão com Acordes e Sem Ritmo (Acompanhamento Parado) Depois de pressionar a tecla [FINGER] para ligar o auto-acompanhamento, você pode tocar na região da esquerda (acompanhamento) do teclado para produzir acordes sem acompanhamento rítmico. Isto é o recurso de “Stop Accompaniment”, e podem ser usadas algumas das digitações de acordes reconhecidas pelo instrumento. O MM6 reconhece como acordes as notas tocadas na região de auto-acompanhamento do teclado (página 25).
Funções dos Padrões Básico sobre Acordes Duas ou mais notas podem ser tocadas juntas para compor um “acorde”. O tipo mais básico de acorde é a “tríade”, contendo três notas: a tônica, a terça e a quinta da respectiva escala. Uma tríade de Dó maior (C major), por exemplo, é composta das notas Dó (tônica ou raiz), Mi (intervalo de terça da escala de dó maior), e Sol (intervalo de quinta da 3ª 3ª escala de Dó maior).
Funções dos Padrões Acordes Comuns Reconhecidos Todos os acordes na tabela são acordes de Dó (C).
Funções dos Padrões Especificando Acordes em Toda a Extensão do Teclado No tópico “Tocando Junto com um Padrão”, na página 23, descrevemos dois métodos de se tocar os padrões (Multi, Full) nos quais os acordes são detectados apenas na região da esquerda do teclado ou em toda a extensão do teclado. Fazendo as configurações descritas abaixo, a detecção de acordes do acompanhamento ocorre ao longo de toda a extensão do teclado.
Configurações da Música Volume da Música 1 Pressione a tecla [UTILITY] para acessar a janela UTILITY. 2 Use as teclas CATEGORY [DEC] / [INC] para selecionar o item Song Volume. Volume da Música Ajuste de 000 a 127 3 Use o dial para ajustar o volume da música como desejar. NOTA • O volume da música pode ser ajustado enquanto a música está selecionada. Alterando o Andamento da Música Você pode alterar o andamento da música como desejar. Pressione a tecla TEMPO [+] ou [-].
Configurações da Música Silenciando uma Pista Cada “pista” executa uma parte diferente da música — melodia, percussão, acompanhamento, etc. Você pode silenciar (mute) pistas individualmente para poder tocar você mesmo no teclado a parte silenciada, ou simplesmente silenciar as pistas que não queira ouvir. Para silenciar uma pista, pressione a tecla da pista correspondente (TRACK [1]–[8], [PATTERN]) enquanto mantém pressionada a tecla [TRACK SELECT/MUTE].
Memorizando Configurações do Painel Este instrumento possui um recurso de PERFORMANCE MEMORY que possibilita a você memorizar até 64 configurações favoritas para serem usadas sempre que você quiser. Até 64 configurações completas podem ser memorizadas (8 x 8 bancos). 8 Bancos Memory 1 Memory 2 Memory 3 Memory 4 Memory 5 Memory 6 Memory 7 Memory 8 Salvando na Memória de Performance 1 Ajuste os controles do painel como quiser — 3 Pressione a tecla PERFORMANCE selecione um timbre, padrão, etc.
Memorizando Configurações do Painel Chamando Configurações da Memória de Performance 1 Pressione a tecla PERFORMANCE BANK [INC] / [DEC] até que o número do banco desejado apareça na tela. Você também pode usar o dial na janela PERFORMANCE BANK.
Memorizando Configurações do Painel Apagando uma Memória de Performance Este procedimento apaga as configurações do painel que foram salvas em uma memória de performance. 1 A janela PERFORMANCE BANK aparece quando você pressiona uma das teclas PERFORMANCE BANK [INC] ou [DEC]. Use as teclas PERFORMANCE BANK [INC] e [DEC] para selecionar o banco que contém a memória de Performance que você quer apagar.
Editando um Timbre Crie timbres originais editando os diversos parâmetros disponíveis. Editando esses parâmetros você pode criar novos timbres que sejam mais adequados às suas necessidades. Selecionando e Editando um Item Existem 21 parâmetros editáveis. 1 Na lista das funções da janela EDIT (página 63), verifique a função que você quer ajustar. 2 Pressione a tecla [EDIT] para acessar a janela EDIT. 4 Use o dial ou as teclas [DEC/NO] e [INC/YES] para ajustar o valor.
Editando um Timbre Lista de Itens de Edição Grupo Item da função Indicação na tela Faixa/Valores MAIN VOICE Volume Main Volume 000–127 Determina o volume do timbre principal (main) Oitava Main Octave -2–2 Determina a oitava do timbre principal em passos de oitava. Pan Main Pan 000 (esquerda)– 064 (centro)– 127 (direita) Determina a posição do pan do timbre principal. O valor “0” posiciona o som todo para a esquerda; “127” posiciona o som todo para a direita.
Configurações Úteis As configurações detalhadas, tais como afinação, ponto de divisão do teclado e efeitos podem ser feitas na janela UTILITY. Selecionando e Configurando Funções Existem 25 parâmetros ao todo. 1 Na lista das funções da janela UTILITY (página 65), verifique a função que você quer ajustar. 2 Pressione a tecla [UTILITY] para acessar a janela UTILITY. 4 Use o dial ou as teclas [DEC/NO] e [INC/YES] para ajustar o valor.
Configurações Úteis Lista de Funções Úteis Grupo Item da função Indicação na tela Faixa/Valores EFFECT Nível de Reverb Reverb Type 01–26 Determina o tipo de Reverb, “26” significa “desligado”. (veja lista na página 98) Nível de Chorus Chorus Type 01–31 Determina o tipo de Chorus, “31” significa “desligado”.
Armazenando/Salvando Dados Nesta seção veremos os procedimentos para se configurar e formatar dispositivos USB de armazenamento, e também como salvar e carregar dados deles. Um dispositivo USB de armazenamento é uma mídia de memória de alta capacidade usada para se armazenar dados. Quando um dispositivo USB é inserido no conector USB TO DEVICE deste instrumento, as músicas e as configurações do instrumento podem ser salvas e carregadas.
Armazenando/Salvando Dados Usando um Dispositivo USB de Armazenamento 1 Conecte o dispositivo USB de armazenamento no conector USB TO DEVICE, tomando cuidado em inseri-lo na direção correta. IMPORTANTE • Para reproduzir músicas copiadas do computador para o dispositivo USB, as músicas devem ser armazenadas no diretório raiz do dispositivo USB ou nas pastas de primeiro ou segundo nível da raiz. As músicas armazenadas nestes locais podem ser selecionadas e reproduzidas como músicas USB (página 26).
Armazenando/Salvando Dados Formatando um Dispositivo USB de Armazenamento Um dispositivo USB novo precisa ser formatado antes de poder ser usado neste instrumento. CUIDADO • Se você formatar um dispositivo USB de armazenamento que já contenha dados, todos os dados serão apagados. Tome cuidado para não apagar dados ao usar a função de formatação. 3 Pressione a tecla [EXECUTE] e aparecerá a uma mensagem de confirmação. Você pode pressionar a tecla [DEC/NO] neste momento para cancelar a operação.
Armazenando/Salvando Dados Salvando os Dados Existem três tipos de dados que podem ser salvos por esta operação como um “arquivo do usuário”: música do usuário, arquivo de padrão e dados de memória de performance. 1 Certifique-se de que há um dispositivo USB de armazenamento devidamente conectado ao conector USB TO DEVICE, e que a mensagem “CONNECT” aparece na janela principal. 2 Pressione a tecla [MENU]. 3 Use as teclas CATEGORY [DEC] e [INC] para localizar o item User File Save.
Armazenando/Salvando Dados Convertendo e Salvando uma Música em Formato SMF Esta operação converte uma música do usuário (001 a 005) em formato SMF 0 e salva o arquivo no dispositivo USB. O que é um arquivo SMF (Standard MIDI File)? O formato SMF (Standard MIDI File) é um dos formatos mais comuns e populares para se armazenar dados de seqüência. Existem duas variações: formato 0 e formato 1.
Armazenando/Salvando Dados Carregando Arquivos do Usuário e Arquivos de Padrões Os arquivos do usuário e de padrões armazenados no dispositivo USB podem ser carregados para o instrumento. CUIDADO • Quando um arquivo do usuário é carregado, são substituídas todas as músicas do usuário 001–005 (user songs), todos os arquivos de padrões (user patterns) e toda a memória de performance. Se você carregar apenas um arquivo de padrão, somente os dados do arquivo de padrão serão substituídos.
Armazenando/Salvando Dados Apagando Dados de um Dispositivo USB Este procedimento apaga arquivos do usuário e arquivos SMF selecionados no dispositivo USB de armazenamento. 1 Certifique-se de que o dispositivo USB 4 Selecione o arquivo que deseja apagar. 2 Pressione a tecla [MENU]. 3 Use as teclas CATEGORY [DEC] / [INC] 5 Pressione a tecla [EXECUTE].
Conexões Conectores 1 1 Conectores OUTPUT L/MONO e R Estes conectores (1/4" mono) saem com os sinais de áudio em estéreo. Para usar saída em mono, use apenas o conector L/MONO. 2 Conectores MIDI IN e OUT O conector MIDI IN recebe as mensagens MIDI dos equipamentos MIDI externos. Ele pode ser usado para controlar o MM6 ou tocar seu gerador de timbres a partir de um equipamentos MIDI externo.
Conexões Conectando a um Equipamento Externo de Áudio Como o MM6 não possui alto-falantes próprios, ele deve ser conectado a um sistema de amplificação externo, a um fone de ouvido ou a algum outro tipo de sistema de áudio. Conectando a caixas ou monitores amplificados . Para uma reprodução ótima e precisa dos sons do instrumento com seus efeitos e plena imagem estereofônica, use um par de caixas amplificadas. Conecte as caixas aos conectores OUTPUT L/MONO e R do painel traseiro.
Conexões Conectando um Dispositivo USB de Armazenamento Conectando um dispositivo USB de armazenamento ao instrumento você pode salvar os dados que você criar, e também carregar ou reproduzir os dados que estão no dispositivo conectado. Dispositivos USB compatíveis Conexão de um dispositivo USB de armazenamento Pode ser conectado ao conector USB TO DEVICE um dispositivo USB de armazenamento, como uma unidade de disco rígido, uma unidade de disquete, ou um dispositivo de memória flash.
Conexões Salvando os dados do instrumento no computador. Uma vez que você salvou os dados em um dispositivo USB de armazenamento, pode copiá-los para o disco rígido do seu computador, e então arquivar e organizar os arquivos como desejar. Salve os dados internos em um dispositivo USB. USB TO DEVICE MM6 Dispositivo USB Copiando arquivos do disco rígido do computador para o dispositivo USB, e em seguida reproduzindo as músicas no instrumento.
Conexões Conectando a um Computador As funções a seguir ficam disponíveis quando o instrumento é conectado a um computador. Instalando o Driver USB-MIDI Para que possa haver a comunicação entre o computador e o instrumento, deve ser instalado no computador o software de driver. O driver USB-MIDI permite que o software de seqüenciamento, ou aplicativo similar, em seu computador possa transmitir e receber dados de MIDI para o instrumento através do cabo USB.
Conexões Transferindo Dados de Execução de/para o Computador Conectando o instrumento a um computador, as execuções feitas no instrumento podem ser usadas no computador, e os dados de execução registrados no computador podem ser usados para controlar o instrumento. Transferindo dados de execução entre o instrumento e o computador Porta USB USB TO HOST Computador MM6 Cabo USB Configurações de MIDI Estas configurações referem-se a transmissão e recepção de dados de execução.
Conexões Modo PC O item PC Mode pode fazer diversas configurações convenientes em uma única operação. Selecione ON ou OFF. ON OFF Local OFF ON External Clock ON OFF Song Out ON ON Style Out ON ON Keyboard Out ON ON 1 Pressione a tecla [UTILITY] para acessar a tela UTILITY. 2 Use as teclas CATEGORY [DEC] e [INC] para selecionar o item PC Mode. 3 Use o dial para selecionar ON ou OFF.
Informações sobre o CD NOTAS ESPECIAIS • O copyright deste manual é propriedade exclusiva da Yamaha Corporation. • O copyright do software fornecido é propriedade exclusiva da Steinberg Media Technologies GmbH. • O uso do software fornecido e deste manual são regidos pelo acordo de licença com o qual o adquirente concorda ao abrir o pacote do software (favor ler atentamente o Acordo de Licença de Software na página 81 deste manual antes de instalar o software.
Informações sobre o CD ATENÇÃO ACORDO DE LICENÇA DE SOFTWARE FAVOR LER COM ATENÇÃO ESTE ACORDO DE LICENÇA DE SOFTWARE (“ACORDO”) ANTES DE USAR O SOFTWARE. VOCÊ SÓ TEM PERMISSÃO DE USAR ESTE SOFTWARE DENTRO DOS TERMOS E CONDIÇÕES DESTE ACORDO. ESTE ACORDO SE FAZ ENTRE VOCÊ (INDIVÍDUO OU ENTIDADE LEGAL) E A YAMAHA CORPORATION (“YAMAHA”). AO ROMPER O LACRE DESTE PACOTE VOCÊ ESTÁ CONCORDANDO COM OS LIMITES DEFINIDOS PELOS TERMOS DESTA LICENÇA.
Soluções de Problemas Problema Possível causa e solução Ouve-se um “pop” ao ligar ou desligar o instrumento. Isto é normal, e é causado pelo rápido surto de corrente produzido ao se ligar ou desligar o instrumento. Reduza sempre o volume ao ligar ou desligar o instrumento. É ouvido ruído ao usar um telefone móvel. Para evitar isto, desligue o telefone móvel ou use-o afastado do instrumento. O uso de telefone móvel próximo ao instrumento pode causar interferência.
Mensagens Mensagem na tela Comentário Access error! Indica falha na leitura ou escrita da mídia ou da memória flash. All Memory Clearing... É mostrada ao se apagar todos os dados da memória flash. Nunca desligue o instrumento durante a transmissão dos dados. Are you sure? Pede confirmação se a operação de Song Clear ou Track Clear deve ser executada. Backup Clearing... É mostrada enquanto os dados memorizados são apagados da memória flash.
Lista de Timbres Polifonia Máxima O instrumento possui polifonia máxima de 32 notas. Isto significa que ele pode tocar no máximo 32 notas de uma vez, independentemente da função que estiver sendo usada. O auto-acompanhamento usa um determinado número de notas, de maneira que, quando se usa o auto-acompanhamento, o número total de notas disponíveis para se tocar no teclado é reduzido. O mesmo se aplica aos timbres de split e às funções de música.
Lista de Timbres No.
Lista de Timbres No.
Lista de Timbres No.
Lista de Timbres No.
Lista de Timbres No.
Lista de Kits de Bateria •“ ” Indica que o som do instrumento é o mesmo do “GM Standard Kit 1”. • Cada instrumento de percussão usa uma nota. • O número (#) e o nome da nota MIDI são na realidade uma oitava abaixo do que o número e o nome da nota no teclado. Por exemplo, em “128: Standard Kit 1”, o instrumento “Seq Click H” (nota 36/ C1) corresponde à nota 24/C0). • Key Off: As notas marcadas com “O” cessam o som quando a tecla é solta. • Os timbres com o mesmo número de “Alternate Note Number” (*1 ...
Lista de Kits de Bateria C1 D1 E1 F1 G1 A1 B1 C2 D2 E2 F2 G2 A2 B2 C3 D3 E3 F3 G3 A3 B3 C4 D4 E4 F4 G4 A4 B4 C5 D5 E5 F5 G5 A5 B5 C6 C#1 D#1 F#1 G#1 A#1 C#2 D#2 F#2 G#2 A#2 C#3 D#3 F#3 G#3 A#3 C#4 D#4 F#4 G#4 A#4 C#5 D#5 F#5 G#5 A#5 No. do timbre MSB(0-127)/LSB(0-127)/PC(1-128) Keyboard MIDI Note No. Note Note No.
Lista de Kits de Bateria C1 D1 E1 F1 G1 A1 B1 C2 D2 E2 F2 G2 A2 B2 C3 D3 E3 F3 G3 A3 B3 C4 D4 E4 F4 G4 A4 B4 C5 D5 E5 F5 G5 A5 B5 C6 C#1 D#1 F#1 G#1 A#1 C#2 D#2 F#2 G#2 A#2 C#3 D#3 F#3 G#3 A#3 C#4 D#4 F#4 G#4 A#4 C#5 D#5 F#5 G#5 A#5 No. do timbre MSB(0-127)/LSB(0-127)/PC(1-128) Keyboard MIDI Note No. Note Note No.
Lista de Kits de Bateria C1 D1 E1 F1 G1 A1 B1 C2 D2 E2 F2 G2 A2 B2 C3 D3 E3 F3 G3 A3 B3 C4 D4 E4 F4 G4 A4 B4 C5 D5 E5 F5 G5 A5 B5 C6 C#1 D#1 F#1 G#1 A#1 C#2 D#2 F#2 G#2 A#2 C#3 D#3 F#3 G#3 A#3 C#4 D#4 F#4 G#4 A#4 C#5 D#5 F#5 G#5 A#5 No. do timbre MSB(0-127)/LSB(0-127)/PC(1-128) Keyboard MIDI Note No. Note Note No.
Lista de Kits de Bateria C1 D1 E1 F1 G1 A1 B1 C2 D2 E2 F2 G2 A2 B2 C3 D3 E3 F3 G3 A3 B3 C4 D4 E4 F4 G4 A4 B4 C5 D5 E5 F5 G5 A5 B5 C6 C#1 D#1 F#1 G#1 A#1 C#2 D#2 F#2 G#2 A#2 C#3 D#3 F#3 G#3 A#3 C#4 D#4 F#4 G#4 A#4 C#5 D#5 F#5 G#5 A#5 No. do timbre MSB(0-127)/LSB(0-127)/PC(1-128) Keyboard MIDI Note No. Note Note No.
Lista de Kits de Bateria C1 D1 E1 F1 G1 A1 B1 C2 D2 E2 F2 G2 A2 B2 C3 D3 E3 F3 G3 A3 B3 C4 D4 E4 F4 G4 A4 B4 C5 D5 E5 F5 G5 A5 B5 C6 C#1 D#1 F#1 G#1 A#1 C#2 D#2 F#2 G#2 A#2 C#3 D#3 F#3 G#3 A#3 C#4 D#4 F#4 G#4 A#4 C#5 D#5 F#5 G#5 A#5 No. do timbre MSB(0-127)/LSB(0-127)/PC(1-128) Keyboard MIDI Note No. Note Note No.
Lista de Performances Banco 1 2 3 4 5 6 7 8 Banco 2–8 96 Performance 1 2 3 4 5 6 7 8 1 2 3 4 5 6 7 8 1 2 3 4 5 6 7 8 1 2 3 4 5 6 7 8 1 2 3 4 5 6 7 8 1 2 3 4 5 6 7 8 1 2 3 4 5 6 7 8 1 2 3 4 5 6 7 8 Performance 1 2 3 4 Sync Start RnB Ballad1 D,B RnB Ballad1 D,B RockPop D,B ElektroPop1 SouthernRap1 On RootRock On Underground On WestcoastRap1D WestcoastRap2 On JazzyRnB D On RnB Ballad1 On PowerRock On Dancefloor On Chillout On ClubSamba On TurkishDance D SouthernRap2 On RnB Pop1 On RnB Ballad1 D,B O
Lista de Padrões No.
Lista dos Tipos de Efeitos Tipos de Reverb No. 1 2 3 4 5 6 7 8 9 10 11 12 13 14 15 16 17 18 19 20 21 22 23 24 25 26 Tipo HALL1 HALL2 HALL3 HALL4 HALL5 HALL M HALL L ROOM1 ROOM2 ROOM3 ROOM4 ROOM5 ROOM6 ROOM7 ROOM S ROOM M ROOM L STAGE1 STAGE2 STAGE3 STAGE4 PLATE1 PLATE2 PLATE3 GM PLATE NO EFFECT Descrição Reverberação simulando a acústica de um salão. Reverberação simulando a acústica de uma sala. Reverberação adequada a instrumento solista. Reverberação simulando um equipamento de “plate reverb”.
Lista de Tipos de Efeitos Tipos de DSP No.
Lista de Tipos de Efeitos No.
Lista de Tipos de Efeitos No.
Lista dos Tipos de Arpejo No. Tipo de Arpejo Tamanho Andam.
Lista de Tipos de Arpejos No. 126 127 128 129 130 131 132 133 134 135 136 137 138 139 140 141 142 143 144 145 146 147 148 149 150 151 152 153 154 155 156 157 158 159 160 161 162 163 164 165 166 167 168 169 170 171 172 173 174 175 176 177 178 179 180 181 182 183 184 185 Tipo de Tamanho Andam. Comp.
Lista do EQ Master No. 1 2 3 4 5 104 Tipo Flat Attack Hard Retro High Pass MM6 Manual do Proprietário Descrição Resposta plana de freqüência. Enfatiza o ataque de sons mais brilhantes. O grave é realçado para dar mais “pegada”. A faixa de reprodução é reduzida para simular um som de rádio AM. As freqüências graves e médias são reduzidas para realçar as agudas.
Formato dos Dados de MIDI NOTA: 1 Na configuração padrão (de fábrica) o instrumento normalmente funciona como um gerador multitimbral de 16 partes, e os dados recebidos não afetam os timbres nem as configurações do painel. Entretanto, as mensagens MIDI listadas abaixo afetam os timbres do painel, o auto-acompanhamento, e as músicas. • MIDI Master Tuning • Mensagens de System Exclusive para alterar o tipo de Reverb e o tipo de Chorus.
Tabela de Implementação de MIDI YAMAHA [ MUSIC SYNTHESIZER ] Modelo: MM6 Tabela de Implementação de MIDI Função Basic Channel Mode Messages Note Number: Transmitido Default Changed 1 - 16 X 1 – 16 X Default Altered X ************** 0 - 127 ************** X X 0 – 127 0 – 127 O 9nH,v=1-127 X 9nH,v=0 O 9nH,v=1-127 X X X X X O O 0-24 semitons O O O O O O O O X *1 O O O 0 - 127 ************** O O O O O O O O O O O True voice Velocity Note ON Note OFF After Touch Key's Ch's Pitch Bend 0,32 1,
MM6 Manual do Proprietário 107
Especificações Teclado MM6 61 teclas (sensibilidade ao toque) Bloco gerador de timbres Gerador de timbres Polifonia Capacidade Multitimbral Formas-de-onda Timbres AWM2 32 notas 16 partes 70MB (se convertidas para o formato 16 bits linear) Pré-gravados: 418 timbres normais + 22 kits de bateria GM: 128 timbres normais + 1 kit de bateria 8 x 8 bancos 25 tipos de Reverb, 30 tipos de Chorus, 189 tipos de Variation 5 tipos Performances Efeitos Equalizador Geral Bloco Seqüenciador Resolução Andamento Tipo d
MM6 Manual do Proprietário 109
Índice [ ] (retrocesso), tecla...................12, 27 [ ] (avanço), tecla ......................12, 27 [ ] (pausa), tecla .........................12, 27 [ ] (iniciar/parar), tecla ................. 12 A Acessórios ............................................ 7 Acompanhamento, parar .................... 53 Acorde ................................................ 25 Acordes comuns ................................ 54 Acorde, digitação ........................... 56, 65 [A]–[D], teclas .....................
Índic e Pista ................................................... 29 Pista, apagar ...................................... 34 Pista, silenciar ................................... 29 Pitch Bend, faixa ................................ 65 R [REC], tecla ..................................12, 30 RELEASE ......................................... 41 [RELEASE], botão............................. 12 RESONANCE ................................... 41 [RESONANCE], botão ...................... 12 Retrocesso Rápido .....
Garantia Limitada 90 DIAS 1 ANO - PARTES A Yamaha Corporation of America, daqui em diante designada por Yamaha, garante ao consumidor original de um produto incluído nas categorias listadas abaixo que o produto estará livre de defeitos de materiais e/ou fabricação durante os períodos indicados.
Para detalhes sobre produtos, contate o revendedor Yamaha mais próximo ou um dos distribuidores abaixo. CANADA NORTH AMERICA THE NETHERLANDS/ BELGIUM/LUXEMBOURG Yamaha Music Central Europe GmbH, Branch Benelux Clarissenhof 5-b, 4133 AB Vianen, The Netherlands Tel: 0347-358 040 Yamaha Canada Music Ltd. 135 Milner Avenue, Scarborough, Ontario, M1S 3R1, Canada Tel: 416-298-1311 FRANCE U.S.A. Yamaha Corporation of America 6600 Orangethorpe Ave., Buena Park, Calif. 90620, U.S.A.
Site global da Yamaha (em inglês) http://www.yamahasynth.com/ Site da Yamaha do Brasil http://www.yamahamusical.com.br U.R.G.