E L S - 02 E L S - 02 C Owner’s Manual DIGITAL ORGAN v2.
PRECAUTIONS PLEASE READ CAREFULLY BEFORE PROCEEDING Please keep this manual in a safe and handy place for future reference. WARNING Always follow the basic precautions listed below to avoid the possibility of serious injury or even death from electrical shock, short-circuiting, damages, fire or other hazards.
CAUTION Always follow the basic precautions listed below to avoid the possibility of physical injury to you or others, or damage to the instrument or other property. These precautions include, but are not limited to, the following: Power supply/Power cord Connections • Do not connect the instrument to an electrical outlet using a multiple-connector. Doing so can result in lower sound quality, or possibly cause overheating in the outlet.
NOTICE To avoid the possibility of malfunction/ damage to the product, damage to data, or damage to other property, follow the notices below. Handling and Maintenance • Do not use the instrument in the vicinity of a TV, radio, stereo equipment, mobile phone, or other electric devices. Otherwise, the instrument and/or other devices may generate noise.
Congratulations! You are the proud owner of a fine electronic organ, the Electone STAGEA ELS-02/ELS-02C. The Yamaha Electone combines the most advanced tone generation technology with state-of-the-art digital electronics and features to give you stunning sound quality with maximum musical versatility. In order to make the most of your Electone and its extensive performance potential, we urge you to read the manual thoroughly while trying out the various features described.
Main Features A wide variety of Voices including Super Articulation Voices pages 34 and 39 • The ELS-02 series features a wide variety of special Super Articulation Voices, which realistically recreate characteristic instrument sounds, such as the sound of finger slides on guitar and the breath noises of saxophone or other wind instruments, as well as many of the performance techniques such as legato, vibrato and glissando necessary for wind instruments.
Large, 7.0-inch TFT-LCD with Intuitive Touch Panel Operation page 14 This large LCD display not only lets you clearly see a wide selection of settings and parameters at almost any angle, it also serves as a touch control panel — letting you intuitively make selections and adjust settings simply by touching the screen! Once you touch a setting, you can even adjust it in finer detail if necessary with the Data Control dial. Audio Recording page 132 You can record your performances as audio data (.
Contents PRECAUTIONS ........................................................................... 2 5. Rhythm/Keyboard Percussion 56 About the Manuals...................................................................... 5 Accessories ................................................................................ 5 Main Features ............................................................................. 6 Panel Layout 10 Front Panel....................................................................
Displaying the Score............................................................... 124 Changing the score contents and settings ...................... 125 Other Functions (Tools) .......................................................... 126 Song copy ........................................................................ 126 Song delete ...................................................................... 128 Converting to XG ..............................................................
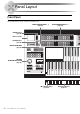
Panel Layout Front Panel The panel illustrations shown are taken from the ELS-02C.
LCD display/ DISPLAY SELECT (page 12) PEDAL VOICE 1, 2 (page 25) DISPLAY SELECT VOICE DISPLAY A.B.C. M.O.C.
LCD Display/Display Select DISPLAY SELECT VOICE DISPLAY 3 FOOT SWITCH 6 A.B.C. M.O.C. 4 MDR 5 UTILITY 7 AUDIO 8 DATA CONTROL RHYTHM PROGRAM VOICE EDIT PATTERN SEQUENCE 9 U.ORGAN FLUTES @ LCD display (touch panel).................... page 14 DATA CONTROL dial........................... page 15 [VOICE DISPLAY] button ...................... page 17 [A.B.C./M.O.C.] button ................. pages 66, 67 [MDR] button..................................page 106 [FOOT SWITCH] button ................
1 Quick Introductory Guide Whether you are an advanced performer or have never touched an electronic keyboard in your life, we recommend that you take the time to go through this basic section. It shows you in the simplest possible manner how to start playing your Electone. Getting Started 1 3 Press the [P] Power switch located on the right of the keyboard to turn the power on. Plug the power cord into an appropriate electrical outlet. CAUTION Only use the voltage specified as correct for the Electone.
Using the LCD Display Using the LCD Display This instrument features a special touch panel that allows you to change the parameters by simply touching the ‘virtual’ buttons or sliders on the display. (Please note that two or more parameters cannot be operated simultaneously.) You can also use the Data Control dial (page 12) to make fine changes to the parameter value shown in the display. NOTE When cleaning the display, use a soft, dry cloth.
Using the LCD Display To open the parameter list: Touching the display slider directly: Quick Introductory Guide To change a display slider value, press the desired point in the slider. The slider moves to the point that is pressed. You can also change the parameter value by sliding your finger up or down while holding down on the display slider. 1 Slider will move to the point you touch When you press a button, a parameter list will appear in which you can select the desired parameter.
LCD Display Settings LCD Display Settings 2 Here you can change the display settings: displayed language (English or Japanese), touch panel sound, and display brightness. Press the desired button, (Japanese) or [English]. LANGUAGE Selecting the display language The LCD display can be shown in two languages, English and Japanese. The default setting is English. 1 Press the [UTILITY] button to call up the GLOBAL Page of the Utility display. DISPLAY SELECT VOICE DISPLAY A.B.C. M.O.C.
Voice Display You can adjust the display brightness to a comfortable, easy-to-read level. 1 Voice Display You can visually confirm the currently assigned Voices to each keyboard, currently selected rhythm, Registration Shift, and so on, in the Voice Display. Press the [UTILITY] button to call up the GLOBAL Page of the Utility display. How to call up the Voice Display: 2 Move the LCD BRIGHTNESS slider by touching it directly or using the Data Control dial.
Voice Display 7 Registration Bank Selection Voice Display [Page 1] Switching the display pages 1 8 7 2 3 For selecting the desired Registration Bank. You can select the Banks from A (at top) to an empty Bank next to the last Bank containing data. When Banks A and B contain Registration data, for example, you can select Banks A, B, and C (which is empty). The on/off indication of Bank (A – E) shows whether the selected Bank contains data or not.
Registration Menu Change the display pages here. Quick Introductory Guide Registration Menu 1 A “Registration” consists of panel settings including the selected Upper Keyboard Voices, Lower Keyboard Voices, Pedal Voices, rhythm and so on. Each Registration Menu button (1 – 5) includes each different music styles of the Registrations. Use each button properly in accordance with the music styles you want to perform.
Registration Menu Registration Menu list REGISTRATION MENU 01 Page 1 2 3 4 5 (ELS-02C) 20 REGISTRATION MENU 1 01 KIDS REGISTRATION MENU 2 01 POPS & ROCK REGISTRATION MENU 3 01 DANCE & BALLAD REGISTRATION MENU 4 01 JAZZ & LATIN REGISTRATION MENU 5 01 SYMPHONY & WORLD Simple 8Beat 1 Dynamic 8Beat Organ Ballad Blow On Sax Fanfare Simple 8Beat 2 NY Ballad Dramatic Ballad Sax Ensemble String Orchestra Light Step British Pop Love Ballad Moonlight Romantic Violin Sunny Pop 8Beat Modern
Registration Menu 1 REGISTRATION MENU 02 1 2 REGISTRATION MENU 1 02 SIMPLE REGISTRATION MENU 2 02 POPS & ROCK REGISTRATION MENU 3 02 DANCE & BALLAD REGISTRATION MENU 4 02 JAZZ & LATIN REGISTRATION MENU 5 02 SYMPHONY & WORLD SimpleReg Strs 1 70s Easy Pop R&B Pop Ballad Big Band Tutti Orch Full Unit SimpleReg Strs 2 BoysGuitarBallad R&B Soul Ballad Alto Sax Combo String Classic SimpleReg Orch 1 Soul Pop R&B Cool Ballad Jazz Combo Fast Sweet Pizzicato SimpleReg Orch 2 70s Top Duo Coo
Registration Menu Page 6 7 REGISTRATION MENU 1 02 SIMPLE REGISTRATION MENU 2 02 POPS & ROCK Cls Organ Chapel J-Pop Piano Band Cls Organ Hall J-Pop Boys RockOrganBallad J-PopShuffleBeat R&B Rock Organ J-Pop BandBallad Organ Combo Breezy Ballad 6/8 Organ Ballad HeroRangerTheme Soul Jazz Organ Sunset Pop Pop Organ 60s Funky Punch *A Toy Organ Funky Punch *B Theatre Organ NY GlxyBattleship*A Nostalgic Organ GlxyBattleship*B J-Pop Anime *A J-Pop Anime *B 70s Honey 70s Hero DBZ *A DBZ *B
Confirming the Electone Version Factory Set (Initializing the Electone) You can confirm the version of your Electone by the following procedure. All current settings including Registration Memory, User Voices, User Rhythms, and LCD display settings can be deleted at once by the following procedure. Note that the operation here does not affect the settings of the wireless LAN settings, which can be initialized on page 200. 1 Press the [UTILITY] button. The Utility display appears.
2 Voices This Electone features more than 900 high-quality Voices. Any of these Voices can be used on the Upper Keyboard, Lower Keyboard and Pedalboard. Up to four Voice sections are available on the Upper Keyboard for playing together in a layer, while the Lower Keyboard and Pedalboard each have two Voice sections.
Selecting Voices with the Voice Buttons Voices for the Pedalboard Up to two different Voice sections are available on the Pedalboard for playing together: Pedal Voice 1 and Pedal Voice 2. Voices for each section can be selected from the panel. By default, Pedal Voices 1 and 2 sound only the highest note if two or more pedals are played. PEDAL VOICE 1 BRILLIANCE BRILLIANT CONTRA BASS ELEC.
Selecting Voices with the Voice Buttons NOTE Changing the Voice volume Depending on the volume value (set by the slider), two adjacent VOLUME button lamps may be lit at the same time, indicating an intermediate position. There are two ways to set the Voice volume: using the VOLUME buttons on the panel and using the volume slider in the display. The VOLUME buttons let you make coarse adjustments to the volume while the slider gives you fine control.
Selecting Voices with the Voice Buttons About the To Lower function LEAD VOICE 1 BRILLIANCE FLUTE SYNTH 1 TRUMPET TO LOWER ELEC. BASS 1 TIMPANI SYNTH BASS TO LOWER MIN VOLUME BRILLIANT MAX MELLOW MIN About the Solo function The Lead Voice 2 section features an exclusive Solo function. Solo lets you instantly switch to a solo Lead Voice in the middle of your performance, muting all other Upper Keyboard Voices. 1 Select the Voice that you wish to play solo in the Lead Voice 2 section.
Selecting Voices from the User Buttons For example, to call up Marimba 1, select the Percussion category. Selecting Voices from the User Buttons Reference page • Voice List (page 29) Percussion This Electone has a wide variety of Voices from which you can choose — far greater than what is immediately apparent from the Voice buttons on the panel. Each Voice section has one or two User buttons (numbered 1 or 2) which can be found at the right side of each Voice section.
Voice List Voice List ELS-02/ELS-02C STRINGS/VIOLIN 1 Power Brass 1 6 Muted Trumpet 2 Power Brass 2 Muted Trumpet 3 Strings 2 Violin 3 Power Brass 3 Muted Trumpet 4 Strings 3 Violin 4 Soft Brass 1 Cornet Strings 4 Violin 5 Soft Brass 2 Muted Cornet Strings 5 Violin 6 Soft Brass 3 Flugel Horn 1 Strings 6 Violin 7 S-BrsSect.Legato Strings 7 Violin 8 S-BrsSect.Fall Strings 8 S-Violin 1 S-BrsSect.
Voice List 2 Whistle 3 Clarinet 1 Woodwind&Glocken Resonance Pad 5 Resonance Pad 7 Clarinet 3 PopVocals Ooh 2 Resonance Pad 8 PopVocals Ooh 3 Resonance Pad 9 Strings&Winds PopVocals Aah Resonance Pad 10 Clarinet 6 Strings&Brass 1 PopVocals Baa S-Clarinet 1 Strings&Brass 2 PopVocals Bee S-Clarinet 2 Strings&Brass 3 PopVocals Daa Bell Pad 2 Bass Clarinet Strings&Horn 1 PopVocals Doo Bell Pad 3 Oboe 1 Strings&Horn 2 PopVocals Mmh Bell Pad 4 Oboe 2 Strings&Choir PopVocals Wah
Voice List 7 Warm Pad 6 Synth Brass 11 13 8 Dark Pad 1 Soft Lead 5 Synth Brass 12 14 Dark Pad 2 Soft Lead 6 Synth Brass 13 Synth Decay 2 Dark Pad 3 Soft Lead 7 Fat Synth Brass1 Synth Decay 3 Dark Pad 4 Early Lead 1 Fat Synth Brass2 Synth Decay 4 Dark Pad 5 Early Lead 2 Fat Synth Brass3 Synth Pluck 1 Dark Pad 6 PWM Lead 1 Fat Synth Brass4 Synth Pluck 2 Dark Pad 7 PWM Lead 2 DetunedSawBrass1 Synth Pluck 3 Dark Pad 8 Chorus Saw Lead1 DetunedSawBrass2 Synth Pluck 4 Dark Pad
Voice List 3 4 Harmonica 4 8 Combo Organ 4 S-Harmonica 9 Rock Organ 1 E.Guitar Amp 3 Stack E.Piano 2 E.Guitar Amp 4 Bandoneon 1 Rock Organ Slow1 S-E.Grand CP80 1 E.Guitar Amp 5 Bandoneon 2 Rock Organ Slow2 S-E.Grand CP80 2 E.Guitar Amp 6 Accordion 1 Rock Organ Slow3 Clavi 1 E.
Voice List 9 Harp 3 2 Slap Bass 1 4 Oud Smooth Bass 9 Sitar 1 Harp 5 Slap Bass 3 Smooth Bass 10 Sitar 2 Deep Bass 1 Deep Bass 2 Slap Bass 6 Deep Bass 3 Log Drum Kalimba Picked Bass 1 Deep Bass 4 Picked Bass 2 Deep Bass 5 Vibraphone 3 Picked Bass 3 Marimba 1 Picked Bass 4 Marimba 2 Picked Bass 5 Fat Bass 2 Marimba 3 Picked Bass 6 Fat Bass 3 Xylophone 1 Picked Bass 7 Fat Bass 4 Xylophone 2 Picked Bass 8 Fat Bass 5 Glockenspiel 1 Picked Bass 9 Fat Bass 6 Glockenspiel 2
Voice List Super Articulation Voice Supplementary List This list describes the effects that are produced by playing the Super Articulation Voices (having names beginning with the prefix “S-”). The meanings of the column titles are as follows: • Super Articulation Describes the effects produced just by playing the keyboard, regardless of the settings. For information about AEM in the list, see page 7. “Key-off Samples” refers to the special, characteristic sound which results when releasing the key.
Voice List Category CHOIR Voice Name ART.1 ART.
Voice List Category GUITAR Super Articulation Auto ART.1 ART.
Voice List ELS-02C (VA) Voice Name Range Description VA ACOUSTIC 1 G2 – A6 Flute with breath and other noises, which may squeak in higher registers. Setting the Touch Tone (After) higher and applying keyboard pressure can recreate flutter tonguing. V-Flute 2 C2 – C6 Flute suited for legato playing. Setting the User Vibrato depth to higher values has a nice effect. V-Ocarina C3 – C6 Soft ocarina. V-Oboe C3 – F5 Wider dynamic range with the Touch Tone effect.
Voice List Voice Name 3 Range Description V-Claviolin G2 – G5 A hybrid sound combining a violin and wind instrument. V-Air Bow C2 – G5 A bowed instrument sound with noise. V-Waspy Horn C1 – G4 A hybrid sound grafting a brass wind instrument mouthpiece to a wind instrument. After Touch affects the muted condition. Lip-slide can be created with Horizontal Touch. V-Mizu Horn C1 – C6 A hybrid sound combining a harmonica and trumpet.
Tone Generators of the ELS-02 Series Tone Generators of the ELS-02 Series AWM Tone Generator AWM is a synthesis system based on sampled waves, or audio recordings of actual instruments. AWM Voices use multiple samples, so that they sound like a real instrument. This section also describes how to play the Super Articulation Voices, since you will need special settings and operations for playing these Voices.
3 Organ Flutes (ELS-02C) The ELS-02C has an Organ Flutes feature that allows you to create your own organ Voices, giving you access to an unlimited combination of organ sounds. With this function, you can recreate all of the classic organ sounds by adjusting the flute footage levels and the percussive sounds, just like on conventional organs. There are nine flute footage settings, with three additional footage settings for the attack sound. 1 Press one of the Organ Flutes buttons (UPPER or LOWER).
4 REVERB EFFECT Page Determines the amount of reverb applied to the Organ Flute Voice. When the panel REVERB control is set to the minimum, the setting here will have no effect. Reference page 1 3 • Reverb (page 46) 5 VOLUME 2 1 EFFECT TYPE 5 Press the [VIBRATO] button in the upper right on the display, then set the related parameters. Selects the Rotary Speaker (tremolo) effect type. Press the EFFECT TYPE button to call up a list of the effect types. Select the desired type from the list.
4 Voice Controls and Effects The Electone is equipped with two general kinds of functions that can be used to change the sound of the Voices: Voice Controls and Effects. Each Voice has been given certain factory-preset effect settings to best enhance its sound. However, if you wish, you can change the sound to suit your preferences by using the controls and effects described in this section. All built-in effects are digital.
Settings Selected from the Voice Condition Display 3 TOUCH TONE Settings Selected from the Voice Condition Display Voice Condition [Page 1] 1 3 -1 INITIAL touch Controls volume and timbre according to the velocity at which you play the keys. The harder you play the keys, the greater the volume and the brighter the timbre will become. Higher settings make the change wider. Minimum setting produces no effect. Range: 0 – 14 NOTE 2 Initial Touch may not be effective on some organ Voices.
Settings Selected from the Voice Condition Display 4 -2 AFTER touch Controls the pitch according to the pressure you apply to the keys after playing them. The minimum setting produces no effect at all. Higher (positive) settings make the pitch higher according to the pressure and lower (negative) settings make the pitch lower. The extreme settings of +14 and -14 result in the widest pitch change.
Settings Selected from the Voice Condition Display 1 -4 SPEED Voice Condition [Pages 3 and 4] Determines the speed of the vibrato effect. Higher settings increase the speed of the vibrato. Range: 0 – 14 2 TOUCH VIBRATO 1 4 NOTE 3 Touch Vibrato is not applied to the Pedal Voices of the ELS-02. 3 SLIDE (only for Lead Voices) Applies a portamento effect to notes played in legato. The Slide function is effective within a one-octave range for Lead Voices.
Selecting from the Panel 3 Effect Parameters Effect parameters are displayed corresponding to the selected effect type. Voice Condition [Page 5] Selecting from the Panel The Reverb, Sustain, Brilliance and Rotary Speaker displays are called up by pressing the respective buttons on the panel. Reverb Reverb adds an echo-like effect to the sound, giving the impression of a performance in a large room or concert hall.
Selecting from the Panel NOTE 3 ORGAN (only for the ELS-02C) Depending on the reverb depth value (set by the slider), two adjacent REVERB button lamps may be lit at the same time, indicating an intermediate position. Determines the amount of reverb applied to the Organ Flute Voice. This parameter corresponds to the REVERB slider contained in the ATTACK/VOLUME Page of the Organ Flute display. On the ELS-02, this slider is not displayed.
Selecting from the Panel 3 RHYTHM SUSTAIN LENGTH display Determines the amount of reverb applied to the rhythm (with PERCUSSION slider) and accompaniment (with ACCOMPANI. slider). Each slider corresponds to the REVERB slider in the Rhythm Condition display. Range: 0 – 24 Reference page • Changing the rhythm reverb (page 60) 4 KEYBOARD PERCUSSION Determines the amount of reverb applied to the Keyboard Percussion.
Selecting from the Panel DISPLAY SELECT Rotary Speaker Rotary Speaker recreates the rich, swirling sound of the popular rotating speaker effect. The Rotary Speaker effect can be switched in real time as you play, with either the front panel button or the Left Footswitch (when properly set for Footswitch operation). Keep in mind that the Rotary Speaker effect CANNOT be turned on only by turning on the [ROTARY SP SPEED] button. To properly use the Rotary Speaker effect, follow the procedure below.
Using Voice Link The settings will be registered, then the Voice Link indication (chain link icon) appears at right of the Voice name on the display. Using Voice Link Registering a Voice with the settings on the Voice Condition display to Voice Link You can register the current Voice with the current settings (except for Volume and Brilliance) on the Voice Condition display to the Voice Link category as a Voice.
Using Voice Link 2 Press the Voice Link Category from the Voice Categories at the right top on the display, then press the desired Voice name, for example “Strings 2” here.
Using Voice Link The settings will be registered, then the Voice Link indication appears at right of the Voice name on the display. Registering a Voice to Voice Link with a different Voice name This section covers how to register the current Voice to Voice Link with a different Voice name. 1 After pressing the [LINK] button on the display, press the [RENAME] button on the dialog window. Deleting a Voice from Voice Link 2 Change the Voice name, then press the [OK] button.
Using Voice Link 3 Press the [OK] button on the dialog window. 4 Voice Controls and Effects The selected Voice is now deleted from Voice Link. When you press the Registration Number button containing data using a Voice registered to Voice Link, the corresponding Voice and its settings on the Voice Condition display will be called up from its original Voice Category (not from Voice Link).
Effect List Effect List REVERB HALL 1 HALL 2 HALL 3 HALL M HALL L XG HALL 1 XG HALL 2 ROOM 1 ROOM 2 ROOM 3 ROOM 4 ROOM S ROOM M ROOM L XG ROOM 1 XG ROOM 2 XG ROOM 3 STAGE 1 STAGE 2 XG STAGE 1 XG STAGE 2 PLATE 1 PLATE 2 XG PLATE GM PLATE WHITE ROOM ATMO HALL ACOSTIC ROOM DRUMS ROOM PERC ROOM TUNNEL CANYON BASEMENT XG DLY LCR DELAY LR ECHO CROSS DELAY1 TEMPO ECHO TEMPO CROSS1 GATE REVERB2 REVERS GATE XG CHORUS 2 XG CHORUS 3 DELAY DELAY LCR CROSS DELAY2 TEMPO DELAY1
Effect List DISTORTION+ DIST+DELAY ODRV+DELAY XG DIST+DLY XG ODRV+DLY CMP+DIST+DLY CMP+ODRV+DLY XG CMP+DT+DL XG CMP+OD+DL V_DIST H+DLY V_DIST S+DLY DIST+T DLY ODRV+T DLY CMP+DST+TDLY CMP+OD+TDLY1 CMP+OD+TDLY2 CMP+OD+TDLY3 CMP+OD+TDLY4 CMP+OD+TDLY5 CMP+OD+TDLY6 VDST H+TDLY1 VDST H+TDLY2 VDST S+TDLY1 VDST S+TDLY2 AMP SIMULATOR XG AMP SIM ST AMP SIM 1 ST AMP SIM 2 ST AMP SIM 3 ST AMP SIM 5 XG ST AMP ST AMP SOLID ST AMP CRUNC ST AMP BLUES ST AMP CLEAN ST AMP HARP SML ST DIST
5 Rhythm/Keyboard Percussion This Electone features more than 600 different real rhythms featuring actual drum and percussion sampled sounds. Automatic Accompaniment functions are used with the rhythms, providing appropriate and completely automatic accompaniment to match the style of the selected rhythm. Moreover, the Electone has a Keyboard Percussion feature that allows you to play drum and percussion sounds from the Upper, Lower keyboard and Pedalboard. KEYBOARD PERCUSSION 1 2 SEQ. SEQ. 1 2 SEQ.
Selecting Rhythms with the Rhythm Buttons Rhythm structure ENDING Each rhythm is made up of “sections.” Since each section is a rhythmic variation of the basic rhythm, you can use them to add “spice” to your performance and mix up the beats while you are playing. You can freely change the section while the rhythm is played back. This is used for the ending of the Song. There are three Ending sections that can be selected with the ENDING [1] – [3] buttons.
Selecting Rhythms with the Rhythm Buttons To use the Fill In patterns: INTRO INTRO 1 2 As you play the Electone along with the rhythm, occasionally press the selected MAIN/FILL button as desired. A Fill In pattern of one measure will be played and the selected Fill In section’s lamp (above the button) flashes. 3 Pressing one of the INTRO [1] – [3] buttons automatically adds a short introduction before starting the actual (Main) rhythm.
Selecting Rhythms with the Rhythm Buttons Changing the rhythm volume Adjusting the tempo There are two ways to set the rhythm volume: using the VOLUME buttons on the panel and using the volume slider in the display. The volume buttons let you make coarse adjustments to the volume while the slider gives you fine control. Turn the TEMPO dial clockwise to increase the tempo, and counter-clockwise to decrease it.
Selecting Rhythms from the User Buttons Reference page • Voice Display (page 17) Each rhythm has its original (preset) tempo. Press [PRESET TEMPO] button in the display to restore the tempo to the original setting. Selecting Rhythms from the User Buttons As with the Voice sections, the Rhythm section also has User buttons (numbered 1 or 2) from which rhythms can be selected. You can select original User rhythms that you have created with the Rhythm Pattern Program function.
Rhythm List Rhythm List This list shows all available rhythms on the Electone. Numbers written at the left side of each column in this list indicate the numbered buttons displayed in the Rhythm Menu.
Rhythm List 7 Organ Groove Piano Swing 6 *2, *3 60s Chart Swing New R&B Piano Stride *2, *3 Bubblegum Pop Worship Medium Tijuana Worship Fast + 70s 8Beat Worshp Power Bld 70s Country Pop Piano Blues 1 *2, *3 Piano Blues 2 *2, *3 Simple 8Beat Pop *2 70s ChartCountry Simple 3/4 Pop *2 Country Brothers Simple Shffl Pop *2 Euro Pop Organ 8Beat Light 1 Euro Fox 8Beat Light 2 Euro Pop 8Beat Light 3 Piano 8Beat *2 8Beat Light 4 Simple Mambo *2 Simple Shuffle 1 Simple Rumba
Rhythm List 6 Guitar Rumba 1 *3 Guitar Rumba 2 BALLAD 1 Simple 8BtBallad *2 *2 Piano Rumba *2, *3 SimpleRockBallad Piano Cha Cha *2, *3 8Beat Ballad Acoustic 8Bt Bld Guitar Ballad 3 Piano Ballad ClassicPianoBld Flamenco 16Beat Ballad 3 ElecPiano Ballad *3 16Beat Ballad 4 Pop Piano Ballad *2 6/8 Ballad Piano8BeatBallad *2, *3 Tarantella 6/8 Slow Rock 1 Piano Slow Rock *2, *3 Sirtaki 6/8 Slow Rock 2 PianoOrchBallad *3 Scand Schottis 6/8 Slow Rock 3 Hawaiian 6/8 Orchestral
Rhythm List 5 Boogie Woogie 2 3 Swingin' Boogie Disco Fox Oldies Rock&Roll Mallorca Disco + *1, *2 *1, *2 Disco Palace Metronome 4/4 + *1, *2 Southern Rock Disco Philly 1 Metronome 6/8 + *1, *2 Cowboy Rock Disco Philly 2 Metronome 9/8 + *1, *2 Scand Bugg Disco Teens 1 Country Rock 1 *1 4 Country Blues *1, *2 Disco Funk 1 Metronome 7/4 + *1, *2 Disco Funk 2 Metronome 8/4 + *1, *2 Click 2/4 + *1, *2 Country Straits+ *1 2 Dance Pop Click 3/4 + *1, *2 Country Strum US D
Accompaniment Accompaniment The Accompaniment function provides arpeggiated chords and other instrumental embellishments when rhythms are used. Accompaniment controls are selected from the Rhythm Menu and Rhythm Condition display. 1 Press any one of the RHYTHM buttons once. Main Drum and Add Drum contains drum and percussion rhythm patterns. When you turn both Main Drum and Add Drum off, the drum and percussion do not sound.
Automatic Accompaniment – Auto Bass Chord (A.B.C.) SINGLE FINGER: Automatic Accompaniment – Auto Bass Chord (A.B.C.) The Auto Bass Chord (A.B.C.) function works with the Rhythm section of the Electone to automatically produce bass accompaniment as you play. It adds an entirely new dimension to your performance by effectively putting a full backing band at your disposal. One of three different modes (Single Finger, Fingered Chord, Custom A.B.C.) is used for producing Automatic Accompaniment patterns.
Melody On Chord (M.O.C.) Key of C Cm C7 Cm7 Cmaj7 Cm maj7 Caug Cdim Cdim7 Csus4 C7sus4 Cm7-5 C6 Cm6 Cadd9 Melody On Chord (M.O.C.) The Melody On Chord (M.O.C.) feature automatically adds a harmony part to the melodies you play on the Upper keyboard. The harmony is derived from the chords you play on the Lower keyboard — or from the chords that are played for you, if you use Automatic Accompaniment.
Keyboard Percussion Mode 2: Produces harmonies of up to three notes in a range close to the melody played. Keyboard Percussion Mode 3: The Keyboard Percussion function features many types of drum and percussion sounds, playable from the keyboards and Pedalboard. Keyboard Percussion has two different modes, Preset and User.
Keyboard Percussion 3 4 Press the [ASSIGN] button at the top right in the display to call up the ASSIGN Page. 5 Adjust the volume and amount of reverb applied to the Keyboard Percussion. Two sliders in the K.B.P. display determine the reverb and volume settings. To adjust the volume and amount of reverb, touch the slider in the display or use the Data Control dial. Press the [KIT CHANGE] button at the center of the display to call up the Keyboard Percussion Kit List.
Keyboard Percussion Preset Keyboard Percussion List EL Kit Preset 1 (UK) - SD Brush Roll Surdo Mute Side Stick - Snare Drum Heavy Surdo Open Snare Claves SD Brush Shot 1 Hi Q Hand Clap - SD Reverb 1 Whip Slap Snare Tight - Snare Drum Light Scratch H Floor Tom L Synth Tom 3 Tom 3 Scratch L Hi-Hat Closed Concert BD Snare Drum Rim 1 Finger Snap Floor Tom H Synth Tom 2 Tom 2 Click Noise Hi-Hat Pedal Bass Drum Heavy Hi-Hat Closed Metronome Click Low Tom Synth Tom 1 Tom 1 Me
Keyboard Percussion Live!AcousticKit Preset 1 (UK) Stick Acoustic Surdo Mute Stick Real Surdo Open Snare Acoustic Surdo Open Snare Real 1 Hi Q Hand Clap Power Hi Q Clap Power Whip Slap Snare Rough Aco Whip Slap Snare Real 2 Scratch H Tom Acoustic 1 Scratch H Tom Real 1 Scratch L Hi-HatClosedAco Scratch L Hi-HatClosedReal Finger Snap Tom Acoustic 2 Finger Snap Tom Real 2 Click Noise Hi-HatPedal Aco Click Noise Hi-Hat PedalReal Metronome Click Tom Acoustic 3 Metronome Click
Keyboard Percussion Live!RealBrushes Preset 1 (UK) Surdo Mute Stick Brush Surdo Mute Snare T8 Rim Surdo Open Vintage Slap 4 Surdo Open Snare T8 2 Hi Q Clap Power Hi Q Clap T9 Whip Slap Vintage Slap 5 Whip Slap Snare T8 1 Scratch H TomRealBrushes 1 Scratch H Tom T8 1 Scratch L Hi-Hat Closed RB Scratch L Hi-Hat Closed T8 Finger Snap TomRealBrushes 2 Snare Hammer Tom T8 2 Click Noise Hi-Hat Pedal RB Kick Zap Hard Hi-Hat Pedal T8 Metronome Click TomRealBrushes 3 Snare Garg L
Keyboard Percussion Analog T9 Kit Preset 1 (UK) Snare T9 Rim W Kick Snare T9 Rim Surdo Open Snare T9 1 Disco Fx Snare T9 1 Hi Q Clap T9 WhiteNoiseDown 1 Clap T9 Whip Slap Snare T9 2 PinkNoise Down 1 Snare T9 2 Scratch H Tom T9 1 WhiteNoiseDown 2 Tom T9 1 Scratch L Hi-Hat Closed T9 PinkNoise Down 2 Hi-Hat Closed T8 Snare Drum&Bass1 Tom T9 2 White Noise Up 2 Tom T9 2 Kick Break 2 Hi-Hat Pedal T9 White Noise Up 1 Hi-Hat Pedal T9 Snare Distortion Tom T9 3 Pink Noise Up Tom T9
Keyboard Percussion HipHop Kit Preset 1 (UK) Surdo Mute SnareAnalogSmRim Surdo Mute Snare T9 Rim Surdo Open Snare HipHop 1 Surdo Open Snare T9 1 Hi Q Snare Clappy Hi Q Clap T9 Whip Slap Snare HipHop 2 Whip Slap Snare T9 4 Scratch H Floor Tom L Scratch H Tom T9 1 Scratch L Hi-HatClosed Hip Scratch L Hi-Hat Closed T9 Hi-HatClosedT8 2 Low Tom Snare Drum&Bass1 Tom T9 2 Tom T8 3 Hi-Hat Pedal Hip Kick Break 2 Hi-Hat Pedal T9 Hi-Hat Open T8 2 Mid Tom L Snare Distortion Tom T9 3
Keyboard Percussion Break Kit Preset 1 (UK) Snare Hip Rim 1 - Cutting Noise 2 Surdo Open Snare Break 3 - - Hi Q Snare Break 1 - String Slap Whip Slap Snare Break 2 - - Scratch H Tom Break 1 - - Scratch L HHClosedRockSoft - - Finger Snap Tom Break 2 - - Snare Break 8 Hi-Hat PedalRock - - Snare Break 9 Tom Break 3 - - Hi-HatClosedBrk1 HH HalfOpen Rock - - Hi-HatClosedBrk2 Tom Break 4 - - - Kick Break Deep Tom Break 5 - - - - Snare Hip Crash Cymbal 1 - -
Keyboard Percussion SFX Kit 2/Live! SFX Kit 2 Preset 1 (UK) - Door Squeak - Pink Noise - Door Slam - WhiteNoiseDown 1 - Scratch Cut - PinkNoise Down 1 - Scratch Split - WhiteNoiseDown 2 - Wind Chime - PinkNoise Down 2 - Telephone Ring - White Noise Up 2 - - - White Noise Up 1 - - - Pink Noise Up - - - WhiteNoiseUp Rel - - - PinkNoise Up Rel - - - WhiteNoiseUp LFO - - - - - PinkNoise Up LFO - - - - - - - - - - - - - - - - - - - - CarEngn
Keyboard Percussion VocalEffectsKit Preset 1 (UK) Female Ha 1 - - - Male Ha 2 - - - Male Ha 3 - - - Male Bh 1 - - - Female Bh 1 - - - Male Kh 1 - - - Female Kh 1 - - - Male Ph 1 - - - Female Ph 1 - - - Male Th 1 - - - Female Th 1 - - - - Male Bh 2 - - C'mon - - Female Bh 2 - - Hoo! - - Male Kh 2 - - Aha! - - Female Kh 2 - - Oh Yeah - - Male Ph 2 - - Yayayayayah - - Female Ph 2 - - Put Your Hands… - - Male Th 2 - - C'mon No
Keyboard Percussion Wonderland Kit Preset 1 (UK) Laser Shot Horse Cajon Low Bongo H Open 3 f Water Phone Bass Drum Cajon Slap Bongo H Rim Bubble Footstep Cajon Tip Bongo H Tip Puddle Snare Claves High Bongo H Heel Thunder Snare Roll Claves Low Bongo H Slap Shower Footstep Hand Clap Bongo L Open 1 f Beach Lion - Bongo L Open 3 f Stream Footstep Finger Snap Bongo L Rim Footstep Oxen Castanet Bongo L Tip Door Squeak Footstep Conga H Tip Bongo L Heel Door Slam Door Sla
Keyboard Percussion Arabic Kit Preset 1 (UK) Side Stick Asma Davul L Tef Cymbal - Snare Soft Asma Davul R Tef Cymbal Mute - Arabic Hand Clap Asma Davul Side Tef Tremolo - Snare Drum Asma Davul Both Tef Shake 1 - Floor Tom L KoltukDavul Flam Tef Shake 2 - Hi-Hat Closed KoltukDavul Teke Tef Tek Flam - Floor Tom H Koltuk Davul Tek Tef Full Open - Hi-Hat Pedal Koltuk Davul Dum Tef Teke OpShort - Low Tom Bendir Teke Flam Tef Tek Op Short - Hi-Hat Open Bendir Teke Dead Tef
Keyboard Percussion China Kit - Gong Batter Symphonic Gong 1 Sus Cym 1 Roll S - Jin Luo Symphonic Gong L Sus Cymbal 1 - Luo High 2 Symphonic Gong 2 Sus Cym 2 Roll L - Luo Mid-Low Timpani E Sus Cymbal 2 - Luo Timpani F Concert Tom 5 - Jin Luo Low Timpani F# OrchCymbal 1 ckd - Da Cha 1 Timpani G Concert Tom 4 - Da Cha Effect Timpani G# Orch Cymbal 1 - Zhongcha Timpani A Concert Tom 3 - Xiaocha Effect Timpani A# Orch Cymbal 2 Da Cha 2 Xiaocha Timpani B Concert Tom 2
Keyboard Percussion Creating a User Keyboard Percussion Kit You can create your own original Keyboard Percussion kit by assigning specific drum/percussion sounds to the notes on the keyboard. To do this, assign your desired Kit (pages 85 – 94) to a User Keyboard Percussion (any of User 1 – 40), then assign each desired drum/percussion sound to any key or pedal. The created User Keyboard Percussion kit can be called up via the KEYBOARD PERCUSSION [1] or [2] button.
Keyboard Percussion 6 Assign an instrument to a particular key or pedal by simultaneously holding down the desired instrument name in the display and pressing the key (or pedal) to which the instrument is to be assigned. To erase one instrument: Simultaneously hold down the [CLEAR] button in the display (ASSIGN Page) and press the key (or pedal) corresponding to the instrument you wish to erase.
Keyboard Percussion Copying the Keyboard Percussion settings You can copy the Preset Keyboard Percussion to one of the User locations, or copy from one User location to another. In the instructions below, Preset 1 is copied to User 1. 1 4 A message appears, prompting confirmation of the operation. 5 Press the KEYBOARD PERCUSSION [1] button to copy Preset 1. Detailed settings for each percussion instrument You can independently adjust the settings of pan, pitch, reverb and volume for each instrument.
Keyboard Percussion 1 PAN Determines the position of the currently selected instrument in the stereo image. Seven pan positions are available. 2 PITCH COARSE Adjusts the pitch of the currently selected instrument by 100 cents. Range: -64 – +63 3 PITCH FINE Adjusts the pitch of the currently selected instrument by one cent, allowing more detailed tuning of the instrument than PITCH COARSE (2). Range: -64 – +63 4 REVERB Determines the amount of reverb applied to the currently selected instrument.
Keyboard Percussion Kit Assign list EL Kit CYMBAL • • • • • • • • • • • • Crash Cymbal 1 Crash Cymbal 2 Crash Cym Mute Ride Cymbal 1 Ride Cymbal 2 Ride Cymbal Cup Orchestra Cymbal Orch Cymbal Roll Orch Cymbal Mute Cymbal March Cym Brush Shot Tam-Tam • • • • • • Hi-Hat Open Hi-Hat Closed Hi-Hat Pedal 1 Hi-Hat Pedal 2 Analog HH Open Analog HH Closed SNARE DRUM • • • • • • • • • • • • Snare Drum Light Snare Drum Heavy Snare Drum Rim 1 Snare Drum Rim 2 SD Accent 1 SD Accent 2 SD Reverb 1 SD Reverb 2 Synth
Keyboard Percussion PERCUSSION 2 PERCUSSION 1 TOM • Hi-Hat Pedal • • • • • • • • • • • • • • • • • • • • • • • • • • • • • SNARE DRUM Surdo Mute Surdo Open Cuica Mute Cuica Open Cabasa Shaker Agogo H Agogo L Samba Whistle H Samba Whistle L PERCUSSION 3 • • • • • • • • • • • • Tambourine Castanet Jingle Bells Bell Tree Triangle Open Triangle Mute Wood Block H Wood Block L Sticks Whip Slap Finger Snap Hand Clap PERCUSSION 4 • • • • • • • • Hi Q Click Noise Scratch H Scratch L Seq Click L Seq Click
Keyboard Percussion Electro Kit • Finger Snap • Hand Clap CYMBAL PERCUSSION 4 • • • • • • • • • • • • • • • • • • Crash Cymbal 1 Crash Cymbal 2 Splash Cymbal Chinese Cymbal Ride Cymbal 1 Ride Cymbal 2 Ride Cymbal Cup Hi-Hat Open Hi-Hat Closed Hi-Hat Pedal Analog Kit SNARE DRUM Snare Noisy 2 Snare Noisy 3 Snare Snap Elec Snare Roll Side Stick Open Rim Shot Brush Tap Brush Slap Brush Swirl Reverse Cymbal TOM • • • • • • Tom Electro 1 Tom Electro 2 Tom Electro 3 Tom Electro 4 Tom Electro 5 Tom Elect
Keyboard Percussion PERCUSSION 1 TOM • Hi-Hat Pedal • • • • • • • • • • • • • • • • • • • SNARE DRUM Conga H Open Conga L Conga H Mute Bongo H Bongo L Timbale H Timbale L Cowbell Claves Guiro Long Guiro Short Maracas Vibraslap PERCUSSION 2 • • • • • • • • • • Surdo Mute Surdo Open Cuica Mute Cuica Open Cabasa Shaker Agogo H Agogo L Samba Whistle H Samba Whistle L PERCUSSION 3 • • • • • • • • • • • • Tambourine Castanet Jingle Bells Bell Tree Triangle Open Triangle Mute Wood Block H Wood Block L St
Keyboard Percussion • Finger Snap • Hand Clap PERCUSSION 4 • • • • • • • • Hi Q Click Noise Scratch H Scratch L Seq Click L Seq Click H Metronome Click Metronome Bell Live!AcousticKit • Samba Whistle L PERCUSSION 3 • • • • • • • • • • • • Tambourine Castanet Jingle Bells Wind Chime Triangle Open Triangle Mute Wood Block H Wood Block L Sticks Whip Slap Finger Snap Hand Clap Power PERCUSSION 4 • • • • • • • • • • • • • • • • • • CrashCymbalAco 1 CrashCymbalAco 2 SplashCymbal Aco China Cymbal Aco RideC
Keyboard Percussion TOM • Hi-Hat PedalReal • • • • • • SNARE DRUM Tom Rock 1 Tom Rock 2 Tom Rock 3 Tom Rock 4 Tom Rock 5 Tom Rock 6 BASS DRUM • Kick Rock • Kick Rock Heavy • Kick Soft Rock PERCUSSION 1 • • • • • • • • • • • • • Conga H Open Conga L Conga H Mute Bongo H Bongo L Timbale H Timbale L Cowbell Claves Guiro Long Guiro Short Maracas Vibraslap PERCUSSION 2 • • • • • • • • • • Surdo Mute Surdo Open Cuica Mute Cuica Open Cabasa Shaker Agogo H Agogo L Samba Whistle H Samba Whistle L • • • • •
Keyboard Percussion • • • • • • Cowbell T8 Claves T8 Glass H Glass L Maracas T8 Vibraslap PERCUSSION 2 • • • • • • Surdo Mute Surdo Open Cabasa Analog Shaker Analog Shaker H Analog Shaker L PERCUSSION 3 Tambourine RX5 Sleigh Bells Wind Chime Triangle Open Triangle Mute Clap T9 Whip Slap PERCUSSION 4 • • • • • • • • • Hi Q Hi Q 1 Hi Q 2 Scratch H Scratch L Scratch H 2 Scratch L 2 Fx Gun 1 Fx Gun 2 Analog T9 Kit CYMBAL • • • • • • • • • • Crash Cymbal T9 Splash Cymbal 2 Crash Cymbal 4 China Cymbal 2 R
Keyboard Percussion • • • • • • • • • • Triangle Open Triangle Mute Whip Slap HipHop Clap 2 HipHop Clap 3 HipHop Clap 5 HipHop Clap 6 HipHop Clap 7 Electric Clap 1 Electric Clap 2 PERCUSSION 4 • • • • • Hi Q Scratch H Scratch L ScratchBDForward ScratchBDReverse Drum Machine CYMBAL • • • • • • • • • • • • • • • • Crash Cymbal T9 Ride Cymbal T9 Hi-Hat Open T8 1 Hi-Hat Open T8 2 Hi-Hat Open T9 Hi-Hat Open Aco Hi-HatOpen Lo-Fi Hi-Hat Open Syn Hi-HatClosedT8 1 Hi-HatClosedT8 2 Hi-Hat Closed T9 Hi-HatClosed
Keyboard Percussion • • • • • • • • • • Train 2 Jet Plane 2 Starship Burst Roller Coaster Submarine Machine Gun 2 Laser Gun Explosion 2 Firework Noise Kit NOISE White Noise WhiteNoiseDown 1 WhiteNoiseDown 2 White Noise Up 1 White Noise Up 2 WhiteNoiseUp Rel WhiteNoiseUp LFO Pink Noise PinkNoise Down 1 PinkNoise Down 2 Pink Noise Up PinkNoise Up Rel PinkNoise Up LFO VocalEffectsKit FEMALE 1 • • • • • • • • • • • • • • Female Bh 1 Female Bh 2 Female Bh 3 Female Bh 4 Female Ha 1 Female Ha 2 Female Kh 1 Fem
Keyboard Percussion • • • • • • • • Rik Dom Rik Tak 1 Rik Tak 2 Rik Sak Rik Tik Rik Finger 1 Rik Finger 2 Rik BrassTremolo CYMBAL/SNARE DRUM • • • • • • • • • Crash Cymbal 1 Crash Cymbal 2 Ride Cymbal 1 Hi-Hat Open Hi-Hat Closed Hi-Hat Pedal Snare Drum Snare Soft Side Stick TOM/BASS DRUM • • • • • • • Floor Tom L Floor Tom H Low Tom Mid Tom L Mid Tom H High Tom Kick Soft PERCUSSION • • • • • • • • • Conga H Open Conga L Conga H Mute Bongo H Bongo L Cowbell Claves Cabasa Tambourine Turkish Kit CYMBAL
6 Registration Memory Registration Memory allows you to store virtually all the settings you make on the panel and LCD, providing a convenient way to instantly change all Voice settings and rhythms while you’re playing, with the simple touch of a single button on the Registration Memory panel. The buttons are conveniently located between the Upper and Lower keyboards for easy access while playing. Moreover, you can also recall the settings using the right footswitch.
Storing Registrations to Another Bank Storing Registrations to Another Bank With the default initial settings and Bank A selected, you can store your original Registrations to Banks A and B. Storing the Registrations to Bank B enables selection of Bank C. Similarly, storing Registrations to Bank C enables selection of Bank D, and so on, up to a maximum of Bank E. 1 At the lower right section of the Voice Display, select the Registration Bank.
Saving the Registration Data to USB Flash Drive Selecting Disable mode: The Disable mode enables you to select what is to be disabled when the [D.] (Disable) button is on. There are two Disable modes: Normal (rhythm menu, tempo, etc. are disabled) and Tempo (only tempo is disabled). 1 2 Press the [UTILITY] button to call up the GLOBAL Page of the Utility display. Press the DISABLE MODE [NORMAL] or [TEMPO] button.
Initializing Registration Memory 4 5 Press the [UNIT EDIT] button on the lower right side of the display to call up the Unit Edit display. Initializing Registration Memory Press the [SAVE] button in the display. Deleting all Registration data in Registration Memory initializes the Registration Memory. Be careful when using this operation, since it erases all your existing data. In order to avoid inadvertently losing your important data, save it to a USB flash drive.
Registration Shift 1 OFF Registration Shift The Registration Shift function allows you to change Registrations without taking your hands from the keyboards. By using the Right Footswitch on the expression pedal, you can “jump” to a specified Registration or step through the panel Registrations in sequence, either in numeric order or in any order you specify. Registration Shift has three modes: Shift, Jump and User. These are set in the Regist Shift display.
Registration Shift To set the User Registration order: 1 2 3 Select a Bank. Press the desired numbered button in the Registration Memory section. Press the DATA [SET] button in the display. The Bank letter and Registration number appear in the display, indicating that the Registration is entered. 4 DELETE: For deleting a Registration number at the current cursor position. To delete the unnecessary number, move the cursor to a numbered position and press [DELETE] in the display.
Registration Shift Registration Shift, in “SHIFT” mode: Confirming the Registration Shift setting in the Voice Display You can confirm the Registration Shift mode in the Voice Display, Page 1. Press the [VOICE DISPLAY] button on the panel to call up the Voice Display. DISPLAY SELECT VOICE DISPLAY A.B.C. M.O.C. MDR FOOT SWITCH UTILITY AUDIO Current Registration Next Registration The current Registration number (left) and the next number (right) are displayed.
Unifying Values/Settings of a Specific Parameter Unifying Values/Settings of a Specific Parameter In the Voice Display, Page 2, you can conveniently unify the values or settings of a specific parameter used in the current Registration Bank at one time. This is useful when you are changing, for example, the Voice Brilliance setting for the Upper Keyboard and want the same setting to be applied to all Registrations in the Bank.
Unifying Values/Settings of a Specific Parameter 4 Select the targeted Registration numbers and turn them on. Parameters in Registrations set to ON will be changed. Unifying the currently highlighted parameter’s value: Pressing [SET] unifies the currently highlighted parameter’s values to the one in the currently selected Registration (at the cursor position). A message appears prompting you to confirm the operation.
Copying Registrations Copying Registrations In the Voice Display, Page 3, you can copy a Registration stored to a specific Registration Memory number to another number on a specific section basis (Voices, rhythm, keyboard percussion). (The function is called Regist Section Copy.) This is useful, for example, when you want the upper keyboard Voice in Registration number 4 to be the same as in Registration number 1. 1 2 Press the [VOICE DISPLAY] button on the panel to call up the Voice Display.
Copying Registrations 5 In the same way, select the COPY TO Registration number and Regist Section. The COPY TO Regist Section depends on the Regist Section selected for COPY FROM. NOTE If you change the source Regist Section after changing the destination Regist Section the destination may automatically change to the section selected as the source Regist Section. 6 Press the [EXECUTE] button in the SECTION COPY area in the display. To copy a Bank: You can also copy Registration data by Bank.
7 Music Data Recorder (MDR) The Music Data Recorder (MDR) is a sophisticated recording system built into the Electone that lets you record your performances and Registration settings to a USB flash drive. Before using a USB flash drive, carefully read “Precautions when using the [USB TO DEVICE] terminal” section on page 110. Calling Up the MDR Display Using the MDR Display Press the [MDR] button in the panel to call up the MDR display.
Using the MDR Display 1 Current USB Flash Drive/Folder ) CUSTOM PLAY Displays the currently selected USB flash drive and folder(s). The left side of the indication (before “:/”) shows the particular USB flash drive and the right side shows the path with the currently selected folder name at the end. For example, “USB 01:/Folder1/” indicates that the folder named “Folder1” contained in the USB flash drive is selected. Records/plays back only the performance data of the selected Songs.
Using the MDR Display * INFORMATION Displays available memory when USB flash drive is selected and displays information such as the title and composer when a Song is selected. The information to be displayed depends on the Songs. Song icons These icons are shown when you select a USB flash drive, folder, and Song. Reference pages • Checking the remaining memory (page 131) • About Protected Songs (page 121) Indicates a USB flash drive. This icon is displayed in the USB flash drive/folder list.
Using the MDR Display USB flash drive contents: Folders, Songs, and Files Folders: A folder is a storage location in the USB flash drive, used to organize multiple Songs in groups. If you’ve saved many Songs to a USB flash drive, it may be difficult to find the desired Song quickly. Organizing your Songs in folders, with similar Songs grouped together (for example, according to genre or tempo), makes it easier to find the Songs you want.
Using the MDR Display NOTICE Precautions when using the [USB TO DEVICE] terminal This instrument is equipped with the three [USB TO DEVICE] terminals as follows: • Avoid connecting or disconnecting the USB flash drive while executing playback/recording and file management operations (such as Save, Copy, Delete and Format), or when accessing the USB flash drive. Failure to observe this may result in “freezing” of the operation of the instrument or corruption of the USB flash drive and the data.
Formatting a USB Flash Drive Formatting a USB Flash Drive If you find that you are unable to use a new, blank USB flash drive or an old one that has been used with other devices, you may need to format it. Formatting erases all the data in the USB flash drive and makes it ready to record. The data erased by formatting will be lost permanently. Check whether or not the USB flash drive contains any important data you wish to keep before executing the operation.
Selecting a Song Selecting a Song In the MDR display, you can select a blank Song to which you want to record your performance or save the Registration settings, or you can select a desired Song for playback. In the MDR display, Songs in the currently selected USB flash drives are displayed. First call up the desired USB flash drive (and folder, if necessary) in the display, then select the desired Song.
Selecting a Song 3 Press the [SEARCH] button in the display. 6 Press the [OK] button. The search will begin, and the detected folder/Song name will be shown on the display. NOTE Previous searched data can be shown on the display. However, the data does not appear if you’ve turned off the power, removed the USB flash drive or saved the Song after performing the search operation. 4 Press the [KEYWORD] button. To cancel the Search operation, press the [INTERRUPT] button.
Recording Recording 4 An hourglass icon appears at the bottom left of the display, indicating that Registration data is currently being read. NOTE Recording your performance Regardless of the currently selected Unit number, the recording operation will save data other than your performance to the first Unit of the Song.
Recording 2 The following setting lets you record only Lower Keyboard and Pedalboard parts. Press the [R] (Play) or [CUSTOM PLAY] button to begin rerecording the Song. Re-recording starts from the beginning of the Song and replaces the previously recorded performance with the newly recorded performance. NOTE Pressing the [J] (Stop) button cancels the re-recording and records the previous performance.
Changing the Song Name 8 Press the [CUSTOM PLAY] button to start recording of the part selected in step 6 (Upper part). Playback of the previously recorded parts starts immediately. The [CUSTOM PLAY] button is used here to record only the parts that have been selected for recording, and plays back only those parts that have been selected for playback. While you listen to the parts being played back, start playing the melody on the Upper Keyboard.
Changing the Song Name 5 Select the desired character type: alphabet, upper or lowercase, or symbol. To convert into kanji (Japanese language): This applies only if you are using the button in Japanese. 1 NOTE If you select Japanese as the Language in the Utility display (page 16), you can also select Japanese language characters (hiragana and kanji, normal size katakana, half size katakana, full size alphabet, and full size symbols). 6 NOTE An XG Song name can contain up to 46 characters.
Saving Registrations and Other Data to a Unit Saving Registrations and Other Data to a Unit You can also record Registration Memory data and other created data without recording a performance, as listed below. The data will be saved to a Unit (page 98) of the selected Song. 2 Press the [UNIT EDIT] button at the right lower section in the display to call up the Unit Edit display. At the left side in the display, the Registration Unit list of the current Song is shown, such as “UNIT 1” and “UNIT 2.
Saving Registrations and Other Data to a Unit 4 Press the [SAVE] button. 3 A message appears, prompting confirmation of overwriting the Registration Unit. Press [OVERWRITE] to overwrite (replace), or press [CANCEL] to abort the operation. Change the order of the Registration Units. From the Registration Unit list at the left end in the display, select the desired Unit then use the MOVE buttons to move the order of the selected Unit.
Recalling Recorded Registrations NOTE Recalling Recorded Registrations Registrations (and bulk data) recorded to Song numbers can be easily loaded back to the Electone by the following procedure. The MDR independently recalls the following five types of data: When you load the Registration data by using the Next Unit function, all data will be loaded no matter which buttons you select here. 5 A message appears, prompting confirmation of the operation.
Playing Back a Song About Protected Songs If you buy or download Song data, it may be protected so that you cannot delete or copy, in order to prevent accidental erasure or protect copyright. These are called Protected Songs. Protected Songs can be saved to a USB flash drive confirmed by Yamaha. A Protected Song can be played back in the same way as Songs you’ve created, but it cannot be converted to XG format or EL format.
Playing Back a Song Custom Play To play back the selected part(s) of XGcompatible Song data: If you want to play back a Song without resetting the Registrations, press the [CUSTOM PLAY] button instead of the [R] (Play) button. This displays the Song time and starts playback immediately. Press the Part [XG] button while XG-compatible Song data is being played back. The following XG PART SETUP display appears.
Playing Back a Song Changing the tempo You can change the tempo of the Song as the Song is playing in the MDR display, either while the Song is stopped or while it is playing. NOTE The tempo cannot be set for a Song containing no performance data. To change the tempo: Use the TEMPO buttons in the display or the Data Control dial to change the tempo. (The TEMPO dial on the panel cannot be used to change the tempo for the Music Data Recorder.) The range is 50 – 200%.
Displaying the Score SINGLE Repeats the currently selected Song indefinitely. ALL Repeats all Songs in the currently selected folder in order. 5 6 Displaying the Score RANDOM Repeats all Songs in the currently selected folder randomly. The MDR display can display music notation (score) of the performance data recorded to USB flash drive. You can change the size and the number of staffs to be displayed.
Displaying the Score The score size can be adjusted by pressing the [SIZE CHANGE] button in the display. Each press of the [SIZE CHANGE] button alternates the score size in the following sequence: normal, large, extra large, small, normal, and so on. Please note that the size cannot be changed while a Song is being recorded. Changing the score contents and settings The Score Settings display lets you choose the contents to be displayed.
Other Functions (Tools) also use the Data Control dial to select channels after pressing the [] or [] button. Selecting [AUTO] automatically assigns parts to the channels according to the Song data. To set the QUANTIZE value use the [] and [] buttons. You can also use the Data Control dial to select channels after pressing the [] or [] button. The shorter the selected note value, the more precisely the score is displayed. Setting the NEXT PAGE L.
Other Functions (Tools) To copy a Song: You can copy Song data within the USB flash drive, and also to another USB flash drive. Connect the USB flash drive containing the Song and (if necessary) a USB flash drive for the copy destination to the [USB TO DEVICE] terminals, then follow the instructions below. NOTICE Insert the USB flash drive to the [USB TO DEVICE] terminal firmly. If the USB flash drive is not inserted firmly, the data may be lost. 1 Select the folder/Song/USB flash drive to be copied.
Other Functions (Tools) Instructions when only one [USB TO DEVICE] terminal is available: 8 It is recommended that you use connect both USB flash drives (source and destination) to the [USB TO DEVICE] terminals. However, if there are not enough terminals available, you can copy a Song by following the procedure below. Folder copy cannot be executed with this procedure. 1 2 3 Press the [EXECUTE] button to execute Song Copy. Select [CLOSE] or [CANCEL] to abort the operation.
Other Functions (Tools) 3 Press the [DELETE] button in the display. A message appears, prompting confirmation of the operation. Confirm that the Song to be deleted is shown in the display. If you want to change the Song, press the [CANCEL] button and select the desired Song. 4 Press the button of the specific data you want to delete (“DELETE ALL,” “DELETE REGIST” or “DELETE PERFORMANCE”). The selected data will be deleted.
Other Functions (Tools) 4 Press the [CONVERT TO XG] button. 2 The following display appears. In the TOOLS Page, press the [CONVERT] button. A “Which do you want to select?” message appears. 5 (If necessary) Change the destination for saving the converted Song. For details on changing the destination, see page 112. 6 Press the [EXECUTE] button. A message appears indicating that the converted data is being checked and the MDR starts playback of the selected Song.
Other Functions (Tools) Converting EL format to ELS If Song data created on an EL-series instrument, such as the EL-900, is saved in the USB flash drive, you can convert the Song data to data compatible with the ELS series. 1 Select the Song you want to convert. For details on selecting a Song, see page 112. 2 Checking the remaining memory When a USB flash drive is selected on the TOOLS page, pressing the [INFORMATION] button will indicate the remaining memory in the USB flash drive.
8 Audio The convenient [AUDIO] button allows you to play back audio files (.WAV) saved to a USB flash drive. Moreover, since you can record your performances and recordings as audio data (.WAV) to a USB flash drive, it is possible to play back the files on computer, share them with your friends, and record your own CDs to enjoy as well.
Recording Your Performance as Audio 1 Connect a compatible USB flash drive to the [USB TO DEVICE] terminal. 4 Press the [I] (Record) button to engage Standby status for recording. Reference Page • Compatible USB flash drives (page 132) 2 Press the [AUDIO] button located at the top right on the panel to call up the AUDIO Page. DISPLAY SELECT VOICE DISPLAY A.B.C. M.O.C. MDR FOOT SWITCH UTILITY AUDIO RHYTHM PROGRAM VOICE EDIT PATTERN SEQUENCE U.ORGAN FLUTES L.
Playing Back Audio Files 7 To hear your newly recorded performance, press the [R] (Play) button in the AUDIO Page. Playing Back Audio Files Try playing back audio files from a USB flash drive connected to this instrument. NOTE This instrument cannot play back DRM protected files. File format that can be played back .wav — 44.1 kHz sample rate, 16-bit resolution, stereo 1 Connect the compatible USB flash drive containing the audio file to be played back to the [USB TO DEVICE] terminal.
Playing Back Audio Files 3 Select the desired audio file for playback. Rewind, Fast Forward and Pause To simply play an existing audio file, select the desired audio file (containing data), referring to the audio file name and icon . Since the operation for selecting audio files is the same as that for Songs, refer to instruction steps 2 and 3 in “Selecting a Song” on page 112. Rewind and Fast Forward: 4 Press the [R] (Play) button in the AUDIO Page to call up the Playback Page of the AUDIO Page.
Playing Back Audio Files To adjust the Volume: Changing the Volume, Tempo and Pitch Touch the VOLUME slider in the display or use the Data Control dial. Range: 0 – 127 To change the Tempo: You can change the volume, tempo and pitch of the audio file as the file is playing. 1 Use the TEMPO buttons in the display or the Data Control dial to change the tempo. The value can be adjusted from 75% to 125% and the default value is 100%. Higher values result in a faster tempo.
Other Functions (Tools) To delete the file: Other Functions (Tools) Creating a New Folder/Deleting the File/Changing the File Name You can delete the file or change the file name. 1 Connect the compatible USB flash drive containing the audio files to the [USB TO DEVICE] terminal. Reference Page • Compatible USB flash drives (page 132) 2 3 To rename the file: Press the [RENAME] button to call up the CHANGE NAME display.
9 Voice Edit This Electone has a Voice Edit feature that allows you to create your own Voices. We suggest that you read through the Voice Structure below at first to get a firm understanding of what comprises a Voice. Then go through the editing steps, referring to page 140 for editing of an AWM Voice, or page 143 for editing of a VA Voice. NOTE Super Articulation Voices cannot be edited. VA Voice structure Voice Structure The internal structure of the Voices of this Electone is explained below.
Editing a Voice DISPLAY SELECT Editing a Voice A.B.C. M.O.C. MDR FOOT SWITCH UTILITY AUDIO RHYTHM PROGRAM VOICE EDIT PATTERN SEQUENCE Selecting a Voice for editing 1 VOICE DISPLAY U.ORGAN FLUTES L.ORGAN ROTARY SP SPEED FLUTES Select the Voice you want to edit from the Voice Menu. For example, if you want to edit Accordion 1, select [Accordion 1] in the Voice Menu of the [ORGAN] button in any Voice section.
Editing a Voice 4 EQ HIGH FREQ./EQ HIGH GAIN Editing an AWM Voice You can edit an AWM Voice on the AWM Page and LAYER Page in the Voice Edit display. In the AWM Page, the tonal balance of the entire Voice can be corrected by some EQ parameters. In the LAYER Page, you can make detailed edits to each Element. AWM Page EQ (Equalizer) 1 1 Sets the frequency and gain (level) of the high frequency band. The EQ HIGH FREQ. slider sets the desired frequency band over a range of 500 Hz – 16.0 kHz.
Editing a Voice LAYER Page 1 These buttons switch the display. 3 ATTACK RATE Determines how quickly the Element will reach its maximum level after the key is played. Higher values produce a faster attack. Range: 0 – 127 Reference page • Envelope Parameters (page 143) 4 RELEASE RATE 1 2 Determines how much time it takes for the level to reach 0 after the key is released. Higher values make the time shorter. Range: 1 – 127 3 1 LEVEL 5 CUTOFF FREQ. Determines the output level of the Element.
Editing a Voice LAYER Page 3 LFO (Low Frequency Oscillator) As its name suggests, the LFO creates waveforms of a low frequency. These waveforms can be used to vary the pitch, filter or amplitude to create effects such as vibrato, wah and tremolo. The following five waveforms are available. 1 2 3 4 saw (sawtooth) tri (triangle) squ (square) rnd (random) 5 1 LFO WAVE Determines the LFO waveform used to vary the sound. For details, see right column.
Editing a Voice Editing a VA Voice (ELS-02C only) You can edit a VA Voice in the VA Page of the Voice Edit display. If you are using the ELS-02, the VA Page cannot be selected. 6 EQ LOW Determines the level (volume) of the low range frequencies. Positive values boost or increase the level, while negative values decrease or cut it. Range: -64 – +63 7 EQ HIGH VA Page Determines the level (volume) of the high range frequencies.
Saving the Edited Voice Saving the Edited Voice Edited AWM Voices can be saved as User Voices (up to 80), and edited VA Voices can be saved as VA Custom Voices (up to six). 1 Press the [SAVE] button at the top right of the display to call up the SAVE Page. When saving User Voices (AWM) 4 Press the [SAVE] button to save the Voice, or press [CANCEL] to abort the operation.
Quitting Voice Edit Quitting Voice Edit Recalling an Edited Voice You can quit the Voice Edit function from any of its display pages. Once your original AWM Voice has been saved, it can be selected from the User button in each Voice section. Refer to chapter 2, “Selecting Voices from the User buttons” (page 28). 1 Press the [VOICE EDIT] button on the panel. If your original Voice has already been saved, the Voice Edit function quits automatically.
10 Rhythm Program The Electone includes powerful rhythm programming functions: Rhythm Pattern Program and Rhythm Sequence Program. Rhythm Pattern Program allows you to record your own original rhythms and save them as user rhythms. Rhythm Sequence Program lets you connect the existing rhythms or your original rhythms to create complete rhythm tracks, which you can automatically play back during your performance.
Rhythm Pattern Program To create your own rhythm from scratch: DISPLAY SELECT VOICE DISPLAY A.B.C. M.O.C. MDR FOOT SWITCH UTILITY AUDIO Press the [PATTERN] button and release it without selecting a Rhythm button. A blank pattern is loaded to the Rhythm Pattern Program. RHYTHM PROGRAM VOICE EDIT PATTERN SEQUENCE U.ORGAN FLUTES L.ORGAN ROTARY SP SPEED FLUTES A Rhythm consists of 15 sections: Intro 1 – 3, Main A – D, Fill In A – D, Ending 1 – 3, and Break.
Rhythm Pattern Program Case 2: Creating your own rhythm by assembling parts from other different rhythms Preset Rhythm Fill In A Intro 1 Main A 2 B B 3 C C D D Ending 1 2 Break 3 Basic settings for the rhythm pattern In the SETTING Page of the display, set the conditions of the rhythm, such as time signature, measure length, and so on. You can also customize the part settings in this SETTING Page — deleting any part or copying a part from another rhythm to the currently selected rhythm.
Rhythm Pattern Program Selecting [CLEAR] deletes all data in the rhythm and changes the time signature. Select [CANCEL] to abort the operation. 3 5 (If necessary) Set the Metronome, Part Assemble, and Part Clear parameters. Select a section to which you want to enter or edit the rhythm pattern. Pressing the SECTION button on the display calls up the Section Select pop-up menu. After selecting the desired section, the pop-up menu automatically closes.
Rhythm Pattern Program You can also select a rhythm pattern currently being created as the COPY FROM RHYTHM. To create a MAIN B section based on MAIN A, create the MAIN A rhythm in the INPUT page, copy it to MAIN B, then edit the MAIN B rhythm as desired. To select the rhythm currently being created, select “Current Rhythm” on the 5th page of the “USER” category. When selecting the desired part, a display prompting confirmation of the operation appears.
Rhythm Pattern Program Entering percussion sounds to a rhythm pattern — Step Write You can enter percussion sounds in the INPUT Page of the display. Before entering percussion sounds, turn off the Upper and Lower keyboard Voices by setting each Voice’s volume to MIN. NOTE The volume of the percussion and accompaniment sound during use of Rhythm Pattern Program can be controlled with the VOLUME button of the RHYTHM section.
Rhythm Pattern Program 5 Set the appropriate Quantize value. For details on Quantize, refer to page 155. NOTE The Quantize setting can be changed in the middle of Step Write. 2 ACCENT buttons Records the instrument and determines its volume or Accent level. Press one of the ACCENT buttons you wish to set (“ ” is softer and “ ” is louder; “REST” is no sound). The instrument is automatically inserted at the Accent level to the selected position in the pattern.
Rhythm Pattern Program 2 NOTE [L] [R] controls To move an entered note: Selects the previous/next position’s note of the currently selected instrument. In the notes below for example, you can select notes 1, 3 and 4 one by one. Rests (2 and 5) are ignored. 1 2 1 23 4 Select the note you want to move (as in step 1 on page 152). Press the Rhythm Clock box to enable the box. 5 3 QUANTIZE [L] [R] controls Advances or reverses the rhythm clock by one step.
Rhythm Pattern Program You can also erase all notes of a single instrument, or all notes entered. To erase all instruments: 1 The following display appears, prompting confirmation of the operation. To erase one instrument: 1 Press [CLEAR] in the display. Select the key to which the instrument that you want to erase is assigned. The key name you have selected and its instrument name are displayed. Selected key 2 Instrument name Press [CLEAR] in the display.
Rhythm Pattern Program About Quantize The Quantize function is a process of rounding off timing or duration values, so that each note plays with precise timing. You can select nine types of Quantize value. Entering percussion sounds to a rhythm pattern — Real Time Write While you listen to the entered rhythm or metronome click, play the Upper/Lower keyboards to enter the desired percussion sounds.
Rhythm Pattern Program “loop”) for a certain number of measures as set in the SETTING Page. 3 Reference page • Metronome (page 149) 5 Using the COPY FROM [RHYTHM] and [SECTION] buttons, select the rhythm and the section which has the accompaniment you wish to use. Reference page Repeat steps 2 through 4 above to layer each instrument and complete your own rhythm. • Basic settings for the rhythm pattern (page 148) You can erase an instrument while the rhythm is playing back.
Rhythm Pattern Program 2 Voices can also be changed even after entering the Rhythmic Chord pattern. You can select only one Voice for one part (Chord 1 or Chord 2). When you want to create a Rhythmic Chord pattern including two different Voices, select one Voice for Chord 1 and another for Chord 2. Select the part, CHORD 1 or CHORD 2, which you want to create for the Rhythmic Chord pattern. 4 Set the appropriate Quantize value. For details on the Quantize function, refer to page 155.
Rhythm Pattern Program To change the Gate Time: 1 2 3 3 Select the desired part for which you wish to change the Voice. The Voice menu appears. Select the note for which you want to change the gate time (see step 1 on page 152). Press the Gate Time box to enable the box. Turn the Data Control dial to change the Gate Time. Changing the Voices for Accompaniment parts 4 Select the desired Voice, and the Voice menu automatically closes.
Rhythm Pattern Program REVERB display Adjusting volume and panning Volume and Pan are set in the VOICE/EFFECT Page. VOLUME display 1 2 1 ON/OFF Determines the amount of reverb applied to each accompaniment part. Range: 0 – 127 CHORUS display Determines the on/off status of each accompaniment part. When this is set to OFF, the part is muted. 2 Volume sliders 1 Determines the volume of each accompaniment part.
Rhythm Pattern Program 2 Chorus sliders Determines the amount of chorus effect applied to each accompaniment part. Range: 0 – 127 VARIATION display 1 2 3 1 VARIATION (Variation Effect Category) Selects the effect category of the variation effect. Pressing the VARIATION button calls up the effect category list. Reference page • Effect List (page 54) Select the desired type, and the list automatically closes.
Rhythm Pattern Program 3 5 PITCH COARSE Press the appropriate key (the key to which the instrument to be changed is assigned). Determines the pitch of the currently selected instrument, adjustable in semitone (100-cent) steps. Range: -64 – +63 The selected instrument’s name is shown on the display and you can change its settings.
Rhythm Pattern Program 3 Select the User Rhythm number to which you wish to save. The following display appears, prompting confirmation of the operation. After saving the Rhythm, be sure to quit Rhythm Pattern Program before turning the power off. Turning off the Electone without quitting Rhythm Pattern Program erases the User Rhythm you have created. Quitting the Rhythm Pattern Program You can quit the Rhythm Pattern Program from any of its display pages. 1 Press the [PATTERN] button.
Rhythm Pattern Program Recalling User rhythm patterns 4 The method for selecting a file is the same as that in the MDR section. See page 108 for more information. The User rhythms you have created in the Rhythm Pattern Program can be selected and played from the User buttons in the panel Rhythm section. Refer to Chapter 5, “Selecting Rhythms from the User buttons” (page 60). RHYTHM Press the [SELECT] button to select the desired pattern file. VOLUME MAX SEQ. SEQ. 1 2 SEQ. SEQ.
Rhythm Pattern Program Percussion Kit list Drum ELKit 1 & &ᅊ ' 'ᅊ ( ) )ᅊ * *ᅊ $ % & $ᅊ &ᅊ ' 'ᅊ ( ) )ᅊ * Lower Keyboard *ᅊ $ % & $ᅊ &ᅊ ' 'ᅊ ) )ᅊ * *ᅊ $ % & $ᅊ &ᅊ ' 'ᅊ ( ) )ᅊ * *ᅊ $ % & $ᅊ &ᅊ ' 'ᅊ ( ) )ᅊ * *ᅊ $ % Upper Keyboard & ' 'ᅊ ( ) *ᅊ % & $ᅊ Room Kit Surdo Mute Surdo Mute Surdo Mute Surdo Mute Surdo Mute Surdo Open Surdo Open Surdo Open Surdo Open Noise Percussion Maracas Low Hi
Rhythm Pattern Program Drum Rock Kit & &ᅊ Electro Kit Analog Kit Dance Kit Jazz Kit Brush Kit Surdo Mute Surdo Mute Kick Dance 1 Surdo Mute Surdo Mute Surdo Open Surdo Open Surdo Open Kick Dance 2 Surdo Open Surdo Open Hi Q Hi Q Hi Q Hi Q Hi Q Hi Q ( Whip Slap Whip Slap Whip Slap Whip Slap Whip Slap Whip Slap ) Scratch H Scratch H Scratch H Scratch Dance 1 * Scratch H Scratch H Scratch L Scratch L Scratch L Scratch Dance 2 * Scratch L Scratch L Finger Sn
Rhythm Pattern Program Drum Symphony Kit & &ᅊ China Mix Kit Live!Std Kit Live!Std+P Kit Live!Funk Kit Live!Funk+P Kit Surdo Mute Surdo Mute Surdo Mute Surdo Mute Surdo Mute Surdo Mute Surdo Open Surdo Open Surdo Open Surdo Open Surdo Open Surdo Open Hi Q Hi Q Hi Q Hi Q Hi Q Hi Q ( Whip Slap Whip Slap Whip Slap Whip Slap Whip Slap Whip Slap ) Scratch H Scratch H Scratch H Scratch H Scratch H Scratch H Scratch L Scratch L Scratch L Scratch L Scratch L Scra
Rhythm Pattern Program Drum Live!Brush Kit & &ᅊ Live!Brush+P Kit Live!Studio Kit Live!AcousticKit Live!Power Kit 1 Live!Power Kit 2 Surdo Mute Surdo Mute Surdo Mute Surdo Mute Surdo Mute Surdo Open Surdo Open Surdo Open Surdo Open Surdo Open Surdo Open Hi Q Hi Q Hi Q Hi Q Hi Q Hi Q ( Whip Slap Whip Slap Whip Slap Whip Slap Whip Slap Whip Slap ) Scratch H Scratch H Scratch H Scratch H Scratch H Scratch H Scratch L Scratch L Scratch L Scratch L Scratch L Sc
Rhythm Pattern Program Drum Live!Rock Kit & &ᅊ Live!Real Drums Live!RealBrushes Analog T8 Kit Analog T9 Kit House Kit Surdo Mute Surdo Mute Surdo Mute Surdo Mute Surdo Mute W Kick * Surdo Open Surdo Open Surdo Open Surdo Open Surdo Open Disco Fx * Hi Q Hi Q Hi Q Hi Q Hi Q WhiteNoiseDown 1 * ( Whip Slap Whip Slap Whip Slap Whip Slap Whip Slap PinkNoise Down 1 * ) Scratch H Scratch H Scratch H Scratch H Scratch H WhiteNoiseDown 2 * Scratch L Scratch L Scratch
Rhythm Pattern Program Drum HipHop Kit & &ᅊ SFX Drum Machine Break Kit SFX Kit 1 SFX Kit 2 Live! SFX Kit 1 Surdo Mute Surdo Mute Surdo Mute Surdo Open Surdo Open Surdo Open Hi Q Hi Q Hi Q ( Whip Slap Whip Slap Whip Slap ) Scratch H Scratch H Scratch H Scratch L Scratch L Scratch L Hi-HatClosedT8 2 Snare Drum&Bass1 Finger Snap Tom T8 3 Kick Break 2 Snare Break 8 Hi-Hat Open T8 2 Snare Distortion Snare Break 9 Tom T8 6 Kick Tek Power Hi-HatClosedBrk1 * Crash T
Rhythm Pattern Program SFX Live! SFX Kit 2 & Noise Kit VocalEffectsKit GospelAdLibs Wonderland Kit &ᅊ Cajon Low ' Cajon Slap 'ᅊ Cajon Tip ( ) PopLatin Kit Claves High Claves Low )ᅊ Hand Clap *ᅊ Finger Snap * $ % Castanet $ᅊ Conga H Tip Conga H Heel Laser Beam Conga H Open Laser Shot * Conga H Mute Water Phone * Conga H SlapOpen Bubble Conga H Slap ( Puddle Conga H SlapMute ) Thunder * Conga L Tip Shower * Conga L Heel Beach * Conga L Open St
Rhythm Pattern Program SFX Cuban Kit & Arabic Kit &ᅊ Turkish Kit China Kit OrchestraPerc Asma Davul L Symphonic Gong 1 Asma Davul R Symphonic Gong L * Asma Davul Side Symphonic Gong 2 ( Asma Davul Both Timpani E ) KoltukDavul Flam Timpani F KoltukDavul Teke Timpani F# Koltuk Davul Tek Timpani G Koltuk Davul Dum Timpani G# Bendir Teke Flam Timpani A ' 'ᅊ )ᅊ * *ᅊ $ % $ᅊ Conga H Tip Bendir Teke Dead Conga H Heel Bendir Tek Dead Da Cha 2 Timpani A# Ti
Rhythm Sequence Program DISPLAY SELECT Rhythm Sequence Program With the Rhythm Sequence Program function, you can string together any of the Electone’s existing rhythms and the rhythms of your own creation together to make complete rhythm compositions. You can save four rhythm compositions (each containing up to 140 bars) to the Sequence buttons on the panel for future recall.
Rhythm Sequence Program NOTE Instead of pressing the Sequence button on the display, you can press one of the sequence buttons in the Rhythm section on the panel to select the sequence number. This selects the Sequence number, to which a rhythm composition can be saved. If you want to edit an existing rhythm composition, refer to “Copying a Rhythm Sequence” on page 177. If you want to program a Rhythm Sequence from scratch, refer to “Programming a Sequence” below.
Rhythm Sequence Program 2 INSERT Press the rhythm [START] button on the panel. SYNCHRO START START For inserting a rhythm before the current cursor position. The new rhythm is entered just before the cursor position and all other rhythms to the right of the cursor are moved to accommodate the new number. This operation is not available between measures of an ending pattern. Additional rhythms cannot be entered beyond the Rhythm sequence function’s capacity of 140.
Rhythm Sequence Program Entering Next Unit: When you program the Next Unit function in Registration Sequence, the next registration data in current Song can be loaded automatically just by playing the Rhythm Sequence. 1 The Registration Sequence is programmed from this display. The entered Registration number is shown along the Registration row in the middle of the display.
Rhythm Sequence Program To erase an entry: 1 2 The Registration Memory also changes with Rhythm Sequence playback, if the sequence includes a Registration Sequence. Using the POSITION buttons, move the cursor and select the data (Registration number or Next Unit) you want to delete. Rhythm playback automatically stops when the sequence reaches its end. If you’ve stopped rhythm playback in the middle of the sequence, press the [START] button again to resume playback.
Saving Rhythm Pattern and Rhythm Sequence Data to a USB 3 Set the control mode of the Footswitch to RHYTHM STOP. (See page 178 for information about the Footswitch settings.) 4 Press the Left Footswitch with your right foot to turn the sequence on. Pressing the Left Footswitch again in the middle of the sequence playback cancels the Rhythm Sequence. When you are playing a Rhythm Sequence that is made up of several sequences (SEQ.
11 Footswitches, Knee Lever and Expression Pedals These leg- and foot-operated controls allow you to execute various performance functions and switch the effect on/off, without taking your hands from the keyboard. 1 Footswitches The Electone has two Footswitches on the main expression pedal. The Right Footswitch is used for the Registration Shift function. The Left Footswitch can be set to control one of the following functions: Rhythm, Glide, and Rotary speaker.
Footswitches Controlling the Rhythm Controlling Glide You can control the rhythm start/stop or switch the rhythm sections by using the Left Footswitch. 1 2 4 You can control the Glide effect by using the Left Footswitch. 3 5 1 STOP Switches the rhythm on/off whenever you press the Footswitch. 2 BREAK When you press the Footswitch, the Break section turns on. This function corresponds to the [BREAK] button on the panel.
Knee Lever Controlling Rotary Speaker You can control the Rotary Speaker effect (on/off ) by using the Left Footswitch. Reference page • Rotary Speaker (page 49) Knee Lever The Knee Lever, located on the underside of the keyboard panel, can be used to turn one of the following on and off: Sustain effect, Melody On Chord function, Lead Slide effect, or Solo function. NOTE One or more functions can be assigned to the Knee Lever simultaneously.
Knee Lever 3 To apply sustain, press the Knee Lever to the right. Sustain is constantly applied as long as the Knee Lever is pressed. Releasing the Knee Lever turns sustain off. Controlling Melody On Chord 1 The Melody On Chord section appears in the right half of the display. 1 When the Knee Lever is folded up: Sustain is applied constantly, as long as the front panel Sustain buttons are on. 2 When the Knee Lever is vertical: Press the [A.B.C./M.O.C.] button on the front panel.
Expression Pedals Controlling Lead Slide 1 Call up the Voice Condition display Page 2 of the Lead Voice section to which you want to apply the Lead Slide effect. Reference page • Voice Condition display (page 44) 2 Press the [KNEE] button of the Slide section on the display. Expression Pedals The Expression pedal can be used to control the volume with your foot as you play. Moreover, the ELS-02C has another Expression Pedal, the 2nd Expression Pedal.
Expression Pedals In this display, you can assign the Pitch Bend control or Tempo control to the 2nd Expression Pedal. If both Pitch Bend and Rhythm Tempo controls are set to ON, both functions are applied when you press the 2nd Expression Pedal. Generally one of them is assigned to the 2nd Expression Pedal. Controlling the Rhythm Tempo Controlling Pitch Bend 1 2 1 MODE Determines the range of tempo change.
12 Transpose and Pitch Controls There are two pitch-related controls on the Electone: Transpose and Pitch. Transpose allows you to change the key of the instrument and Pitch lets you finely adjust the tuning. Transpose and Pitch can be adjusted in the Utility display. (The settings here cannot be recorded to the Music Data Recorder.) 1 2 Press the [UTILITY] button. 2 PITCH The Utility display appears. Determines the fine pitch setting of all the Voices. Each step changes the pitch by 0.2 Hz.
13 Connections On the underside of the Electone keyboard is a separate panel equipped with various input/output terminals and miscellaneous controls. 3 MIC./LINE switch Accessory Jacks and Controls This section provides brief explanations for each jack/ control on the Electone. For details on connecting to external devices, see page 187. When connecting a microphone or other electric/ electronic instrument to the MIC.
Accessory Jacks and Controls 8 5 6 7 USB AUX IN L / L+R R AUX OUT L / L+R R AUX OUT L R TO DEVICE (LEVEL FIXED) 9* TO HOST ) IN OUT MIDI ! 5 AUX IN (Phone; L/L+R, R) jacks * An ELS-01 series instrument with an installed STAGEA Vitalize unit has two [USB TO DEVICE] terminals installed here. This pair of stereo phone jacks is for connection to an external device. The signal from the connected external device sounds from the Electone’s built-in speakers.
Connection Examples – External Devices 9 [USB TO DEVICE] terminals For details on [USB TO DEVICE] terminal, see page 110. Connection Examples – External Devices USB Dock CAUTION Before connecting the Electone to other electronic components, turn off the power to all the components. Before turning the power of the components on or off, set all volume levels to minimum (0). Otherwise, electrical shock or damage to the components may occur.
Connection Examples – External Devices Connection example: Using a mixer for live performance Generally, when you use the Electone on stage (in concert, etc.), you should connect it to a mixer. By using a mixer, you can easily adjust the volume and tone quality of each component. To connect to a mixer, use the AUX OUT jacks of the Electone. The Electone features different types of AUX OUT jacks, allowing you to choose the appropriate one for your specific application.
Connection Examples – External Devices Outputting the sound of an external device through the built-in speakers of the Electone 2 By connecting a cable from the external audio device to the AUX IN jacks, you can play back the sound of the external device via the speakers of the Electone. Set the MIC./LINE switch to the MIC position when connecting a microphone, or the LINE position when connecting a guitar or other high-level output device. MIC. LINE MIC.
Connection Examples – External Devices Controlling external MIDI devices from the Electone Controlling the Electone from an external device You can use the Electone to remotely play the Voices of a MIDI keyboard (or tone generator), combining them with the Electone and letting you create even richer, more multi-layered sound textures. (The MIDI receive channels of the MIDI keyboard must match the transmit channels on your Electone.
Connection with Computer Connection with Computer By using the [USB TO HOST] terminal or MIDI terminals, you can connect the Electone and computer enabling the MIDI communication between both. Install the USB-MIDI driver to your computer, then make the MIDI connection between the Electone and computer. Regarding the USB-MIDI driver, you can download the latest version from the Yamaha website: http://download.yamaha.
MIDI Control NOTE MIDI Control If you set Second Expression to on in the MIDI OUT FILTER parameters, the setting in the OUTPUT (1) parameters will be disabled. When you connect your Electone with a second MIDI device (such as a synthesizer or computer), you can determine how the Electone controls that MIDI device, or how the Electone is controlled. 1 2 3 INTERNAL/EXTERNAL Switches control over the displayed items between the Electone (INTERNAL) or the connected device (EXTERNAL).
Connecting to an iPhone/iPad Connecting to an iPhone/ iPad You can connect a smart device such as an iPhone or iPad to the instrument. By using an application tool on your smart device, you can take advantage of convenient functions and get more enjoyment out of this instrument. For details on connections, refer to the “iPhone/iPad Connection Manual” on the website. http://download.yamaha.com/ For information about compatible smart devices and application tools, access the following page: http://www.
Connecting to an iPhone/iPad Automatic Setup by WPS If your access point supports WPS, you can easily connect the instrument to access point by WPS, without making settings, such as key input, etc. 5 The “Connected” indication appears when connection between the instrument and the access point is successful. NOTE Check whether your access point supports WPS by referring to the owner’s manual for the access point you are using.
Connecting to an iPhone/iPad Displaying available networks in the wireless LAN and connecting to a network 5 Select the desired network by pressing the button shown the name of the network in the display. Select the desired Network for connection from the Network list in the display by following the steps below. For a network without a lock icon: 1 For a network with a lock icon: 2 Connecting starts. Connect the USB wireless LAN adaptor.
Connecting to an iPhone/iPad Manual Setup SECURITY If you cannot find the desired network on the display, it may be a network that is closed or hidden. In this case, you will need to manually input SSID, Security and Password settings for connection. Press the [SECURITY] button in the display to call up the display for security select, then press either the [NONE], [WPA2-PSK (AES)] or [WEP] button.
Connecting to an iPhone/iPad Connecting by the Ad Hoc Mode 1 Set the Wireless LAN mode to “Ad Hoc Mode.” Refer to “Wireless LAN Mode.” 2 The settings for the instrument are complete if you do not need to change the SSID and so on. Connect the iPhone/iPad to the instrument by referring to the “iPhone/iPad Connection Manual.” You can change the SSID, Security, etc. from the DETAIL display.
Connecting to an iPhone/iPad Wireless LAN Detailed Settings You can set the detailed settings for each mode: INFRASTRUCTURE and AD HOC. There is no need to change or make any settings if you’ve enabled connection between the iPhone/iPad and instrument. Reference Page • Wireless LAN Mode (page 197) 1 Set the Wireless LAN mode, then call up the display for detailed settings by pressing the [DETAIL] button in the WIRELESS LAN display.
Connecting to an iPhone/iPad 2 As necessary, set the detailed settings. Wireless LAN mode INFRASTRUCTURE mode AD HOC mode Display DETAIL (IP ADDRESS) display DETAIL (WIRELESS) display DETAIL (IP ADDRESS) display Item DHCP DETAIL (OTHER) display 0.0.0.0 SUBNET MASK 0.0.0.0 GATEWAY 0.0.0.0 DNS SERVER 1 0.0.0.0 DNS SERVER 2 0.0.0.0 SSID ap-(model name, such as “ELS-02C”)(last 6 characters of MAC address in lowercase); or simply “ap-(model name),” if MAC address cannot be used.
Connecting to an iPhone/iPad Initialize the wireless LAN settings “Factory Set (Initializing the Electone)” on page 23 in chapter 1 does not affect the wireless LAN settings, which can be initialized by the following procedure. Be careful when executing initialize, since it erases all the wireless LAN settings and replaces them with the factory defaults. 1 2 Press the [UTILITY] button, then press the [WIRELESS LAN] button on the display to call up the WIRELESS LAN Page.
14 Appendix Troubleshooting Problem Possible Cause and Solution GENERAL OPERATION A click or pop is heard when the power is turned on or off. Electrical current is being applied to the instrument. This is normal. The sound is not heard for about 10 seconds after turning the power on. This is normal; the Electone takes a while to start up. A cracking noise is sometimes heard.
Troubleshooting Problem Possible Cause and Solution Only one sound is heard when two notes of the Lead or Pedal Voices are simultaneously played. For practical performance reasons, the Electone has been designed so that only one note of the Lead or Pedal Voices can be played at a time. If you want, the Pedal Voice can be set to polyphonic mode (page 44). The Pedal Voices do not sound, even though the volume is properly set. • The Single Finger or Fingered Chord mode of Auto Bass Chord is on.
Troubleshooting Problem Possible Cause and Solution An error message appears while the Voice name is entered. Voice name capacity is 16 characters. Delete the unnecessary letters or spaces. RHYTHM PROGRAM During use of the Rhythm Pattern Program, no sound is produced even when you play a certain percussion sound. If percussion sounds have been recorded while memory is full, no subsequently selected instruments can be heard or recorded.
Specifications Specifications TONE GENERATION ELS-02 ELS-02C AWM AWM/VA/ORGAN KEYBOARD Upper: 49 keys (C – C), Lower: 49 keys (C – C), Pedal: 20 keys (C – G) Keyboard Type Standard (FS) Custom (FSV) Initial Touch Upper, Lower, Pedal After Touch Horizontal Touch REGISTRATIONS Registration Menu Upper, Lower Upper, Lower, Pedal — Upper, Lower 506 566 Registration Memory Registration Shift VOICE Voice Sections 1 Unit 16 x 5 M. (Memory), 1 – 16, D.
Specifications ELS-02 PROGRAMS ELS-02C Voice Edit Yes Rhythm Pattern Program Rhythm Sequence Program Keyboard Percussion CONTROLS Footswitch Left Yes 1 Unit SEQ.
Index Index Numerics DISTORTION ........................................ 54 J 2nd Expression Pedal .........................182 DYNAMIC ............................................. 55 Jacks and Controls ............................ 185 A E A.B.C./M.O.C. .................................66, 67 EACH (Organ Flutes) ............................ 40 K ACCENT ..............................................152 EFFECT ................................................. 45 Keyboard Percussion ............
Index P Rhythmic Chord .................................. 156 User button (Rhythm) ........................... 60 PAD .......................................................65 ROTARY SP SPEED .............................. 49 User button (Voice) .............................. 28 PAN (Voice Edit) .................................141 Rotary Speaker ..................................... 49 User Keyboard Percussion .................. 81 User Rhythm ......................................
About Using BSD-Licensed Software The software used by this product includes components that comply with the BSD license. The restrictions placed on users of software released under a typical BSD license are that if they redistribute such software in any form, with or without modification, they must include in the redistribution (1) a disclaimer of liability, (2) the original copyright notice and (3) a list of licensing provisions.
MEMO
MEMO
Yamaha Downloads http://download.yamaha.