
User Manual

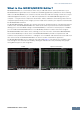


Starting the MOXF6/MOXF8 Editor (VST version)
MOXF6/MOXF8 Editor Owner’s Manual
4
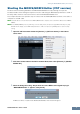
Starting the MOXF6/MOXF8 Editor (VST version)
Install the Yamaha Steinberg USB Driver and MOXF6/MOXF8 Editor VST by following the respective
Installation Guides. After making the required connection and setting the MIDI IN/OUT parameter to “USB” in
the Utility mode, follow the instructions below to start the MOXF6/MOXF8 Editor VST.
This example describes the operation steps for Cubase with the MOXF6/MOXF8 instrument connected to a
computer via an USB cable.
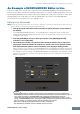
n For details about connection between the MOXF6/MOXF8 and a computer, refer to the Owner’s Manual of the MOXF6/
MOXF8.
n On the MOXF6/MOXF8, press the [UTILITY] to enter the Utility mode, then press the [F6] MIDI followed by the [SF4]
OTHER. On this display, set the MIDI In/Out parameter to “USB”, then press the [STORE] button to store this Utility
setting.
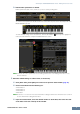
1. Open the VST Instrument window via [Devices] [VST Instruments] in the Cubase
series menu.
2. Click the Instrument Slot in the VST Instrument Rack, then select [External] [MOXF6/
MOXF8 VST].
3. When the dialog box asking “Do you want to create a MIDI track assigned to plug-in
“MOXF6/MOXF8 VST”?” appears, click [Create].
A MIDI track will be created and the MOXF6/MOXF8 Editor VST window will appear.