
Installation guide


MOXF6/MOXF8 Editor Installation Guide 5
MOXF6/MOXF8 Editor Installation
Follow the instructions below to install the MOXF6/MOXF8 Editor programs.
Windows
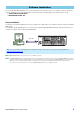
1 After the downloaded compressed file is properly extracted, double-click the “Install
MOXF6_MOXF8 Editor Standalone_VST.exe” file.
The MOXF6/MOXF8 Editor setup dialog appears.
n Make sure to log on to the “Administrator” account before installing MOXF6/MOXF8 Editor.
n If the “User Account Control” window appears, click [Continue] or [Yes].
2 Follow the on-screen instructions to install the software.
Mac
1 After the downloaded compressed file is properly extracted, double-click the “Install
MOXF6_MOXF8 Editor Standalone_VST V*.*.*.pkg” file.
The MOXF6/MOXF8 Editor setup dialog appears.
n The asterisks (*) above indicate the version number of the installer.
2 Follow the on-screen instructions to install the software.
When the MOXF6/MOXF8 Editor and the other necessary software is installed, you can start the MOXF6/MOXF8
Editor. You’ll need to start the MOXF6/MOXF8 Editor VST from the VST window of Cubase series. For details about
starting and setting up Cubase series, refer to the manual of the Cubase series.
To remove the installed editors from your computer, follow the instructions below.
n The button names or menus may differ depending on the computer OS.
When using Windows 7/Windows 8
Select [Control Panel] [Programs and Features] or [Uninstall a program], then select the application to be
remove and click [Uninstall/Change].
Follow the on-screen instructions to uninstall the application.
If the “User Account Control” window appears, click [Continue] or [Yes].
Mac
After the downloaded compressed file is properly extracted, double-click the “Uninstall MOXF6_MOXF8 Editor
Standalone_VST.app” file, then follow the on-screen instructions to uninstall the application.
Software Uninstall (removing the installed application)