
User Manual
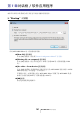

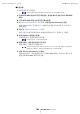
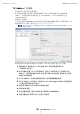
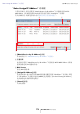
Table Of Contents
- 数据版权相关注意事项
- 本使用说明书内容相关的注意事项
- 目录
- 第1章MTX-MRX Editor概述
- 第2章菜单栏和工具按钮
- 第3章Project画面
- 第4章系统画面
- 第5章联机和同步
- 第6章预设设定
- 第7章对话框/软件应用程序
- “Startup” 对话框
- “Network Setup”对话框
- “Device Information”对话框
- “Match Devices by IP Address”对话框
- “MTX Configuration”对话框
- “Dante Information”对话框
- “Word Clock”对话框
- “Clock”对话框
- “Daylight Saving Time”对话框
- “Scheduler”对话框
- “Remote Control”对话框
- “External Events”对话框
- “Digital Control Panel”对话框
- “Wireless DCP”对话框
- “MCP1”对话框
- “PIN Setup”对话框
- “Label”对话框
- “Re-size Image”对话框
- “PGM1/PGX1”对话框
- “PGM1 Label Creator”应用程序
- “GPI”对话框
- “GPI Calibration”对话框
- “Security Settings”对话框
- “Project Information”对话框
- “Configuration Diagram”对话框
- “Get Log”对话框
- “Sampling Rate Converter”对话框
- “Input Source/Redundant”对话框
- 附录

“Auto-Assign IP Address”对话框 第 7 章对话框 / 软件应用程序
MTX-MRX Editor 用户指南
170
“Auto-Assign IP Address”对话框
只需单步操作,即可将使用“Match Devices by IP Address”对话框指定到 MTX-
MRX Editor 上所放置设备的 IP 地址等信息应用到“IP Address”对话框。
有关详细信息,请参见附录中的“控制子网上设备的设置”。
1 [Match Device by IP Address] 按钮
单击此项打开“Match Devices by IP Address”对话框。
2 设备列表
此项显示使用“Match Devices by IP Address”对话框对 MTX-MRX Editor 中所放
置设备指定的 IP 设置的信息。
3 DNS Server
指定 DNS 服务器。
4 [Assign IP Address] 按钮
将设备列表中显示的信息和 DNS 服务器设置应用到“IP Address”对话框。即使
在“ IP Address”对话框中选择 [DHCP] 选项按钮,[Use the following IP Address]
选项按钮也将切换到所选状态。
5 [Cancel] 按钮
关闭对话框。
12
4
53