MSP series Powered Monitor Speaker MSP7 STUDIO MSP5 STUDIO Powered Subwoofer SW10 STUDIO Powered Near-field Reference Monitors & Subwoofer OWNER’S MANUAL BEDIENUNGSANLEITUNG MODE D’EMPLOI MANUAL DE INSTRUCCIONES 取扱説明書 EN DE FR ES ZH JA
Explanation of Graphical Symbols The lightning flash with arrowhead symbol within an equilateral triangle is intended to alert the user to the presence of uninsulated “dangerous voltage” within the product’s enclosure that may be of sufficient magnitude to constitute a risk of electric shock to persons.
Nous vous remercions d’avoir choisi un haut-parleur de contrôle ou un caisson de basses amplifié YAMAHA. Pour obtenir les performances optimales de vos haut-parleurs et garantir une longévité maximale, lisez attentivement ce mode d’emploi avant d’utiliser le haut-parleur de contrôle ou le caisson de basses amplifié. Conservez-le en lieu sûr pour pouvoir vous y référer ultérieurement. English Español Gracias por elegir los monitores o el subwoofer autoamplificados de Yamaha.
PRECAUTIONS English PLEASE READ CAREFULLY BEFORE PROCEEDING * Please keep this manual in a safe place for future reference. WARNING Always follow the basic precautions listed below to avoid the possibility of serious injury or even death from electrical shock, shortcircuiting, damages, fire or other hazards. These precautions include, but are not limited to, the following: Power supply/Power cord Water warning • Only use the voltage specified as correct for the device.
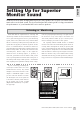
English Setting Up for Superior Monitor Sound Unlike most other audio and production gear, the way speakers are set up in a room has a dramatic effect on the final sound. This short tutorial provides a basic guide to help you maximize the performance of your Yamaha MSP-series monitor speakers. Listening vs.
Speaker Placement English Speaker placement is one of the most important consid- is definitely worth the time spent doing a little experimen- erations when setting up a monitor system, but it is all too tation and measuring to make the most of limited often overlooked with the result that performance is seri- resources. The difference can be astounding. The basics are ously compromised. Admittedly the obstacles to perfect the same whether you’re setting up a stereo or 5.
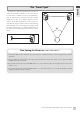
English The “Sweet Spot” For both stereo and surround mixing your position in relation to the main front speakers — the "sweet spot" as it’s often called — should be one apex of an equilateral triangle. In other words your distance from either speaker should be the same as the distance between the two speakers. The speakers should also be "toed in" to the corresponding 60° angle so that the drivers are aimed directly at the listening position.
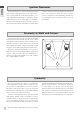
Adding a Subwoofer English Even if you don’t plan to set up a surround system, add- tional. To say it another way, the ear can’t locate the source ing a subwoofer can be a real advantage for stereo mixing. of such low frequencies, so in theory the subwoofer can be If you can’t hear the extreme low end there’s not much placed anywhere in the room. In reality it’s a good idea to you can do to make it sound great.
stand or other convenient object at the listening position center, and rear speakers are all located on the circumfer- and use it to measure the distance from the listening posi- ence of a circle with its center at the listening position. An tion to each of the speakers.
English Fine-tuning for Surround (MSP7 STUDIO or MSP5 STUDIO x 5, SW10 STUDIO x 1) ● Set the MSP7 STUDIO or MSP5 STUDIO LEVEL control to about 12 o’clock for nominal input level. If you’re using the MSP7 STUDIO set the SW10 STUDIO LEVEL control to about 1 o’clock*, and if you’re using the MSP5 STUDIO set it to about 11 o’clock*. You can then fine-adjust the SW10 STUDIO LEVEL control as required.
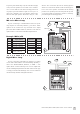
English Controls and Functions MSP7 STUDIO, MSP5 STUDIO MSP7 STUDIO (Rear Panel) 1 (Front Panel) 5 2 3 4 6 7 MSP5 STUDIO (Rear Panel) 8 (Front Panel) 3 1 4 6 7 2 8 1 POWER switch 4 HIGH TRIM switch Turns power to the speaker on or off. When the power is turned on the POWER indicator (8) on the front panel will light green. Adjusts the level of high-frequency range. With the "+1.5" setting, the range around 15 kHz is boosted by 1.5 dB. With the "-1.
English SW10 STUDIO SW10 STUDIO (Rear Panel) 3 (Front Panel) 4 5 6 7 1 2 1 POWER switch 5 LEVEL control Turns power to the speaker on or off. When the power is turned on the POWER indicator (8) on the front panel will light green. Adjusts the overall output level. 2 AC IN Connector Connect the supplied power cable here. First connect the power cord to the subwoofer, then insert the power cord plug into the AC outlet. 3 PHASE switch Selects a phase of output sound from the SW10 STUDIO.
MODEL MSP7 STUDIO MSP5 STUDIO English Specifications SW10 STUDIO Type Biamp 2-way Powered Speaker Biamp 2-way Powered speaker Powered subwoofer Crossover Frequency 2.5 kHz LF: 30 dB/oct, HF: 30 dB/oct 2.
Dimensions English Deutsch MSP7 STUDIO Français ! " # $ %" & ' Español MSP5 STUDIO ! " # $ %" & SW10 STUDIO ' ' ' 66
-30 -40 ! ! " !" " " # " -10 -20 -30 -40 ! ! " !" " " -10 -20 SW10 STUDIO -20 -30 -10 MSP5 STUDIO -40 # " ! ! " !" " " Deutsch MSP7 STUDIO English Performance graph # " $%& # Français Block Diagram MSP7 STUDIO Español
For details of products, please contact your nearest Yamaha representative or the authorized distributor listed below. Pour plus de détails sur les produits, veuillez-vous adresser à Yamaha ou au distributeur le plus proche de vous figurant dans la liste suivante. NORTH AMERICA CANADA Yamaha Canada Music Ltd. 135 Milner Avenue, Scarborough, Ontario, M1S 3R1, Canada Tel: 416-298-1311 U.S.A. Yamaha Corporation of America 6600 Orangethorpe Ave., Buena Park, Calif. 90620, U.S.A.