
User Manual
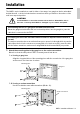
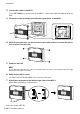
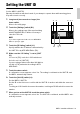
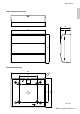

Table Of Contents

13MCP1 Installation Manual
Setting the UNIT ID
Set the MCP1’s UNIT ID.
Operate the switches with bare hands. If you attempt to operate them while wearing gloves,
they will not work correctly.
1. Long-touch (two seconds or longer) the
home switch.
Move to the utility page.
2. Touch the [Settings] switch (R1).
Move to the settings page. After synchronizing
with MTX-MRX Editor, it will be necessary to
enter the PIN code.
3. Touch the [IP Setting] switch (L1).
Specify whether the IP address is determined by
the UNIT ID or by MTX-MRX Editor (PC).
4. Make sure that “IP Setting” is set to [UNIT
ID].
If it is set to [PC], touch the L1/2/3 switches at
the left to set it to [UNIT ID].
If you are using a subnet other than 192.168.0.x,
set this to [PC] and make the setting in MTX-
MRX Editor.
5. Touch the return switch.
A confirmation screen appears; select Yes. The setting is confirmed as the UNIT ID, and
the MCP1 automatically restarts.
6. Touch the [Unit ID] switch (L2).
Set the MCP1’s UNIT ID.
Set the ID so that it does not conflict with the UNIT ID of another unit within the same net-
work.
To uching an L1/2/3 switch decreases the number; touching an R1/2/3 switch increases the
number.
7. When you’ve set the UNIT ID, touch the return switch.
A confirmation screen appears; select Yes. The UNIT ID is confirmed, and the MCP1 auto-
matically restarts.
NOTE
If you have forgotten the PIN code, use MTX-MRX
Editor to specify it again.
3 2
6 5, 7
1 5, 7