
User Manual


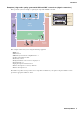


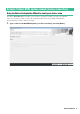
Table Of Contents
- Cover
- Introduction
- Setup workflow
- Example 1) Basic MTX3 system example (analog connections)
- Example 2) High audio quality system with XMV and YDIF connections (digital connections)
- Example 3) Using cascade mode to add MTX input channels (analog connection)
- Using the Device Configuration Wizard to create your device setup
- Making preliminary settings in MTX-MRX Editor
- Connecting the equipment
- Powering-on the MTX
- Powering-on the amp
- Setting the MCP1’s UNIT ID
- Specifying the computer’s TCP/IP address
- Taking MTX-MRX Editor online
- Making XMV settings
- Verifying that the settings were applied
- Example 4) A system using Dante
- Using the Device Configuration Wizard to create your device setup
- Making preliminary settings in MTX-MRX Editor
- Dante settings between systems
- Connecting the equipment
- Powering-on the MTX
- Powering-on the amp
- Specifying the computer’s TCP/IP address
- Taking MTX-MRX Editor online
- Making XMV settings
- Verifying that the settings were applied
- Example 5) A system using the PGM1 for paging
- Using the Device Configuration Wizard to create your device setup
- Making preliminary settings in MTX-MRX Editor
- Connecting the equipment
- Power-on the PoE-equipped gigabit network switch
- Power-on equipment other than amps and powered speakers
- Power-on amps and powered speakers
- Specifying the computer’s TCP/IP address
- Taking MTX-MRX Editor online
- Making XMV settings
- Verifying that the settings were applied
- Q&A
- Uninstalling the software (Removing the application)

Example 1) Basic MTX3 system example (analog connections)
MTX Setup Manual
10
2.
Specify the number of units that will be connected in your MTX/MRX System, and click
[Next>].
In “YDIF Connected,” specify 1 as the number of MTX3 units.
3.
Verify that the MTX’s UNIT ID is 1, and then click [Next>].
Unless you have specific reasons for doing so, use the UNIT ID that is assigned.