
User Manual


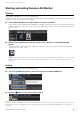
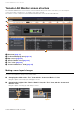

Table Of Contents
- Information
- About Yamaha LAN Monitor
- Contents
- Terminology
- Steps to use the software
- Software operating requirements
- Notes
- Notes regarding device detection
- Notes regarding SWX2100/SWR2100P series PoE switch detection
- Notes regarding the power supply interruption function for the Yamaha PoE switch
- Notes regarding a slave with the stack function enabled
- Notes on printing and print preview of the “Whole map”
- Notes regarding detection of Dante-enabled devices
- Notes regarding when using macOS10.15.x or later
- Installing and uninstalling Yamaha LAN Monitor
- Starting and exiting Yamaha LAN Monitor
- Yamaha LAN Monitor screen structure
- Network settings on the computer
- Basic operation
- Menu bar
- Toolbar and display area
- Map screen
- List screen
- Configuring the device
- Update the firmware
- Import/Export the CONFIG
- Troubleshooting

Network settings on the computer
Yamaha LAN Monitor for Mac User Guide
10
Network settings on the computer
Configure network settings for your computer.
1. Connect the computer to a network device.
2. Open “System Preferences” of macOS.
3. Click the [Setup] menu on the menu bar [Open IP Settings for PC].
The “Network Connections” window appears.
4. From the list of network adapters, select the wired LAN adapter that you want to use with LAN
Monitor.
5. Set the IP address according to your network environment.
Important
Note that the detection of Dante-enabled devices may not function if multiple network adaptors
have been “Connected”. Also, in macOS10.15.x or later, do not turn off Wi-Fi.
If Wi-Fi is off, Yamaha LAN Monitor cannot detect the network adapter.