Руководство пользователя RU
Руководство пользователя MRX7-D
FCC INFORMATION (U.S.A.) 1. IMPORTANT NOTICE: DO NOT MODIFY THIS UNIT! This product, when installed as indicated in the instructions contained in this manual, meets FCC requirements. Modifications not expressly approved by Yamaha may void your authority, granted by the FCC, to use the product. 2. IMPORTANT: When connecting this product to accessories and/or another product use only high quality shielded cables. Cable/s supplied with this product MUST be used. Follow all installation instructions.
PA_ru_5 1/2 ПРАВИЛА ТЕХНИКИ БЕЗОПАСНОСТИ ВНИМАТЕЛЬНО ПРОЧТИТЕ, ПРЕЖДЕ ЧЕМ ПРИСТУПАТЬ К ЭКСПЛУАТАЦИИ Сохраните это руководство, чтобы можно было обращаться к нему в дальнейшем. ПРЕДУПРЕЖДЕНИЕ Во избежание получения серьезных травм вплоть до наступления смерти от удара электрическим током, а также во избежание короткого замыкания, повреждения оборудования, пожара и других инцидентов, всегда соблюдайте основные правила безопасности, перечисленные далее.
PA_ru_5 2/2 Правила безопасности при эксплуатации Аккумулятор резервного питания • Не вставляйте пальцы или руки в отверстия на устройстве (вентиляционные отверстия и т. п.). • Никогда не вставляйте и не роняйте посторонние предметы (бумагу, пластиковые, металлические и прочие предметы) в отверстия на устройстве (вентиляционные отверстия и т. д.). Если это произойдет, немедленно отключите питание и отсоедините кабель питания от розетки.
Содержание ПРАВИЛА ТЕХНИКИ БЕЗОПАСНОСТИ .....................................................................4 Начало работы..............................................................................................................7 Комплект поставки (проверьте полноту комплектации).................................................. 7 Версии микропрограмм ........................................................................................................
Начало работы Благодарим за приобретение сигнального процессора Yamaha MRX7-D! Для того чтобы в полной мере воспользоваться возможностями MRX7-D, внимательно прочтите это руководство. После прочтения данного руководства уберите его в безопасное место: оно может потребоваться вам в будущем.
Общие сведения о MRX7-D Характеристики • Сигнальный процессор оснащен функцией обработки аудиосигналов, которая необходима для оптимизации акустики установленных систем MRX7-D — это высокопроизводительный сигнальный процессор с высококачественным звучанием, который оснащен функцией обработки аудиосигналов, которая необходима для оптимизации акустики установленных систем.
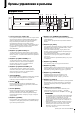
Органы управления и разъемы Передняя панель q we t yu i !1 !2 !5 88 r q Разъем для карты памяти SD В этот разъем вставляется карта памяти SD. С карты памяти SD, на которую записаны звуковые файлы (MP3 и WAV), можно воспроизводить музыку или звуковые эффекты. Перед вставкой карты памяти SD в разъем или ее извлечением необходимо снять крышку разъема. Дополнительные сведения о работе с картой памяти SD см. на стр. 21. Дополнительные сведения о воспроизведении аудиофайлов см.
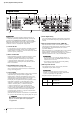
Органы управления и разъемы Задняя панель q e w r ty u i o !0 !3 ПРИМЕЧАНИЕ У MRX7-D есть разъемы, имеющие одинаковую форму, но с совершенно разными функциями (например, разъем [DCP], разъемы Dante [PRIMARY]/[SECONDARY], разъемы [YDIF]). Выполните необходимые подключения, следуя инструкциям, приведенным для каждого разъема. В противном случае возникает опасность повреждения оборудования. q Разъем AC IN К этому разъему следует подключить входящий в комплект поставки кабель питания.
Органы управления и разъемы Переключатели 1-2 (UNIT ID) Переключатель 5 (PANEL LOCK) Данные переключатели задают старший разряд, а описанный ранее поворотный переключатель задает младший разряд, что позволяет установить код устройства UNIT ID в диапазоне от 01 до 3F (63 комбинации).
Органы управления и разъемы o Разъемы [YDIF] Это разъемы используются для формирования кольцевого соединения с устройствами, составляющими систему MTX/MRX, что позволяет принимать и передавать аудиосигналы. Используйте кабель CAT5e или лучший Ethernet STP-кабель (с экранированной витой парой), в котором все 8 контактов подключены с использованием прямого соединения. Максимальная длина кабеля между устройствами — 30 метров. Вы можете подключить до 8 устройств, оснащенных разъемами [YDIF].
Органы управления и разъемы Подключение разъема Euroblock При подключении к разъемам [INPUT]/[OUTPUT] и разъему [GPI] используйте входящие в комплект штекеры Euroblock. 1. Ослабьте винты клемм. Ослабьте Отвертка со шлицем Подготовка кабеля Винт клеммы примерно 7 мм (приблизительно 5 мм для для разъема GPI) Разъем Euroblock Ушко примерно 20 мм • Используйте многожильный провод для подключений разъемов Euroblock, зачистите провод как показано на следующем рисунке.
Органы управления и разъемы 5. Вставьте штекер Euroblock в разъем [GPI] или [INPUT]/[OUTPUT] MRX7-D. 3. Выровняйте края платы с направляющими внутри слота и вставьте плату. Вставляйте плату в слот до упора, чтобы разъем в конце платы был правильно вставлен в разъем внутри слота. ПРИМЕЧАНИЕ При подключении несбалансированных кабелей к разъему [INPUT], используйте перемычку для соединения контактов «-» и «G» штекера Euroblock.
О технологии Dante Этот модуль использует технологию Dante как протокол для передачи аудиосигналов. Dante — это сетевой протокол, разработанный компанией Audinate. Этот протокол предназначен для передачи многоканальных аудиосигналов с разными частотами сэмплирования и на разных скоростях, а также сигналов для управления устройством в сети Giga-bit Ethernet (GbE). Протокол Dante обеспечивает следующие преимущества.
О технологии Dante О резервирующих сетях О приложении Dante Controller Сеть с резервированием состоит из двух цепей — первичной и вторичной. Обычно работа сети осуществляется по первичной цепи. Однако если происходит разрыв соединения в первичной цепи, аудиосвязь автоматически будет осуществляться по вторичной цепи.
Краткое руководство В этом разделе описаны основные настройки и действия, необходимые для сборки системы MTX/MRX с MRX7-D. Возможно для вашей системы некоторые из действий можно пропустить, в таком случае переходите к последующему шагу. Подготовка Перед фактической установкой и подключением оборудования выполните необходимые настройки, указанные в MTX-MRX Editor. 1. Подготовьте компьютер, на который будет установлена программа MTX-MRX Editor. 2. Установите MTX-MRX Editor на компьютер. 6.
Краткое руководство Работа на участке (установка и подключение кабелей) Установите и соберите систему, сверяясь с напечатанной схемой соединений. 1. Укажите код устройства UNIT ID для MRX7-D и XMV/EXi8/EXo8. Укажите код устройства UNIT ID для каждого устройства MRX7-D и XMV/EXi8/EXo8. Код устройства UNIT ID задается комбинацией положения поворотного переключателя [UNIT ID] и DIP-переключателей, расположенных на задней панели каждого устройства.
Различные процедуры Загрузка (переключение) предустановок В системе MTX/MRX входные и выходные подключения, настройки матричного микшера и параметры усилителей XMV одной MTX/MRX-системы хранятся вместе как «предустановка» в MRX7-D и MTX-MRX Editor, что позволяет загружать набор этих параметров при надобности. Каждая MTX/MRX система может хранить до 50 предустановок. MTX-MRX Editor используется для редактирования предустановок. Каждая предустановка содержит следующие настройки.
Различные процедуры Подключение через разъем [GPI] • Примеры подключений к разъему [GPI IN] Пример. Управление MRX7-D из коммутатора Устройства с интерфейсом GPI могут быть подключены к разъему [GPI] задней панели. С помощью интерфейса GPI возможен обмен сигналами с внешними контроллерами и другими устройствами. MRX7-D +5VDC +V CPU IN A/D 100k Пример. Управление MRX7-D с помощью линейного потенциометра на 10 кОм. MRX7-D MRX7-D содержит 16 входных гнезд и 8 выходных.
Различные процедуры Воспроизведение аудиофайлов, сохраненных на карте памяти SD, с помощью MRX7-D В MRX7-D можно использовать находящиеся в свободной продаже карты памяти SD для воспроизведения аудиофайлов, например музыки и звуковых эффектов, без необходимости подключения CD-проигрыватели или других устройств. MRX7-D может воспроизводить аудиофайлы в формате MP3 и WAV. Далее объясняется как работать с картами памяти SD.
Различные процедуры 4. По завершении инициализации отключите питание MRX7-D. 5. Установите DIP-переключатели 7 и 8 в положение «RESUME». 6. Снова включите питание MRX7-D. MRX7-D запустится с восстановленными заводскими настройками.
Приложение Поиск и устранение неисправностей На веб-сайте профессиональных аудиоустройств Yamaha Pro Audio опубликованы ответы на часто задаваемые вопросы (FAQ). http://www.yamahaproaudio.com/ Симптом Возможная причина и способ устранения Правильно подсоедините шнур питания. Устройство не включается, светодиоды на панели не горят. Убедитесь в том, что переключатель питания включен. Если питание не включается по-прежнему, обратитесь к местному представителю корпорации Yamaha.
Приложение Симптом Предустановка не переключается во время, указанное в планировщике. Индикатор [ALERT] мигает. Невозможно переключить предустановки на устройстве, подключенном к разъему [GPI]. Возможная причина и способ устранения Часы MRX7-D устанавливаются после отправки данных из компьютера через MTX-MRX Editor в MRX7-D. Убедитесь, что часы компьютера установлены правильно. Проверьте правильность настроек планировщика в MTX-MRX Editor.
Приложение Сообщения На индикаторах передней панели MRX7-D отображаются предупреждения и подобная информация. Сообщения также отображаются в поле Error Status (Состояние ошибки) приложения Dante Controller. Ниже приведены описания состояний, когда каждый индикатор горит или мигает. Не горит Горит Индикатор не горит. Индикатор постоянно горит. Мигает Flash x 2 Индикатор постоянно мигает. Индикатор циклически мигает дважды.
Приложение Список оповещений Это список оповещений, которые могут отображаться на экране [PRESET] передней панели. Оповещение ноты Значение Действия Устройство запускается неправильно. Выключите питание, подождите по крайней мере 6 секунд и включите его повторно. Если неполадка не устраняется, инициализируйте память устройства. Если и это не поможет, обратитесь к своему дилеру Yamaha. 10 Внутренняя резервная батарея разряжена или не установлена.
Приложение Оповещение ноты Значение Действия 43 К сети подключено слишком много устройств. Уменьшите количество подключенных к сети устройств. 44 Превышено время ожидания ответа от сервера времени или сервер дал неверный ответ. Проверьте состояние сервера времени или укажите другой сервер времени. 45 Имя хоста сервера времени не может быть назначено DNS-сервером. Проверьте настройки сервера времени, адрес DNS-сервера и убедитесь, что DNS-сервер работает правильно.
Приложение Технические характеристики Характеристики продукта Размеры (Ш x В x Г) Вес Напряжение источника питания Потребляемая мощность Теплоотдача (в час) Диапазон рабочих температур Температура при хранении Константа УЧПУ (NC value) Количество банков памяти Максимальное количество одновременно используемых устройств Длина кабеля питания Комплект поставки Продающиеся отдельно комплектующие Электрические спецификации Частота дискретизации Задержка сигнала Частотная характеристика Общее нелинейное искаже
Приложение Характеристики ввода-вывода ХАРАКТЕРИСТИКИ АНАЛОГОВОГО ВВОДА Входные разъемы GAIN (усиление) Действительное полное сопротивление нагрузки Для использования при номинальном уровне 10 кОм 50–600 Ом (микрофоны) и 600 Ом (линии) 10 кОм 600 Ом (линии) +66 дБ INPUT 1–8 -6 дБ ST IN 1, 2 — Входной уровень Разъем Номинальный Макс. до среза -62 дБ отн. ур. (0,616 мВ) -42 дБ отн. ур. (6,16 мВ) +10 дБ отн. ур. (2,45 В) +30 дБ отн. ур.
Руководство пользователя MRX7-D Analog ADC – + – Digital DSP DSP Digital DAC + – Analog +20dBu LPF -40 -30 -20 -40 -30 -20 -10 0 [0dBu = 0.775Vrms] [0dBV = 1.000Vrms] (0dBFS = Full Scale) -70 INPUT 1–8 (GAIN -6dB) INPUT 1–8 (GAIN +66dB) ST IN 1, 2 1-1 1-2 2 Nominal Input [-62dBu] 3 OUTPUT 1-8 Nominal Output [+4dBu] -40 -30 -20 -10 0 +10 -70 -60 1-2 0dBu 3 +20 -60 [-10dBu] YDIF OUT Dante SLOT [+10dBu] -50 (-18dBFS) (0dBFS) 3 Max.
Приложение Предметный указатель Символы +48 В ..................................................................... 12 [s/t], кнопки ......................................................... 9 [ALERT], индикатор ............................................... 9 [DCP], pазъем ....................................................... 11 [ENTER], кнопка ..................................................... 9 [GPI], pазъем ........................................................ 10 [INPUT PEAK], индикаторы ...
Руководство пользователя MRX7-D
ADDRESS LIST NETHERLANDS/BELGIUM/ LUXEMBOURG NORTH AMERICA CANADA Yamaha Music Europe Branch Benelux Clarissenhof 5b, 4133 AB Vianen, The Netherlands Tel: +31-347-358040 Yamaha Canada Music Ltd. 135 Milner Avenue, Toronto, Ontario, M1S 3R1, Canada Tel: +1-416-298-1311 FRANCE U.S.A. Yamaha Corporation of America 6600 Orangethorpe Avenue, Buena Park, CA 90620, U.S.A. Tel: +1-714-522-9011 CENTRAL & SOUTH AMERICA MEXICO Yamaha de México, S.A. de C.V. Av. Insurgentes Sur 1647 Piso 9, Col.
Номер модели, серийный номер, требования к источнику питания и пр. указаны на наклейке в верхней части модуля или рядом с ней. Запишите серийный номер в расположенном ниже поле и сохраните данное руководство как подтверждение покупки; это поможет идентифицировать принадлежность устройства в случае кражи. Номер модели. Cерийный номер.
ПАМЯТКА Руководство пользователя MRX7-D 35
Yamaha Pro Audio global website http://www.yamaha.com/proaudio/ Yamaha Downloads http://download.yamaha.