Verkkoon kytkettävä N e t wo rk CD R eceiver CD-vastaanotin OWNER’S MANUAL Käyttöohje Julkaisija: Yamaha Scandinavia Kaikki oikeudet pidätetään. Käyttöohjeen tiedot perustuvat sen tekohetkellä oleviin tuotetietoihin. Ominaisuus- tai varustemuutokset ovat mahdollisia. Emme vastaa muutoksista.
TÄRKEITÄ TURVALLISUUSOHJEITA 12 Laita vain valmistajan suosittamalle tai laitteen mukana myydylle jalustalle tai telineeseen. Jos laite on telineessä, siirrä sitä varoen, jotta putoava laite ei aiheuttaisi vahinkoja 13 Irrota virtajohto ukonilman ajaksi tai jos laitetta ei aiota käyttää pitkään aikaan. 14 Anna huoltoliikkeen asiantuntijan tehdä laitehuolto.
COMPLIANCE INFORMATION STATEMENT FCC INFORMATION (for US customers) Responsible Party: Yamaha Corporation of America A/V Division Address: 6600 Orangethorpe Avenue, Buena Park, CA 90620 Telephone: 714-522-9011 Type of Equipment: Network CD Receiver Model Name: CRX-N470 This device complies with part 15 of FCC Rules and Industry Canada’s licence-exempt RSSs.
VAROITUS: LUE ENNEN LAITTEEN KÄYTTÖÄ 1 2 3 4 5 6 7 8 9 10 11 12 13 14 15 16 17 18 Soittimeen tiivistyy kosteutta, jos ympäristön lämpötila muuttuu nopeasti. Irrota virtajohto pistorasiasta ja anna laitteen kuivua itsekseen. 19 Pitkäkestoisen käytön aikana laite voi lämmetä. Sammuta virta ja anna laitteen jäähtyä. 20 Sijoita laite lähelle pistorasiaa niin, että virtajohto voidaan irrottaa helposti. 21 Suojaa paristot kuumuudelta, kuten auringonpaisteelta ja tulelta.
• • • • • • Älä käytä erityyppisiä paristoja yhdessä (esim. alkali- ja mangaanipareja). Paristot voivat olla ominaisuuksiltaan erilaiset, vaikka ne näyttäisivät samanlaisilta. Virheellisesti vaihdetut paristot voivat aiheuttaa räjähdysvaaran. Puhdista paristotila hyvin, ennen kuin laitat uudet paristot kauko-ohjaimeen. Hävitä paristot jätehuolto-ohjeiden mukaan. Säilytä paristot lasten ulottumattomissa. Jos lapsi nielee pariston, ota heti yhteys lääkäriin.
USB-laitteiden käsittely Tietoa kuluttajalle vanhojen laitteiden ja käytettyjen paristojen keräyksestä ja hävityksestä • Nämä merkit tuotteessa, pakkausmateriaalissa ja/tai dokumenteissa tarkoittavat, että käytettyä sähkö- ja elektroniikkalaitetta sekä paristoja/akkuja ei saa hävittää sekajätteenä. Vanhat tuotteet ja käytetyt paristot käsitellään, kerätään ja kierrätetään oikein, jos toimitat ne tähän tarkoitukseen suunniteltuun keräyspisteeseen niin kuin on säädetty kansallisessa laissa.
Sisältö Laitteen toiminnot......8 Johdanto ......9 Tarvikkeet······9 Tietoja käyttöohjeesta......9 Laitteen rakenne······10 Etulevy ......10 Takalevy ......11 Etulevyn näyttö......12 Kauko-ohjain ......13 Tämän laitteen ja mobiililaitteen välinen suora yhteys······39 Lisää toistotoimintoja.....40 Satunnais/uusintatoisto40······40 Toistotiedot......41 Musiikkisisällön tallennus FAVORITES-paikalle······42 Äänenlaadun säätö······43 Uniajastin······43 Muut asetukset······44 Valmistelu....
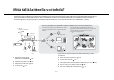
Mitä tällä laitteella voi tehdä? • Tämä laite on verkkoon kytkettävä CD-soitin. Sen kautta voit kuunnella musiikkitiedostoja mediapalvelimelta (PC tai NAS), joka on yhdistetty samaan verkkoon tämän laitteen kanssa, USB-laitteeseen tallennettuja musiikkitiedostoja sekä audiosisältöä internetradiosta, FM-radiosta, CD-levyiltä, AirPlay-laitteista (iPhone/ iTunes) ja erillislaitteista, kuten DVD-soittimesta.
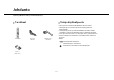
Johdanto Tarkasta pakkauksen sisältö ja lue tämä käyttöohje. Tarvikkeet Tietoja käyttöohjeesta • Ohjeissa ja kuvissa viitataan malliin CRX-N470, ellei toisin mainita. • Tässä käyttöohjeessa neuvotaan ohjaamaan toimintoja pääasiassa kaukosäätimellä. • Tässä käyttöohjeessa iOS- ja Android-mobiililaitteisiin viitataan termillä “mobiililaite”. Tarvittaessa mobiililaitteen tyyppi on määritetty tarkemmin. • Tässä ohjeessa kuvattu “iPhone” voi viitata myös “iPod”- ja "iPad"-laitteeseen.
Laitteen rakenne Perehdy laitteen rakenteeseen ja osien toimintoihin. 1 Etulevy Virran merkkivalo Merkkivalo palaa, kun tämä laite on toimintatilassa. 2 O (Virta) ( s.16) 3 PHONES Kytkentäliitin kuulokkeille. ED C • Kaiuttimet ja subwoofer eivät toista ääntä silloin, kun kuulokkeet on kytketty. Huom B Wi-Fi 4 USB-liitin ( s.24) 5 Levykelkka ( s.23) 6 BLUETOOTH VOLUME INPUT A CONNECT PHONES USB ( s.23, 24, 41) PRESET 7 8 / ( s.36) (Play/pause) ( s.23, 24, 41) (stop) ( s.
Laitteen rakenne Takalevy 1 Virtajohto ( s.16) 2 Langaton antenni ( s.19) 3 AUX 1 -liittimet (RCA-tulo) ( s.29) 4 AUX 2 -liitin (minijakki, tulo) ( s.29) 5 ANTENNA-liitin ( s.15) 6 SUBWOOFER-liitin ( s.14) 7 NETWORK-liitin ( s.15) Verkkokytkentäliitin. Tee kytkentä erikseen myytävällä verkkokaapelilla. 8 1 2 3 4 5 6 7 8 11 Fi SPEAKERS -liittimet ( s.
Laitteen rakenne Etulevyn näyttö 1 1 Vaihtuvan tiedon näyttö Vaihtuvaa tietoa, kuten tietoa musiikista ja radion viritystaajuus. Etulevyssä näkyvät vain aakkosnumeeriset merkit. 2 STEREO-merkkivalo Merkkivalo palaa, kun laite vastaanottaa FMstereolähetystä. 3 TUNED-merkkivalo Merkkivalo palaa, kun laite vastaanottaa FMlähetystä. 4 6 2 3 Satunnaistoiston/uusintatoiston ilmaisin Satunnais- tai uusintatoisto CD-levyltä, USBlaitteesta tai tietokoneesta.
Laitteen rakenne 1 Kauko-ohjain 2 3 1 2 A 4 (avaa / sulje levykelkka) ( s.23) Ohjelmalähdepainikkeet B 4 Numerot ( s.23, 42) 5 MEMORY ( s.34, 42) 6 Äänentoisto, nuolipainikkeet ( s.23, 24, 38, 41) 7 REPEAT ( s.47) 8 SHUFFLE ( s.47) 9 DIMMER ( s.12) laitetta kuin ennen, vaihda paristot. 11 O (Virta) ( s.16) 6 12 OPTION ( s.52) C D 8 9 0 E F G Laita paristot napaisuusmerkintöjen (“+” ja “-”) suuntaisesti. Huom • Mikäli kauko-ohjain toimii vain lähempänä 10 FAVORITES ( s.
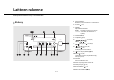
Valmistelu Kytke kaiuttimet, antennit yms. Käynnistä tämä laite. Kytke tämän laitteen virtajohto vasta, kun olet tehnyt kaikki kytkennät. Kaiuttimien kytkeminen 1 Oikea kaiutin Vasen kaiutin 1 Poista eristettä jokaisen kaiutinkaapelin päästä. 2 3 15 mm (5/8 in.) 2 Kaiutinkaapeli Kytke kaiuttimet tähän laitteeseen kuten kuvassa. Subwoofer • Käsittele kaiuttimet, subwoofer ja kaiutinkaapelit erikseen. Monokaapeli • Kaiuttimista on lisätietoja kaiuttimien käyttöohjeessa.
Valmistelu Antennin kytkentä 1 2 Kytke mukana toimitettu antenni laitteeseen. Kiinnitä se paikkaan, jossa se vastaanottaa radiosignaaleja hyvin. Mukana toimitettu 2 Verkkoyhteyden valmistelu Langaton verkkoyhteys Kaapelilla kytkettävä verkkoyhteys Nosta langaton verkkoantenni pystyyn. Kytke tämä laite reitittimeen, kuten kuvassa. • Nosta takalevyssä oleva langattoman verkkoyhteyden antenni pystyyn.
Valmistelu Option-valikon virta-asetukset (System Config) Laite toimintatilaan Kytke virtajohto pistorasiaan. Paina (Lihavointi/alleviivaus: perusasetus) Lisätietoja Option-valikosta, katso "Optionasetukset" ( s.52). . • Laite kytkeytyy toimintatilaan. AutoPowerStby • Kytke laite pois käytöstä (valmiustilaan) painamalla uudestaan . • un käynnistät tähän laitteeseen virran ensimmäisen käyttöönoton yhteydessä, näkyviin saattaa tulla verkkoasetusten valmisteluviesti (Share WiFi Set).
Verkkoyhteyden muodostaminen Kun olet kytketyt tämän laitteen verkkoon, voit toistaa musiikkitiedostoja, jotka on tallennettu PC-tietokoneelle, mobiililaitteseen, DLNA*yhteensopivaan NAS-palvelimeen, sekä audiosisältöä suoraan internetistä. * Digital Living Network Alliance Yhteydenmuodostustavan valinta MusicCast CONTROLLER-sovellus on yksinkertaisin ja suositeltava tapa muodostaa verkkoyhteys.
Verkkoyhteyden muodostaminen Yhteydenmuodostus: MusicCast CONTROLLER Huom • MusicCast CONTROLLER -asetuksien tekemistä varten voit lukea myös "MusicCast Setup Guide" -käyttöönottoohjeen, joka on ladattavissa verkosta: Yamaha Downloads http://download.yamaha.com/ 1 Liitä tämä laite samaan kotiverkkoon kuin muutkin mobiililaitteet. 1 2 3 Käynnistä ”MusicCast CONTROLLER”sovellus mobiililaitteesta. • Tämän sovelluksen voit ladata ilmaiseksi App Storesta tai Google Playsta.
Verkkoyhteyden muodostaminen Langaton verkkoyhteys Mikä on WPS? WPS (Wi-Fi Protected Setup) on Wi-Fi Alliancen laatima standardi, jonka ansiosta kotiverkko on helppo tehdä. Käyttöönoton voit tehdä WPS (Wi-Fi Protected Setup)-painikkeella tai jakamalla iOS-laitteen (iPhonen tms.) asetukset. Huom • Jos tämä laite on sijoitettu kauas langattomasta reitittimestä (tukiasemasta), yhteyttä ei välttämättä muodostu. Siinä tapauksessa vie laitteet lähemmäs toisiaan.
Verkkoyhteyden muodostaminen Huom iOS-laiteasetusten jakaminen Nämä koskevat iOS-laitteen verkkoasetuksia, jotka voit jakaa tälle laitteelle. • iOS-laitteen käyttöjärjestelmän on oltava iOS 7.1 tai uudempi. • Ennen kuin jatkat, varmista, että iOS-laitteestasi on yhteys langattomaan reitittimeen. 1 2 3 4 5 6 Paina . Valitse [Network Config]-kohta / painikkeilla. Paina . Valitse [Select Network]-kohta / painikkeilla. Paina . 1 OPTION Valitse [Wireless]-kohta / painikkeilla. Paina .
Verkkoyhteyden muodostaminen Kaapelilla muodostettava verkkoyhteys 1 2 3 4 Paina Huom • Ellei reititin tule DHCP-toimintoa, määritä verkkoasetukset Option-valikon kohdassa [Network Config] ( s.52). • Jos määrität aliverkkoasetuksen itse, jokainen palvelin on kytkettävä samaan aliverkkoon kuin tämä laite ( s.53). . Valitse [Network Config]-kohta / painikkeilla. Paina . Valitse [Select Network]-kohta / painikkeilla. Paina . 1 OPTION Valitse [Wired]-kohta / painikkeilla. Paina .
Verkkoyhteyden muodostaminen Laiteohjelmiston (firmware) päivitys Huom • Jos internetyhteys on liian hidas tai tällä laitteella on yhteys langattomaan verkkoon langattoman verkkosovittimen välityksellä, päivitys verkon kautta ei välttämättä ole mahdollista langattoman yhteyden tilan takia. Tässä tapauksessa yritä uudestaan tai päivitä laiteohjelmisto USB-muistilaitteen avulla. Uusimman laiteohjelmiston voit ladata Yamaha-verkkosivustolta.
Musiikin kuuntelu Huom • Tällä laitteella voit toistaa audio-CD-levyille ja CD-levyjen toisto 1 2 3 2 Valitse INPUT-painikkeella [CD]. Vaihtoehtoisesti paina kaukoohjaimen -painiketta. data-CD-levyille tallennettuja MP3/WMAtiedostoja. Lisätietoja toistokelpoisista CDlevyistä, ks. “Tuetut laitteet/mediat” ( s.53). 1 INPUT • Kun CD-toisto on lopetettu, toisto jatkuu viimeksi soitetun kappaleen alusta. Jos painat , kun toisto on lopetettu, keskeytyskohta häviää muistista.
Musiikin kuuntelu Musiikin toisto USBlaitteesta 1 2 3 Valitse INPUT-painiketta painamalla [USB] tai paina kauko-ohjaimen painiketta. Kytke USB-laite USB-porttiin. Näyttää toisen kohdan. ENTER/ Vahvista valittu tietue ja jatka seuraavalle tasolle tai käynnistä toisto. HOME Ylin tietuetaso. Palaa edelliseen kohtaan. DISPLAY Lopeta selailu ja palauta näyttöön parhaillaan soivan sisällön tiedot. • Lopeta toisto ennen kuin irrotat USB-laitteen.
Musiikin kuuntelu Musiikin toisto Bluetooth-yhteyden kautta Bluetooth-laitteen pariliitos ja musiikin toisto Kun muodostat yhteyden Bluetooth-laitteesta tähän laitteeseen ensimmäisen kerran, kyseinen Bluetoothlaite täytyy rekisteröidä tämän laitteen käyttöön (liittää pariksi). Kun pariliitos on kerran muodostettu, laitteiden välinen yhteydenmuodostus uudestaan on helppoa, vaikka Bluetooth-yhteys olisi välillä katkaistu.
Musiikin kuuntelu Yhteydenmuodostus ja musiikin toisto Bluetooth-laitteesta, jonka pariliitos on jo tehty Huom 1 • Jos käynnistät yhteydenmuodostuksen tästä laitteesta, tämä laite etsii sen Bluetoothlaitteen, johon yhteys on ollut viimeksi. Varmista tässä tapauksessa, että toisen laitteen Bluetooth-toiminto on käytössä.
Musiikin kuuntelu Musiikin toisto erillislaitteesta 2 Voit toistaa tällä laitteella ohjelmaa erillislaitteesta, kuten DVD-soittimesta. 1 2 3 4 3 Irrota tämän laitteen virtajohto ja kytke erillislaite tähän laitteeseen. 1 Stereokaapeli (RCA-liitin) • Hanki kytkentöihin tarvittavat kaapelit. Kytke tämän laitteen virtajohto takaisin pistorasiaan. Kytke tähän laitteeseen virta painamalla . DVD-soitin tms. Valitse ohjelmalähde. 3.5 mm stereominiplugi Kannettava musiikkisoitin tms.
Musiikin kuuntelu DAB-radio(vain CRX- Note 1 Press N470D) 2 Press / to select [Initial Scan] and press Initial scan 1 TUNER repeatedly to select [DAB]. OPTION • Initial scan starts automatically when you select [DAB] for the first time. • When scanning is completed, the number of receivable DAB stations is shown on the front panel display momentarily, and the first station stored is played. 2 / Tuning in DAB stations 1 2 Press when the source is DAB.
Musiikin kuuntelu Note Presetting DAB stations Use the preset function to store your favorite 30 DAB stations. 1 Tune in a DAB station you want to preset ( s.28) and press . • The preset number flashes on the front panel display. 1 MEMORY OPTION 2 / 3 ENTER • To cancel the DAB preset setting, press . • You can change the information of the DAB station shown on the front panel display by pressing the DISPLAY button.
Musiikin kuuntelu Note Confirming the reception You can confirm the DAB signal level. This is useful when setting up the antenna. 1 2 3 Press when the source is [DAB]. • Option menu is shown on the front panel display. Press / to select [Tune Aid] and press . Press / to change the channel label. 1, 4 OPTION • The measured DAB signal reception level is displayed. 2, 3 / ENTER 4 • The level is from 0 (none) to 100 (best). Press to exit the Option settings.
Musiikin kuuntelu FM-radio Huom Katso mukana toimitetun antennin kytkentäohjeet kohdasta “Antennin kytkentä ( s.15)” FM-asemien viritys 1 TUNER 1 2 2 / Paina . Pidä painettuna /. • Jos radiosignaalin kuuluvuus on heikko, voit virittää aseman itse painelemalla / painiketta. Tässä tapauksessa äänentoisto tapahtuu monoäänenä. • Automaattiviritys alkaa. Se loppuu automaattisesti, kun radioasema on löytynyt.
Musiikin kuuntelu Käyttäjän ohjaama tallennus 1 2 Huom • Jos haluat perua asemien tallennuksen, paina . Viritä kuuluviin radioasema, jonka haluat tallentaa ( s.31). Paina . Aseman poistaminen muistipaikalta 2 MEMORY OPTION 1 Paina OPTION-painiketta, kun • Valittu muistipaikkanumero vilkkuu etulevyn näytössä. ohjelmalähteenä on FM. 4 ENTER 3 4 Option-asetuksen kautta voit poistaa muistipaikalle tallennetun radioaseman. 3 / - Option-asetusvalikko näkyy etulevyn näytössä.
Musiikin kuuntelu RDS-ilmaisimet (vain mallit UK ja Europe) Huom Tämä laite pystyy vastaanottamaan RDS-dataa. Paina -painiketta, kun ohjelmalähteenä on FM. • Tietue vaihtuu seuraavassa järjestyksessä jokaisella painalluksella: PService (asemanimi) PTY (ohjelmatyyppi) RT (radioteksti) CT (kellonaika) Taajuus DISPLAY 33 Fi • Jos RDS-aseman signaali on heikko, tämä laite ei välttämättä pysty vastaanottamaan RDS-dataa kunnolla.
Musiikin kuuntelu Internetradion kuuntelu Huom Tarkista, että tällä laitteella on internetyhteys ( s.17). 1 2 Radioaseman nimi (perusasetus) 1 NET Toistoaika Kappaleen nimi • Voit rekisteröidä internetradioasemasuosikkisi "Bookmarks"kansioon seuraavan verkkosivun kautta. Avaa verkkosivu tietokoneen verkkoselaimella. http://yradio.vtuner.com Painele , kunnes valittuna on [NetRadio]. Selaa internetiä ja valitse radioasema.
Musiikin kuuntelu Tietokoneella olevan musiikin toisto Huom • Lisätietoja median jakamisesta voit lukea Windows Media Player -soittimen ohjeesta (Help). 2 NAS-palvelin tai tietokone, jossa muu DLNApalvelinohjelmisto Musiikkitiedostojen jakamisasetukset Määritä median jakamisen asetukset toisen laitteen tai ohjelmiston käyttöohjeiden avulla.
Musiikin kuuntelu Huom PC-koneella olevan musiikin toisto 1 2 3 Painele , kunnes valittuna on [Server]. Selaa kappaleita ja valitse niistä yksi. / Näyttää muut kohdat. ENTER/ Vahvista valittu tietue ja jatka seuraavalle tasolle tai käynnistä toisto. HOME Ylin tietuetaso. Edellinen tietue. DISPLAY Lopeta selailu ja palauta näyttöön parhaillaan soivan sisällön tiedot. • Voit tallentaa tietokoneella olevia musiikkitiedostoja muistipaikalle ( s.37). 1 NET Toisto alkaa.
Musiikin kuuntelu Verkkosisällön tallennus • Tälle muistipaikalle tallennettu sisältö alkaa soida, kun tämä laite muodostaa verkkoyhteyden. Verkkosisällön tallennus Voit tallentaa muistipaikoille seuraavia verkkosisältöjä: • Internetradio 2 • Tietokoneeseen (palvelimelle) tallennetut musiikkitiedostot 2 3 Paina aikana. verkkosisällön toiston 1, 3 MEMORY Anna haluamasi muistipaikan numero numeropainikkeilla. • Numerot 1 - 37 ovat käytettävissä muistipaikkoina.
Musiikin kuuntelu Toisto AirPlayn välityksellä Voidaksesi käyttää tätä toimintoa on tämän laitteen ja tietokoneen/iPhonen oltava kytkettyinä samaan reitittimeen ( s.17). Jos iPhone tunnistaa tämän laitteen, näyttöön tulee . 1 iPhone iOS7/iOS8/iOS9 Musiikin toistaminen iPhonesta 1 2 3 Kytke tämä laite toimintatilaan ja valitse iPhonen näyttöön toistonäkymä. Näpäytä 2 iPhone CRX-N470 XXXX . Valitse tämän laitteen nimi.
Langaton yhteys tämän laitteen ja mobiililaitteen välillä Voit muodostaa langattoman yhteyden tämän laitteen ja mobiililaitteen välille (Wireless Direct). Nosta laitteen takalevyssä oleva langaton antenni pystyyn ( s.15). 1 2 3 4 5 6 Paina Huom . Valitse [Network Config]-kohta / painikkeilla. Paina . Valitse [Select Network]-kohta / painikkeilla. Paina . • Et voi käyttää tätä asetusta samanaikaisesti kaapelilla muodostetun verkkoyhteyden tai langattoman verkkoyhteyden aikana.
Lisää toistotoimintoja Erilaiset toiminnot, kuten satunnaistoisto/uusintatoisto, ohjelmasisällön tiedot ja muistipaikat, lisäävät osaltaan tämän laitteen käyttömukavuutta. Satunnais/ uusintatoisto Huom Satunnaistoisto Paina toiston aikana. • Etulevyssä oleva satunnaistoiston ilmaisin muuttuu ohessa kuvatulla tavalla jokaisella painikkeen painalluksella. Satunnaistoisto.* Ei näytössä Ei satunnaistoistoa. * Toistettava media vaikuttaa siihen, minkä alueen satunnaistoisto valitsee.
Lisää toistotoimintoja Toistotiedot Huom Kun toistat ohjelmaa tietokoneelta (palvelimelta), USB-laitteesta, AirPlaylta tai CD-levyltä, voit tarkistaa etulevyn näytöstä kappaleen nimen, toistoon kuluneen ajan yms. tietoa. Paina toiston aikana. AL B U M M e t eora • Näyttötietue vaihtuu oheisessa järjestyksessä painiketta painelemalla.
Lisää toistotoimintoja Ohjelmasisällön tallennus FAVORITESmuistipaikalle Huom • Kun tallennat ohjelman FAVORITESpainikkeelle, sille mahdollisesti aiemmin tallentamasi sisältö korvautuu uudella. • FAVORITES-painikkeen painaminen käynnistää yhden seuraavista toimista sen mukaan, millaisen ohjelmasisällön olet tallentanut sille. Voit tallentaa suosikkisisältöäsi FAVORITESpainikkeille (A-C). Sen jälkeen sisällön toisto on helppo käynnistää.
Lisää toistotoimintoja Äänenlaadun säätö Huom Tämän laitteen äänenlaatua voi säätää. Lue lisätietoja Option-menun kautta tehtävästä äänenlaadun säädöstä (ks. oikealla). 1 2 3 4 1, 4 OPTION • Jos haluat perua äänenlaadun säädön, paina OPTION. Option-valikon äänenlaatuasetukset (Lihavointi/alleviivaus: perusasetus) Equalizer Paina Säätä matalia taajuuksia [Bass] ja ylätaajuuksia [Treble]. Asetus vaikuttaa myös kuulokeääneen. (-10 - 0 - +10) . Valitse / -painikkeella haluamasi kohta. Paina .
Lisää toistotoimintoja Option-asetukset Option-asetukset mahdollistavat tämän laitteen toimintojen säädön. 1 2 Paina . • Option-asetusvalikko näkyy etulevyn näytössä. Katso “Option-valikko” ( s.45). Valitse haluamasi valikko / painikkeella. Paina . 1, 4 OPTION 3 Muuta asetusta /-painikkeilla. Paina . 2, 3 / / ENTER • Toista vaihe 3, mikäli valikossa on alavalikko. • Paina , jos haluat perua asetuksen ja palata edelliselle valikkotasolle.
Lisää toistotoimintoja Option-valikko Valikko Alavalikko Perusasetus Valikko Toiminto Alavalikko Perusasetus Toiminto Preset Delete*1 ( s.32) Tyhjentää radioasemien muistipaikat. Subnet Mask 0.0.0.0 Vahvistaa aliverkon peitteen. Auto Preset*1 Käynnistää radioasemien automaattitallennuksen muistipaikoille. Default Gateway 0.0.0.0 Vahvistaa oletusyhdyskäytävän. DNS Server(P) 0.0.0.0 Vahvistaa ensisijaisen verkkotunnuspalvelimen (primaarinen DNS). DNS Server(S) 0.0.0.
Vianmääritys Lue taulukko, ellei laite toimi kunnolla. Mikäli vikaa ei ole mainittu luettelossa tai ohjeista ei ole apua, sammuta tämä laite, irrota sen virtajohto pistorasiasta ja ota yhteys lähimpään valtuutettuun Yamaha-huoltoon. Tarkista ensin, että kaikkien laitteiden kaapelien liittimet on kytketty kunnolla oikeisiin liittimiin. Tarkasta, että virtakaapeli on kytketty pistorasiaan. Yleistä Ongelma Laite kytkeytyy valmiustilaan pian virrankytkeytymisen jälkeen. Laite ei toimi normaalisti. Ei ääntä.
Vianmääritys Verkko Ongelma Syy Ratkaisu Verkkotoiminnot eivät toimi. Tarvittavia verkkoasetuksia (IP-osoitetta) ei ole saatu vastaanotettua kunnolla. Kytke reitittimen DHCP-palvelintoiminto käyttöön. Valitse lisäksi laitteen Option-valikon [Network Config]-asetuskohtaan asetus [DHCP] - [On]. Jos haluat määrittää verkkoasetukset itse, varmista, että käytät vain tämän laitteen käytössä olevaa IP-osoitetta ( P.53). Lisätietoja saat reitittimen käyttöohjeesta.
Vianmääritys Ongelma iPod ei tunnista tätä laitetta AirPlaytoiston aikana. Tämä laite ei pysty muodostamaan internetyhteyttä langattoman reitittimen (tukiaseman) kautta. Langatonta verkkoa ei löydy. Syy Ratkaisu Käytössä on montaa SSID-tunnusta käyttävä reititin. Reitittimen verkkoerottelutoiminto saattaa estää iPhonea muodostamasta yhteyttä tähän laitteeseen. Jos muodostat yhteyttä iPhoneen, käytä SSID:tä, jonka yhteydenmuodostus tähän laitteeseen on sallittu. Langaton reititin on pois päältä.
Vianmääritys Ongelma Ääntä ei kuulu tai ääni pätkii toiston aikana. Syy Ratkaisu Bluetooth-laitteen äänenvoimakkuus on säädetty hyvin pieneksi. Lisää äänenvoimakkuutta Bluetooth-laitteesta. Bluetooth-laite ei voi asetustensa mukaan lähettää Bluetoothaudiosignaalia tähän laitteeseen. Valitse kyseisestä Bluetooth-laitteesta asetus, joka sallii Bluetoothaudiosignaalin siirron toisesta laitteesta tähän laitteeseen. Bluetooth-yhteys tämän laitteen ja toisen laitteen välillä on katkennut.
Vianmääritys DAB-vastaanotto (vain CRX-N470D) Ongelma DAB-asemia ei voi virittää Ensihaku ei onnistu (etulevyn näyttöön tulee [Not Found]). Syy Ratkaisu Laitteesta ei ole käynnistetty ensihakua. Käynnistä ensihaku ( P.30). DAB-lähetyssignaali on liian heikko. Käytä DAB Tune Aid-toimintoa saadaksesi antennille parhaan mahdollisen sijainnin ( P.33). Antennin sijainti ei ole ihanteellinen DAB-vastaanoton kannalta. Alueellasi ei ole DAB-kuuluvuutta.
Vianmääritys Etulevyn näytön viestit Viesti Syy Ratkaisu Pääsy tietokoneeseen on estetty. Määritä jakamisasetukset ja salli musiikkisisällön jakaminen tämän laitteen kanssa ( P.40). Laite ei voi lukea USB-laitetta. Sammuta tämä laite ja kytke USB-laite uudelleen tähän laitteeseen. Jos ongelma uusiutuu, käytä toista USB-laitetta. Tämän laitteen ja verkon välisellä signaalitiellä on ongelma. Varmista, että reititin ja modeemi ovat toimintatilassa.
Tuetut laitteet/mediat ja tiedostoformaatit Yhteensopivat laitteet/ mediat Tietokoneet Levyjen käsittely Levyt • Tämä laite on suunniteltu käyttämän CD, CD-R/RW (ISO 9660-formaatti) -levyjä, joihin on levyyn tai koteloon painettu jokin seuraavista logoista. • Älä käytä suojaa, jonka tarkoituksena on estää levyn naarmuuntuminen. • Älä laita levykelkkaan muita esineitä kuin levyjä. CD-R/RW* • Laita laitteeseen vain yksi levy kerrallaan. Muuten tämä laite ja levyt voivat mennä rikki.
Tuetut laitteet/mediat ja tiedostoformaatit Tiedostoformaatti Tämä laite tukee seuraavia tiedostoformaatteja. DLNA/USB Formaatti Levy Näytetaajuus (kHz) WAV* 32/44.1/48/ 88.2/96/176.4/ 192 MP3 WMA Kvantisointi (bit) Bittinopeus (kbps) Kanavien lkm Keskeytyksetön toisto (gapless) 2 Formaatti 16/24 - 32/44.1/48 - 8-320 2 - 32/44.1/48 - 8-320 2 - MPEG-4 AAC 32/44.1/48 - 8-320 2 - FLAC 32/44.1/48/ 88.2/96/176.4/ 192 16/24 - 2 ALAC 32/44.1/48/ 88.
Tekniset tiedot Bluetooth Ohjelmalähde AUX IN AUX 1 AUX 2 Bluetooth-versio Stereo L/R: RCA 3.5 mm stereominiliitin Tuetut profiilit CD Laser Tyyppi Aallonpituus Lähtöteho Media Audioformaatti Puolijohdelaser GaAs/GaAlAs 790 nm 7 mW CD, CD-R/RW Audio CD, MP3, WMA Yhteensopivat koodekit Toimintamuoto Langaton lähtöteho Suurin mahdollinen yhteysetäisyys Ver. 2.
Tavaramerkit AirPlay, iPad, iPhone, iPod, iPod touch ja iTunes ovat Apple Inc:n tavaramerkkejä, rekisteröity Yhdysvalloissa ja muissa maissa. (CRX-N470D) Laite tukee DAB/DAB+ -viritystä. AirPlay toimii seuraavien laitteiden kanssa: iPhone, iPad ja iPod touch, jossa iOS 4.3.3 tai uudempi, Mac, jossa OS X Mountain Lion tai uudempi, ja Mac ja PC, jossa iTunes 10.2.2 tai uudempi. GPL (tilanne heinäkuussa 2015) Tämä tuote käyttää joissakin osioissa GPL/LGPL-lisensoituja avoimen lähdekoodin ohjelmistoja.
VAROITUS Muiden kuin tässä esitettyjen toimintojen säädön tai asetusten muutto saattaa altistaa vaaralliselle säteilylle tai muille vaarallisille toiminnoille. OBSERVERA Apparaten kopplas inte bort från växelströmskällan (nätet) så länge som den är ansluten till vägguttaget, även om själva apparaten har stängts av. DK Advarsel: Usynlig laserstråling ved åbning når sikkerhedsafbrydere er ude af funktion. Undgå utsættelse for stråling.
AVEEA71102A Important Notice: Guarantee Information for customers in EEA* and Switzerland English For detailed guarantee information about this Yamaha product, and Pan-EEA* and Switzerland warranty service, please either visit the website address below (Printable file is available at our website) or contact the Yamaha representative office for your country. * EEA: European Economic Area http://europe.yamaha.com/warranty/ Yamaha Global Site http://www.yamaha.com/ Yamaha Downloads http://download.yamaha.