
User Manual


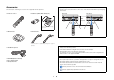
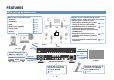


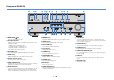
Table Of Contents
- Accessories
- FEATURES
- PREPARATIONS
- General setup procedure
- Placing speakers
- Connecting speakers
- Connecting a TV
- Connecting playback devices
- Connecting the FM/AM antennas
- Connecting a network cable or preparing the wireless antenna
- Connecting other devices
- Connecting the power cable
- Selecting an on-screen menu language
- Optimizing the speaker settings automatically (YPAO)
- Connecting to a network device wirelessly
- PLAYBACK
- Basic playback procedure
- Selecting the input source and favorite settings with one touch (SCENE)
- Selecting the sound mode
- Listening to FM/AM radio
- Playing back music via Bluetooth
- Playing back iPod music
- Playing back music stored on a USB storage device
- Playing back music stored on media servers (PCs/NAS)
- Listening to Internet radio
- Playing back music with AirPlay
- Playing back music in multiple rooms (multi-zone)
- Controlling the unit from a web browser (web control)
- Viewing the current status
- Configuring playback settings for different playback sources (Option menu)
- CONFIGURATIONS
- Configuring input sources (Input menu)
- Configuring the SCENE function (Scene menu)
- Configuring sound programs/surround decoders (DSP Program menu)
- Configuring various functions (Setup menu)
- Viewing information about the unit (Information menu)
- Configuring the system settings (ADVANCED SETUP menu)
- ADVANCED SETUP menu items
- Changing the speaker impedance setting (SP IMP.)
- Selecting the remote control ID (REMOTE ID)
- Changing the FM/AM tuning frequency setting (TU)
- Switching the video signal type (TV FORMAT)
- Removing the limitation on HDMI video output (MON.CHK)
- Selecting the HDMI 4K signal format (4K MODE)
- Restoring the default settings (INIT)
- Updating the firmware (UPDATE)
- Checking the firmware version (VERSION)
- Updating the unit’s firmware via the network
- APPENDIX

En 10
Front panel (RX-V679)
1 MAIN ZONE z key
Turns on/off (standby) the unit.
2 Standby indicator
Lights up when the unit is in standby mode under any of the
following conditions.
• HDMI Control is enabled (p.110)
• Standby Through is enabled (p.111)
• Network Standby is enabled (p.112)
• An iPod is being charged (p.67)
3 YPAO MIC jack
For connecting the supplied YPAO microphone (p.36).
4 ZONE 2 key
Enables/disables the audio output to Zone2 (p.85).
5 Remote control sensor
Receives remote control signals (p.5).
6 ZONE CONTROL key
Changes the zone (main zone or the Zone2) that is controlled
by the keys and knobs on the front panel (p.85).
7 INFO (WPS) key
Selects the information displayed on the front display (p.90).
Enters the wireless network connection setup (WPS push
button configuration) by holding down for 3 seconds (p.47).
8 MEMORY key
Registers FM/AM radio stations as preset stations (p.62).
9 PRESET keys
Select a preset FM/AM radio station (p.62).
0 FM and AM keys
Switch between FM and AM (p.61).
A Front display
Displays information (p.11).
B TUNING keys
Select the radio frequency (p.61).
C PURE DIRECT key
Enables/disables Pure Direct (p.60).
D PHONES jack
For connecting headphones.
E INPUT keys
Select an input source.
F TONE CONTROL key
Adjusts the high-frequency range and low-frequency range
of output sounds (p.92).
G SCENE keys
Select the registered input source, sound program, and
various settings with one touch. Also, turns on the unit when
it is in standby mode (p.54).
H PROGRAM keys
Select a sound program or a surround decoder (p.55).
I STRAIGHT key
Enables/disables the straight decode mode (p.59).
J VIDEO AUX (HDMI IN) jack
For connecting a device, such as a camcorder and a game
console (p.30).
K USB jack
For connecting a USB storage device (p.70) or an iPod
(p.67).
L VOLUME knob
Adjusts the volume.
INFO (WPS)ZONE 2
ZONE CONTROL
MEMORY
PRESET
FM AM
TUNING
CONTROL
TV
BD
DVD
NET
RADIO
SCENE
MAIN ZONE
PHONES
SILENT
CINEMA
STRAIGHT
PURE DIRECT
VIDEO
VOLUME
AUX
TONE
PROGRAM
YPAO MIC
INPUT
HDMI IN
5V 1A
(CONNECT)
5A C3 46781 2 9:
D
L
FHIJ KEG
B