
Installation guide


Yamaha Steinberg FW Driver Installation Guide
5
Installation (Windows XP)
Preparing to Install
1 Make sure that the power to the device compatible
with the Yamaha Steinberg FW Driver is turned off.
2 Using an IEEE1394 cable, connect the device com-
patible with the Yamaha Steinberg FW Driver directly
to the computer (without using a hub), and discon-
nect all other IEEE1394 devices from the computer.
3 Start the computer and log on to the Administrator
account.
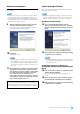
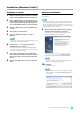
4 Select [Start] ( [Settings]) [Control Panel]. If the
control panel appears as shown below, click
“Switch to Classic View” in the upper left of the win-
dow.
All control panels and icons will be displayed.
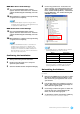
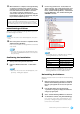
5 Go to [System] [Hardware] [Driver Signing]
[Driver Signing Options], and select the radio but-
ton to the left of “Ignore - Install the software any-
way and don’t ask for my approval” and click [OK].
NOTE
• After completing the installation, make sure to restore
the original setting if necessary.
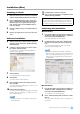
6 Check that no “!” or “x” marks appear next to
“IEEE1394 Bus host controllers” in ([System]
[Hardware] ) [Device Manager].
If one of these marks is shown, the IEEE1394/i.LINK
connection cannot be used. Refer to the owner’s man-
ual of your computer for details.
7 Close the Device Manager window, System Proper-
ties window and Control Panel by clicking the [OK]
button or the Close button ([X]) of the windows.
8 Exit any open applications and close all open win-
dows.