
Installation guide


Yamaha Steinberg FW Driver Installation Guide
6
Software Installation
The installer will install the Yamaha Steinberg FW Driver to
your computer.
NOTE
• Use the Cancel button or Close button to quit the installa-
tion. Quitting by using the [Ctrl]+[Alt]+[Delete] buttons or
by turning off the power while installation is in process can
result in problems since the installation is terminated with-
out performing a proper uninstall.
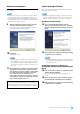
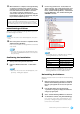
9 After the downloaded compressed file is properly
extracted, double-click the file “setup.exe.”
A “Welcome to the InstallShield Wizard for Yamaha
Steinberg FW Driver” window appears.
10 Click [Next].
The installation starts.
NOTE
• If a message “The software you are installing has not
passed Windows Logo Testing” appears, click [Con-
tinue Anyway]. You do not need to abort the installa-
tion. If the message does not appear, proceed to the
next step.
11 When installation is complete, a message indicating
so appears. If restarting of the computer is neces-
sary following successful completion of the installa-
tion, make sure that the radio button to the left of
“Yes, I want to restart my computer now” is
selected, then click [Finish] to restart the computer.
If restarting the computer is unnecessary, click [Fin-
ish] to exit the installation process.
Initial Settings of Driver
After you’ve installed Yamaha Steinberg FW Driver, perform
the initial settings of the driver.
NOTE
• A dialog box may appear asking you whether you wish to
connect to Windows Update. In this case, select the radio
button to the left of “Not at this time,” then click [Next].
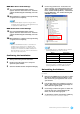
Bus Driver Initial Settings
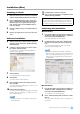
12 The “Found New Hardware Wizard” window
appears. Select the radio button next to “Install the
software automatically [Recommended],” then click
[Next].
13 When installation is complete, a message indicating
so appears, then click [Finish].
NOTE
• If multiple IEEE1394 interfaces have been installed to
the computer, the wizard appears several times. Exit
the wizard each time.
Initial Driver Settings of the Device
Compatible with the Yamaha Steinberg FW
Driver
14 Turn on the power to the device compatible with the
Yamaha Steinberg FW Driver.
The “Found New Hardware Wizard” window is dis-
played.
15 Select the radio button next to “Install the software
automatically [Recommended],” then click [Next].
16 When installation is complete, a message indicating
so appears, then click [Finish].
When canceling the installation:
If you’ve cancelled an installation before it is complete, the
software may not have been installed properly. To install
the software properly, resume the procedure from Step
9.