Dante ライブレコーディングガイド [M7CL, PM5Dを例に] Steinberg Cubase 5, Nuendo 4を使用
Yamaha Commercial Audio M7CL / PM5D Dante ライブレコーディングガイド このガイドでは、ヤマハデジタルミキサーおよび PC を使用したハイクオリティのマ ルチトラックライブレコーディングを実現するための簡単な方法を解説します。 インターフェースカードとソフトウェアをうまく組み合わせることで、ミキシングシステ ムと PC 間はケーブル 1 本のみ使用するだけのシンプルなシステムを構築すること ができます。 こうしたシステムはバーチャルサウンドチェックツールとして便利で、またコンサート のデータをマルチトラックで保存しておいて、後でスタインバーグ社の Cubase、 Nuendo をはじめとするプロフェッショナル DAW ソフトウェアを使用してミックスダウ ンを行うのに最適です。 目次 Page 2 はじめに 3 使用する機材 PC 推奨環境 4 4 機器の設定 ワードクロックの設定 ミキサーのパッチ設定とダイレクト出力設定 5 6 7 Dante バーチャルサウンドカードの設定 9 Dante Controller の設定 機器の特定 / 機器名の
Yamaha Commercial Audio M7CL / PM5D Dante ライブレコーディングガイド はじめに このガイドで解説するライブレコーディングソリューションでは、Dante メディアネット ワーキングテクノロジーを使用します。これは多チャンネルのオーディオを扱うライ ブレコーディングを実現するための最も簡単な方法のひとつです。PM5D や M7CL といったヤマハデジタルミキサーを使用すれば、コンソールの再起動、ケーブル配 線の変更、またはワードクロック設定の変更などを必要とせずレコーディングとプレ イバックモードを簡単に切り替えることができます。このガイドは、読者の方に Dante ネットワーキングに関する基本的な知識があり、「Dante Controller」ソフトウェ アのご使用の経験があることを前提としています。Dante に関する詳細な情報、最 新ソフトウェアのダウンロード、ユーザーガイドおよびサポート情報については、 Dante の開発元である Audinate 社の下記ウェブサイトをご覧ください。 www.audinate.
Yamaha Commercial Audio M7CL / PM5D Dante ライブレコーディングガイド 使用する機材 1. ヤマハデジタルミキサーM7CL または PM5D/PM5D-RH 2. Dante-MY16-AUD インターフェースカード x4 (M7CL に装着する場合は 3 枚まで) 3. 下記のいずれかの PC1 台: a. Windows XP (SP3 以上)または Vista (SP1 以上、32 ビット版のみ)、 インテルまたは AMD プロセッサー(デュアルコア以上)で動作周波 数 2GHz 以上、RAM 1GB 以上、DVD ドライブ、USB ポート、1 ギガ ビットイーサネットポートを搭載したもの b. Mac OSX 10.5、インテル CPU(デュアルコア以上)、RAM 1GB 以 上、DVD ドライブ、USB ポート、1 ギガビットイーサネットポートを搭 載したもの 4. スタインバーグ Cubase 4 または 5、または Nuendo 4 ソフトウェア 5.
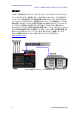
Yamaha Commercial Audio M7CL / PM5D Dante ライブレコーディングガイド 機器の設定 ミキシングコンソール(例:PM5D または M7CL)に MY カードを装着します(DanteMY16-AUD カード 4 枚まで)。各カードのプライマリーポートをイーサネットスイッチ の 1 ギガポートに接続します。使用するミキサーによっては、Dante-MY16-AUD カ ードは MY16-AT(48kHz 動作時)、MY8-AE96(96kHz 動作時)と認識されます。 M7CL に Dante-MY16-AUD カードを 3 枚装着 PM5D に Dante-MY16-AUD カードを 4 枚装着 5 proaudio.yamaha.co.
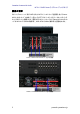
Yamaha Commercial Audio M7CL / PM5D Dante ライブレコーディングガイド ワードクロックの設定 Dante ネットワークでは、マスター機器が正確なワードクロックをネットワークの他の 機器に供給します。マスターがネットワークから離脱したり、故障したりした場合は 別の機器が自動的にクロックマスターの役割を引き継ぎます。 ここでは、ミキサーがワードクロックをスロットから受ける設定にすることを推奨しま す。Dante-MY16-AUD カードはサンプリングレート 48kHz および 96kHz のみに対 応しています。また、Dante-MY16-AUD カードはクロックソースが切り替わった場 合、再び同期が完了するまで約 20 秒を必要としますので注意してください。 M7CL ワードクロック設定画面 (SETUP メニュー) PM5D ワードクロック設定画面 (SYS/W.CLOCK メニュー) 6 proaudio.yamaha.co.
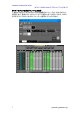
Yamaha Commercial Audio M7CL / PM5D Dante ライブレコーディングガイド ミキサーのパッチ設定とダイレクト出力設定 1. 録音する各チャンネルのダイレクト出力機能をオンにし、ダイレクト出力ポイント を選択します。通常はプリ HPF かプリ ATT が使われることが多いですが、PM5D および M7CL V2/V3 ではポストフェーダーも選択することができます。 M7CL ダイレクト出力設定画面 PM5D ダイレクト出力設定画面 7 proaudio.yamaha.co.
Yamaha Commercial Audio M7CL / PM5D Dante ライブレコーディングガイド 2. 各チャンネルのダイレクト出力を必要なスロット出力にパッチします。チャンネル 1-16 にはスロット 1 を、チャンネル 17-32 にはスロット 2 を使用するとわかりやすく 便利です。 M7CL ダイレクト出力設定画面 (8 チャンネルビュー) PM5D ダイレクト出力パッチ設定画面 セットアップ時間を短縮するため、すべてのダイレクト出力およびパッチ設定を保存 した PM5D / M7CL 用サンプルファイルを下記ウェブサイトよりダウンロードしてご 利用いただけます(ライブレコーディングガイド欄のテンプレートファイルです)。 http://proaudio.yamaha.co.jp/training/self_training/index.html 8 proaudio.yamaha.co.
Yamaha Commercial Audio M7CL / PM5D Dante ライブレコーディングガイド Dante バーチャルサウンドカードの設定 このガイドの作成時点では、Dante バーチャルサウンドカードのソフトウェアバージ ョンは V3.0.1 となっています。Dante バーチャルサウンドカードご使用時はこれ以 降のバージョンのものを使用してください。 はじめにオーディオレコーディングに使用するコンピュータに Dante バーチャルサ ウンドカードと Dante Controller をインストールしてください。最新のソフトウェア、ユ ーザーガイドおよびサポート情報については、www.audinate.
Yamaha Commercial Audio M7CL / PM5D Dante ライブレコーディングガイド Dante バーチャルサウンドカード: Advanced 設定と ASIO 設定 パワーボタンをクリックして Dante バーチャルサウンドカードをオンに Dante Controller の設定 このガイドの作成時点では、Dante Controller のソフトウェアバージョンは V3.0.1 となっています。Dante Controller ご使用時はこれ以降のバージョンのものを使用 してください。最新のソフトウェア、ユーザーガイドおよびサポート情報については、 www.audinate.
Yamaha Commercial Audio M7CL / PM5D Dante ライブレコーディングガイド Dante Controller: Network View [Routing]画面 初期設定の機器名は、その機器のタイプの簡単な説明と MAC アドレスの最後の 数桁で表されます。機器名をダブルクリックして「Device View」ウィンドウを開きま す(または「Device」メニューより「Device View」を選択します)。 Dante Controller: Device View 機器を特定するために目のアイコンをクリックします。これにより、該当する MY16 カード上のすべての LED が数秒点滅します。次に「Config」タブを選択し、機器に 適切な名前をつけることができます(注:コンピュータ名は Dante Controller では変 更できません)。機器の名前を変更するには、「Rename Device」フィールドで新し い名前を入力し、[Enter]キーを押します。 11 proaudio.yamaha.co.
Yamaha Commercial Audio M7CL / PM5D Dante ライブレコーディングガイド Dante Controller: Config: Rename Device カードのサンプリングレートを変更する必要がある場合(例:48kHz→96kHz)は、 Dante Controller での設定変更後にホスト機器を再起動する必要があります。この 場合、「Config」画面での「Reboot」ボタンをクリックするだけでは不十分です。 ネットワークルーティング すべての機器に名前を設定したら、次はオーディオのルーティングを設定します。 MY16 カードのすべてのチャンネルをコンピュータにルーティングするには、まずコ ンピュータの「Device View」を開き、「Receive」タブを選択します。次に、右の 「Available Channels」エリアでスロット 1 のチャンネル 1-16 を全選択してハイライ トさせ(まず「01」をクリックし、[Shift]キーを押しながら「16」をクリックします)、それ らを左側の「Receive Channels」エリアにドラッグします(チャ
Yamaha Commercial Audio M7CL / PM5D Dante ライブレコーディングガイド 続いて、スロット 2 の全チャンネルをコンピュータのチャンネル 17-32 に、スロット 3 をチャンネル 33-48 に、そしてスロット 4(使用時)をチャンネル 49-64 にドラッグし ます。 Dante Controller の「Routing」画面でもオーディオのルーティングを行うことができ ます。[+]ボタンを押して画面を拡張し、コンピュータが MY16 カードから正しくチャン ネルを受信していることを確認します。[Ctrl]を押しながらクロスポイントボックス をクリックすることで、選択した機器間で使用できるすべてのチャンネルを一度にル ーティングできます。[Ctrl]と[Shift]キーを押しながら ボックスをクリックすると、す べてのルーティングを一度に削除することができます。 Dante Controller: ミキサースロットからコンピュータへのルーティング Dante を介した PC での再生 PC からオーディオを再生するには、Dante Controller を使用し
Yamaha Commercial Audio M7CL / PM5D Dante ライブレコーディングガイド Dante Controller: スロット 1 の「Receive」画面 また、「Routing」画面でルーティングの設定確認と変更ができます。 Dante Controller: コンピュータからミキサースロットへのルーティング これで、Dante ネットワークのオーディオシグナルフローは次の図のようになります。 14 proaudio.yamaha.co.
Yamaha Commercial Audio M7CL / PM5D Dante ライブレコーディングガイド 録音 / 再生時の Dante シグナルフロー 15 proaudio.yamaha.co.
Yamaha Commercial Audio M7CL / PM5D Dante ライブレコーディングガイド Nuendo 4 / Cubase 4 / Cubase 5 の設定 デバイス設定 設定手順は Nuendo 4 と Cubase 4 / 5 でほぼ共通です。ここでは、Nuendo 4 の 画面を使用して解説していきます。 Nuendo 4(または Cubase 4 / 5)を起動後、「デバイス」メニューを開き、「デバイス 設定...」を選択します。 左側のコラムで「VST オーディオシステム」をクリックし、ウィンドウの右側でサウン ドカードに対応する ASIO ドライバを選択します。ここでは、「Dante Virtual Soundcard--ASIO」を選択します。 [OK]をクリックしてウィンドウを閉じます。 16 proaudio.yamaha.co.
Yamaha Commercial Audio M7CL / PM5D Dante ライブレコーディングガイド テンプレート Nuendo / Cubase のテンプレートとは、プロジェクトに関連するすべてのセットアッ プデータを含んだファイルのことをいいます。テンプレートを開くだけで、時間のかか る初期設定をすることなしにすぐにプロジェクトの作成を始めることができます。 Nuendo 4、Cubase 4 / 5 および Dante バーチャルサウンドカードを使用したライブ レコーディングのために、このガイドの付録としていくつかのテンプレートを用意して あります(こちらのウェブサイトからダウンロードできます http://proaudio.yamaha.co.jp/training/self_training/index.
Yamaha Commercial Audio M7CL / PM5D Dante ライブレコーディングガイド Cubase 4 / Nuendo 4 でテンプレートを開くには、「ファイル」メニューを開き「新規プ ロジェクト」を選択します。次にリストから必要なテンプレートを選択します。 Nuendo 4 で新規プロジェクトを開く Cubase 5 (5.1.1)では、「ファイル」メニューから「新規プロジェクト」を選択すると「プ ロジェクトアシスタント」ウィンドウが表示されます。この中でテンプレートはさまざま なカテゴリーに分類されていますが、上記のフォルダに置いたテンプレートは「その 他」のカテゴリーに属します。 Cubase 5 で新規プロジェクトを開く 18 proaudio.yamaha.co.
Yamaha Commercial Audio M7CL / PM5D Dante ライブレコーディングガイド レコーディング ここでの手順は Nuendo 4 と Cubase 4 / 5 で共通です。説明のために使用してい る画面は Nuendo 4 のものですが、Cubase 4 / 5 での操作もほぼ同じです。録音 の準備として、メインフォルダの「Monitor」機能をオンにします。オンにすると、すべ てのトラックのスピーカーアイコンがオレンジ色に点灯します。次にフォルダの 「Record Enable」ボタンをクリックすると、すべてのトラックの「Record Enable」ボタ ンが赤色に点灯します。 次に、ツールバーの「Record」トランスポートボタンをクリックすると録音が開始され ます。 録音を止めるには、キーボードのスペースキーを押します(またはツールバーのトラ ンスポートエリアにある「Stop」ボタンをクリックします)。最後にプロジェクトを保存し ます(「ファイル」メニューから「保存」を選択)。 19 proaudio.yamaha.co.
Yamaha Commercial Audio M7CL / PM5D Dante ライブレコーディングガイド オーディオの再生 「Time-line」内をクリックして再生マーカーを任意の位置に移動します。 次に、「Play」トランスポートボタンをクリックします(またはキーボードのスペースキ ーを押します)。 PM5D-V2 での再生 録音したオーディオの再生には、ミキサーのインプットパッチをアナログ端子入力か らデジタルのスロットインプットに変更する必要があります。しかし、PM5D-V2 では 新たなパッチライブラリーを作成する必要はありません。 まず、SYS/W.CLOCK メニューの「MIXER SETUP」ページにある「VIRTUAL SOUNDCHECK」機能の設定をします。この機能はシーンメモリーやパッチライブラ リーに影響を与えずに、入力信号のパッチ設定を一時的に切り替えます。 矢印のついた小さいボタンをクリックして「VIRTUAL SOUNDCHECK SETUP」画 面を開きます。 20 proaudio.yamaha.co.
Yamaha Commercial Audio M7CL / PM5D Dante ライブレコーディングガイド 「PRESET」ボタンを押すと、デフォルト設定が呼び出されます。この設定でほとんど の場合に使うことができます。グリッドの左側は、すべての 48 のアナログ端子入力 がスロット 1-3 のインプットに一時的に変更されることを示しています。もちろん、必 要であればこれらの割り当てとは異なるパッチ設定にしたり、録音のインプットをマ イクのインプットと組み合わせたりと、自由に変更することができます。「OK」をクリッ クしてウィンドウを閉じた後、「VIRTUAL SOUNDCHECK」機能をオンにします。 これで、PM5D で録音を聴いてミックスをする準備ができました。「VIRTUAL SOUNDCHECK」をオフにすれば、カレントシーンのパッチ設定に戻ります。 「VIRTUAL SOUNDCHECK」機能がオンになっているときは、PM5D のディスプレ イ上部に「VIRTUAL SOUNDCHECK」と表示されます。 M7CL での再生 録音したオーディオの再生には、ミキサーのインプットパッチをアナ
Yamaha Commercial Audio M7CL / PM5D Dante ライブレコーディングガイド 次に Scene Focus を「IN PATCH」のみリコールする設定にします。 次に、インプットパッチをスロットに設定し直します。 これを「Playback」シーンとしてストアし、Scene Focus で「IN PATCH」のみリコー ルする設定にします。 これで、他のミキシングパラメータに影響を与えることなく「Playback」と 「Recording」パッチを切り替えることができます。Focus 機能を使って他のすべて のシーンから「Input Patch」だけを取り出すことができるので、複数のシーン構成か 22 proaudio.yamaha.co.
Yamaha Commercial Audio M7CL / PM5D Dante ライブレコーディングガイド らなるショーがあっても、シーンごとにライブレコーディングと PC での再生を続けて 行うことができます。たとえば、次のようにシーンを設定します: M7CL シーンリスト ライブレコーディングおよびオーディオ再生のためのシーンを保存した M7CL のセ ットアップファイルは下記ウェブサイトよりダウンロードできます(ライブレコーディン グガイド欄のテンプレートファイルです)。 http://proaudio.yamaha.co.jp/training/self_training/index.html セットアップが完了したら、次回からの新規プロジェクトでロードしてすぐに使えるよ うに必ず M7CL の設定を USB メモリーに保存するか、ヤマハの Studio Manager ソフトを使用して PC に保存してください。 23 proaudio.yamaha.co.
Yamaha Commercial Audio M7CL / PM5D Dante ライブレコーディングガイド 付録 Nuendo / Cubase で新規テンプレートの作成 異なる種類のサウンドカードを使用している場合や、新たにプロジェクトの設定を行 いたい場合は、新規のテンプレートを作成することができます。この手順は Cubase 4 と Nuendo 4 で共通です(ここでの説明には Nuendo 4 の画面を使用していま す)。「ファイル」メニューを開いて、「新規プロジェクト」を選択します。テンプレートウ ィンドウが開いたら、「空白」を選択して「OK」をクリックし、オーディオファイルおよび データファイルを保存するフォルダを選択します。 Cubase 5 では手順が少し異なり、「プロジェクトアシスタント」ウィンドウが開きます。 「空白」テンプレートは「その他」カテゴリーの中に含まれており、デフォルトの保存 先フォルダもすぐに選択することができます。その後のテンプレート作成手順は Cubase 4 および Nuendo 4 と同じです。 デバイスメニューで「VST コネクション」を選択します。 「入
Yamaha Commercial Audio M7CL / PM5D Dante ライブレコーディングガイド 「出力」についても同様に設定します。 設定が完了したら VST コネクションウィンドウを閉じます。 「プロジェクト」メニューを開き、「プロジェクト設定…」を選択します。 ここで、プロジェクトの長さを設定します(例:2 時間 30 分)。 次にサンプルレートと録音フォーマット(ここでは 48kHz / 24 ビット)および録音ファ イル形式を選択します(ファイル形式の選択はレコーディングデータを他のオーディ オ編集ソフトでも使う場合に重要です:たとえば、「Broadcast Wave File」および 「AIFF File」タイプであれば Pro Tools にデータをインポートすることができます)。 そして「OK」をクリックしてウィンドウを閉じます。 25 proaudio.yamaha.co.
Yamaha Commercial Audio M7CL / PM5D Dante ライブレコーディングガイド 再び「プロジェクト」メニューを開き、「トラックを追加」>「フォルダ」を選択します。 今度は「プロジェクト」メニューから、「トラックを追加」>「オーディオ」を選択します。 64 mono トラック(または必要な数だけ)を選んで「OK」をクリックします。 ここですべてのオーディオトラックを同時にコントロールできるようフォルダ内に移動 します。最初のトラック(初期設定では「オーディオ 01」となっています)をクリックし、 一番下までスクロールしたら、「Shift」キーを押した状態で最後のトラックをクリックし ます。これですべてのオーディオトラックが選択されます。再び上までスクロールし、 「オーディオ 01」をフォルダ内へドラッグすると緑色の矢印が一時的に表示され、他 のすべてのトラックもフォルダ内へ移動します。 26 proaudio.yamaha.co.
Yamaha Commercial Audio M7CL / PM5D Dante ライブレコーディングガイド 次に、「VST コネクション」ウィンドウで作成したバスのインプットとアウトプットに各ト ラックを割り当てます。通常は「Mono In 1」と「Mono Out 1」をトラック 1 に、「Mono In 2」と「Mono Out 2」をトラック 2 に…というように割り当てるとよいでしょう。 この割り当ては、「インスペクターの表示」ボタンが有効になっている時にプロジェク トウィンドウの左のコラムで行うことができます。 全 64 トラックを順番に選択してひとつひとつ割り当てていくのは時間がかかります が、一度完了すれば「テンプレート」として保存することで次回からのプロジェクトに 利用することができます。 プロジェクトテンプレートを保存するには、「ファイル」メニューを開き「テンプレートと して保存…」を選択します。次に名前を入力して「OK」をクリックします。これで次回 から新規プロジェクトを作成する時は、このテンプレートを選択することですぐにレコ ーディングを開始する準備ができます。 27 pro