Dante-MY16-AUD & Rシリーズ HAリモートコントロールガイド 第3版: 2013年8月
Yamaha Commercial Audio Dante-MY16-AUD HA リモートコントロールガイド このガイドでは、ヤマハデジタルミキサー(PM5D、M7CL、LS9 など)のスロットに装着 した Dante-MY16-AUD カードを経由して、Dante オーディオネットワークに接続した I/O ラック(Rio3224-D、Rio1608-D、Ri8-D など)のヘッドアンプ(以降 HA)をリモートコ ントロールするシステム例とその設定手順を解説します。このソリューションにより、 以前からお使いのデジタルミキサーをそのまま使用して、新たに追加した Dante 対 応 I/O ラックをシステムに組み込んでリモートコントロールすることができます。 デジタルミキサーの設定方法は、各モデルによって異なりますので、詳しくは各モデ ルの取扱説明書もご参照ください。 目次 システム例 ...............................................................................................................
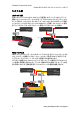
Yamaha Commercial Audio Dante-MY16-AUD HA リモートコントロールガイド システム例 LS9 システム例 お使いの LS9 に Dante-MY16-AUD カードを装着すれば、シンプルなネットワーク 接続だけで、Dante ネットワーク上にある I/O ラックの HA を LS9 からリモートコント ロールできます。LS9 からは、Rio1608-D が 1 台につき 2 台の AD8HR として認識 してコントロールします(Ri8-D は 1 台の AD8HR として認識)。HA コントロール信号 をブリッジするカードは、必ずスロット 1 に装着してください(LS9-32 の場合)。 Ri8-D Rio1608-D Rio1608-D mode 2 Slot 1: mode 2 Ri8-D LS9-16 LS9-32 PM5D システム例 PM5D から Dante ネットワーク上にある I/O ラックの HA をリモートコントロールする には、ネットワーク接続だけでなく、コンソールとカード間の REMOTE 端子どうしを シリアルケーブル(ストレート、
Yamaha Commercial Audio Dante-MY16-AUD HA リモートコントロールガイド 複数コンソールシステム例 Dante ネットワーク上に複数のコンソールを接続して、I/O ラックを共有することも可 能です。ただしこの場合、オーディオ信号は Dante Controller を使用してパッチする ことで同一 I/O ラックから複数のコンソールに分配できますが、HA コントロールは いずれかのコンソールからのみ可能です。以下の例では、PM5D からのみ HA コン トロールしていて、CL5 ではオーディオ信号のみ共有しています。複数コンソールシ ステムについて詳しくは、以下をご参照ください。 mode 3 Rio3224-D Rio3224-D PM5D/PM5D-RH Primary Secondary CL5 Dante ネットワーク上に複数のコンソールを接続して I/O ラックを共有する場合、オ ーディオ信号は同一 I/O ラックから複数のコンソールに分配できますが、複数のコ ンソールから同一 I/O ラックの HA をコントロールすることはできません。 CL
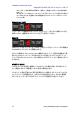
Yamaha Commercial Audio Dante-MY16-AUD HA リモートコントロールガイド CL シリーズから HA をコントロールする場合は、Gain Compensation 機能により、ネ ットワークに流れる信号のゲインを一定に保つことができます。つまり、下図の例に おいて CL シリーズから HA ゲインを変更した場合でも、PM5D に入力される音声信 号のレベルは変動しません。他のコンソールから HA コントロールする場合は、R シ リーズを AD8HR モードとして動作させるので、Gain Compensation 機能を使用する ことはできません。 AD8HR mode Native mode Gain Compensation CL Other Consoles CL Other Consoles Note: 1 台の CL シリーズコンソールから 9 台以上の R シリーズをコントロールしたい場合は、 スロット 1 に装着した Dante-MY16-AUD 経由で R シリーズ(AD8HR モード)をコントロー ルすることもできます。 AD8HR と混
Yamaha Commercial Audio Dante-MY16-AUD HA リモートコントロールガイド 使用する機材 1. ヤマハデジタルミキサー(PM5D/PM5D-RH, M7CL-32/48, M7CL-48ES, LS9, DM2000, DM1000)またはデジタルミキシングエンジン(DME64N/24N) 2. Dante-MY16-AUD カード (ファームウェア v3.3.9 以上) 3. Dante 対応ヤマハ HA 機器 (Rio3224-D、Rio1608-D、Ri8-D など) 4. Dante Controller v3.2.9 以上をインストールした PC または Mac 5. Gigabit ネットワークスイッチ、CAT5e 以上のネットワークケーブル 6.
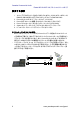
Yamaha Commercial Audio Dante-MY16-AUD HA リモートコントロールガイド HA コントロールの接続 Dante-MY16-AUD カードを経由した HA リモートコントロール用の接続およびブリッ ジ設定には、以下の 3 種類があります。初期設定はブリッジ無効(Mode 4)なので、 Dante Controller ソフトウェアで必ず設定する必要があります(11 ページ参照)。 Mode 1 HA コントロール信号がスロット 1(ホスト機 器)とカードの REMOTE 端子の間でブリッ ジされます(Dante ネットワークにはブリッジ されません)。LS9 などの HA REMOTE 端 子を持たないホスト機器から、シリアルケ ーブル経由で直接 HA 機器をコントロール する場合に使用します。 Mode 2 HA コントロール信号がスロット 1(ホスト機 器)と Dante ネットワーク間でブリッジされ ます(カードの REMOTE 端子にはブリッジ されません)。LS9 などの HA REMOTE 端 子を持たないホスト機器から、Dante ネット ワーク経由で H
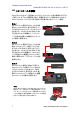
Yamaha Commercial Audio Dante-MY16-AUD HA リモートコントロールガイド R シリーズの設定 Dante-MY16-AUD カード経由で R シリーズの HA をリモートコントロールする場合 は、R シリーズのフロントパネルで UNIT ID および DIP スイッチを以下のように設定 してから電源を入れてください。 UNIT ID ここで設定した UNIT ID によって AD8HR(8 チャンネル単位)としての仮想 ID が決ま ります。たとえば UNIT ID を 1 に設定した場合、Rio3224-D は仮想 ID 1~4、 Rio1608-D は仮想 ID 1~2 としてミキサー上で認識されます(Ri8-D の場合は、 UNIT ID と仮想 ID が同じになります)。 特にシステム内で R シリーズの異なるモデルを混在させたり、他の HA 機器 (AD8HR など)を混在させたりするときは、仮想 ID が重複しないように設定してくださ い。UNIT ID や仮想 ID 番号が不連続になるのは問題ありません(1、3、4 など)。 Rio3224-D AD
Yamaha Commercial Audio Dante-MY16-AUD HA リモートコントロールガイド 異なるモデルが混在する場合の設定例: Unit ID 設定例 (カッコ内は仮想 ID) システム 入力数 I/O ラック 構成 32 入力 Rio1608-D x1 Ri8-D x2 48 入力 Rio1608-D Ri8-D 1 3, 4 (1, 2) (3, 4) Rio3224-D x1 Rio1608-D x1 1 3 (1-4) (5, 6) Rio3224-D x1 Ri8-D x2 1 5, 6 (1-4) (5, 6) Rio1608-D x2 Ri8-D x2 1, 2 5, 6 (1-4) (5, 6) Rio1608-D x1 Ri8-D x4 1 3-6 (1, 2) (3-6) Rio3224-D x1 Rio1608-D x2 Rio3224-D x1 Rio1608-D x1 Ri8-D x2 64 入力 Rio3224-D Rio3224-D x1 Ri8-D x4 Rio1608-D x3 Ri8
Yamaha Commercial Audio ・ Dante-MY16-AUD HA リモートコントロールガイド のパッチは、上記の制限とは関係なく、使用カード枚数によるチャンネル数の制限 のみです。 NATIVE モードと AD8HR モードの R シリーズが同一ネットワークに混在する場合に、 モード間で UNIT ID が重複するのは問題ありません(CL/R シリーズのファームウェ ア V1.
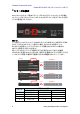
Yamaha Commercial Audio Dante-MY16-AUD HA リモートコントロールガイド Dante Controller による設定 Dante Controller を起動すると、最初に Network View が開き、ネットワーク上のす べての Dante 機器が表示されます。ここで Dante 機器間のオーディオルーティング を設定します。送受信チャンネルの交点のセルをクリックし、右上の送信チャンネル から左下の受信チャンネルへのオーディオルートを設定します。ルートが設定され ると緑色のアイコンが表示されます。詳しくは Dante Controller ユーザーマニュアル をご参照ください。 (ホスト機器と HA コントロール信号を通信する)Dante-MY16-AUD カードの機器名 をダブルクリックして、Device View ウィンドウを開きます。HA Remote ページで、 Dante-MY16-AUD カードの HA リモートのシリアルブリッジモードを Mode 1~3 の いずれかに設定します。各モードについては、「HA コントロールの接続」(7 ページ)
Yamaha Commercial Audio Dante-MY16-AUD HA リモートコントロールガイド デジタルミキサーの設定 デジタルミキサーでは、他の外部 HA 機器をリモートコントロールする場合と同様の 設定を行います。詳しくは、各デジタルミキサーの取扱説明書もご参照ください。 ワードクロック設定 システム内のワードクロック設定には以下の 3 通りがあります。 ・ Dante をマスタークロックにします。ネットワーク内に複数台のコンソールが接 続されている場合はこれが一番よいでしょう。 ・ コンソールをマスタークロックにします。システム内にコンソールが一台しかな い場合に便利です。 ・ 外部のワードクロックジェネレーターをマスタークロックにします。スタジオや放 送環境で他のデジタルオーディオシステムに同期する場合に必要となります。 Dante マスターの場合 デジタルミキサーの WORD CLOCK 画面で、Dante-MY16-AUD カードが装着されたスロ ットのうちの 1 つをクロックマスターとして選択してください。Dante ネットワークは、ネット ワーク全体の同期を保つために自動的
Yamaha Commercial Audio Dante-MY16-AUD HA リモートコントロールガイド 外部ワードクロックジェネレーターの場合 デジタルミキサーの WORD CLOCK 画面で、「WC IN」(WORD CLOCK IN 端子)をクロック マスターとして選択してください。Dante Controller を起動して、Clock Status タブを開き ます。ミキサーに装着されている Dante-MY16-AUD カードの一つに対して、「Salve to External Clock」をチェックします。同じカードに対して「Preferred Master」もチェックすると、 このカードからネットワーク内の他の機器にワードクロックを送信するようになります。 EXTERNAL HA 設定 次に、お使いのデジタルミキサーで EXTERNAL HA 画面(または REMOTE 画面)を 開きます。この画面では、接続されている外部 HA 機器(ここでは R シリーズ)を仮想 的に AD8HR としてラックにマウントしてコントロールすることができます。 M7CL-48: RACK→EXTE
Yamaha Commercial Audio Dante-MY16-AUD HA リモートコントロールガイド Note: ミキサーから HA 機器を認識できず、ミキサーの画面に HA 機器が表示されない場合は、 以下をチェックしてみてください。 ・ Dante-MY16-AUD のファームウェアと Dante Controller は HA リモート機能に対応 したバージョンにアップデートされていますか?ファームウェア V3.3.9 以降、および Dante Controller V3.2.