RL NS-P20 (NS-B20 + NS-C20 + NS-SW20) SPEAKER PACKAGE OWNER'S MANUAL MANUAL DE INSTRUCCIONES
Precautions Please read the following operating precautions before use. Yamaha will not be held responsible for any damage and/or injury caused by not following the cautions below. 1. To assure the finest performance, please read this manual carefully. Keep it in a safe place for future reference. 2. Install the speakers in a cool, dry, clean place – away from windows, sources of heat, sources of excessive vibration, dust, moisture or cold. Avoid sources of electrical humming (e.g.
Precautions English • VOLTAGE SELECTOR (For China, Korea, Asia and General models) The voltage selector switch on the rear panel of this unit must be set to your local main voltage BEFORE plugging this unit into the AC main supply. Voltages are 110-120/220-240 V AC, 50/60 Hz. This unit is not disconnected from the AC power source as long as it is connected to the wall outlet, even if this unit itself is turned off. In this state, this unit is designed to consume a very small quantity of power. For U.K.
Contents Package contents................................................1 Installing the speakers.......................................1 Installing the front, center, and surround speakers ...........................................................2 Installing the subwoofer.......................................2 Wall-mounting the speakers................................2 Connecting the speakers .................................. 3 Connection diagram.............................................
Installing the speakers Front speakers: Place the two front speakers on the left and right sides of the TV facing directly forward. Surround speakers: Place the left and right surround speakers behind your listening position, facing slightly inward. The front and surround speakers can be placed on a flat surface or wall- mounted. See “Wall-mounting the speakers” for more information. Center speaker: Place the center speaker centrally between the front speakers, facing directly forward.
Connecting the speakers Caution: Make sure the power cables for the subwoofer and your other AV components are disconnected from the AC wall outlets before making any connections.
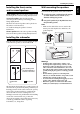
■ Operating the speaker terminals Positive (+) 1 3 1 2 3 4 2 Note: Make sure the terminal is gripping the bare wire, not the insulation. Press and hold the terminal tab. Connect each speaker to the appropriate speaker terminals on your amplifier by using the cables you prepared earlier. See the “Connection diagram” on page 3 for reference. Make sure you connect the speakers with the correct polarity—positive (+) terminals to positive (+) terminals, and negative (–) terminals to negative (–) terminals.
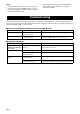
Notes • Once the subwoofer volume has been set, you can leave the subwoofer’s VOLUME control set as it is and use your amplifier’s volume control to adjust the volume of the entire system. • If you replace the front speakers (NS-B20) with other speakers, you will need to re-adjust the subwoofer’s volume. Troubleshooting If this product doesn’t work as expected, look for a possible cause below.
Specifications Type...........................................Full range acoustic suspension non magnetic shielding type Driver ...................................................7 cm (2-3/4") cone type Nominal input power ....................................................... 30 W Maximum input power .................................................. 100 W Impedance ............................................................................. 6 Ω Frequency response NS-B20 .................................
Precauciones Lea las siguientes precauciones de funcionamiento antes de iniciar el uso del aparato. Yamaha no se responsabilizará de cualquier daño o lesión causada por no seguir las precauciones que aparecen a continuación. 1. Para asegurar el mejor rendimiento posible, lea con atención este manual. Guárdelo en un lugar seguro para consultarlo en el futuro. 2.
Contenido Conectar los altavoces....................................... 3 Diagrama de conexión .........................................3 Conectar los cables de alimentación ..................4 Utilizar el subwoofer.......................................... 4 Ajustar el volumen del subwoofer.......................4 Solucionar problemas ....................................... 5 Especificaciones..................................................
Instalar los altavoces Instalar los altavoces frontales, central, y surround Instalar los altavoces en la pared Altavoces frontales: Sitúe los dos altavoces frontales en los lados derecho e izquierdo del televisor totalmente hacia delante. Altavoces Surround: Sitúe los altavoces surround derecho e izquierdo por detrás de la posición de audición, ligeramente hacia dentro. Los altavoces frontales y surround pueden colocarse sobre una superficie plana o fijarlos a una pared.
Conectar los altavoces Precaución: Antes de realizar las conexiones, compruebe que los cables de alimentación para el subwoofer y los otros componentes AV no estén conectados a las tomas de CA.
■ Utilizar los terminales del altavoz Negativo (–) Positivo (+) 1 3 1 2 3 4 2 Nota: Compruebe que el terminal sujete los cables pelados y no la parte aislada. Mantenga pulsada la lengüeta del terminal. Inserte el cable pelado. Suelte la lengüeta para que sujete correctamente el cable por su extremo pelado, no la parte del aislamiento. Compruebe que la conexión sea segura tirando ligeramente del cable.
4 5 Reproduzca una fuente de audio que contenga sonidos graves de baja frecuencia. Coloque el control de volumen del amplificador a un nivel adecuado. Suba gradualmente el control VOLUME del subwoofer hasta que consiga un buen balance entre el subwoofer y los otros altavoces. Solucionar problemas Si este producto no funciona de la forma deseada, a continuación encontrará una lista con las posibles causas.
Especificaciones ■ Altavoces frontales, surround (NS-B20), y central (NS-C20) Tipo............................ Suspensión acústica de gama completa tipo blindado no magnéticamente Driver ............................................................. Tipo cónico 7 cm Potencia de entrada nominal .......................................... 30 W Potencia de entrada máxima......................................... 100 W Impedancia............................................................................