G (NS-PB120: NS-B120 + NS-C120) SPEAKER PACKAGE PACKAGE ENCEINTES OWNER'S MANUAL MODE D'EMPLOI MANUAL DE INSTRUCCIONES ИНСТРУКЦИЯ ПО ЭКСПЛУАТАЦИИ
Precautions Please read the following operating precautions before use. Yamaha will not be held responsible for any damage and/or injury caused by not following the cautions below. 1. To assure the finest performance, please read this manual carefully. Keep it in a safe place for future reference. 2. Install the speakers in a cool, dry, clean place – away from windows, sources of heat, sources of excessive vibration, dust, moisture or cold. Avoid sources of electrical humming (e.g.
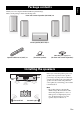
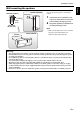
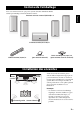
English Package contents Thank you for choosing the Yamaha NS-PB120 Speaker Package. Make sure the package contains the following items. Front and surround speakers (NS-B120) x 4 Center speaker (NS-C120) x 1 Speaker cable 24.5 m (80 ft.) x1 Fastener x 2 (for center speaker) Non-skid pads (4 pcs) x 4 (for front and surround speakers) Installing the speakers Front right Front left Center Before you connect the speakers, place each speaker in its respective location.
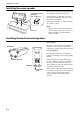
Installing the speakers Installing the center speaker Fastener Peel of the seal. Place the center speaker centrally between the front speakers, facing directly forward. When placing it on a flat surface (TV rack, etc), affix the supplied fasteners to bottom of the speaker as shown left. When wall-mounting it, see “Wall-mounting the speakers” (page 4). Note TV rack, etc • Wipe the surface clean before affixing the fasteners.
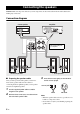
Installing the speakers Wall/wall support Surround speaker 26 mm (1") You can mount the speakers on the wall as follows. 1 3 mm (1/8") 2 Minimum 20 mm (3/4") Install screws into a solid wall or wall support as shown left. Use 3.5 to 4 mm (1/8") diameter self-tapping screws. Hang each speaker by its keyhole slots onto the protruding screws. Note 245 mm (9-5/8") Center speaker • Make sure the shaft of the screw is seated in the narrow part of the keyhole slot. Otherwise, the speaker may fall.
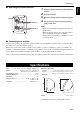
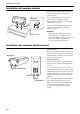
Connecting the speakers Caution: Make sure the power cables for your AV components are disconnected from the AC wall outlets before making any connections.
Specifications Loosen 1 2 3 Tighten Positive (+) 4 Rotate the speaker terminal counterclockwise to loosen it. Insert the bare wire. Rotate the speaker terminal clockwise to tighten it. Test the security of the connection by pulling gently on the cable. Notes Negative (–) • Make sure the terminal is gripping the bare wire, not the insulation. • Make sure the bare wires do not touch each other, as this could damage the speaker or amplifier.
Précautions Lisez attentivement les précautions d’utilisation suivantes. Yamaha décline toute responsabilité en cas de dommages et/ou de blessures découlant du non respect de ces consignes. 1. Pour profiter au mieux de votre acquisition, lisez attentivement ce mode d’emploi. Conservez-le soigneusement pour référence. 2. Installez les enceintes dans un endroit frais, sec, loin des fenêtres et des sources de chaleur et de vibration, des poussières, de l’humidité et du froid.
Contenu de l’emballage Nous vous remercions d’avoir opté pour le système d’enceintes Yamaha NS-PB120. Vérifiez que l’emballage contient les éléments suivants : Français Enceintes avant et surround (NS-B120) x 4 Enceinte centrale (NS-C120) x 1 Câble d’enceinte (24,5m) x1 Fixation x 2 (pour enceinte centrale) Patins antidérapants (4 pcs.
Installation des enceintes Installation de l’enceinte centrale Placez l’enceinte centrale entre les enceintes avant, en l’orientant directement vers la position d’écoute. Fixation Retirez le film. Si vous installez l’enceinte sur une surface plane comme un meuble TV, collez les fixations fournies sur le dessous de l’enceinte comme illustré ci-contre. Si vous souhaitez installer l’enceinte au mur, voyez la section “Suspension murale des enceintes” (page 4). Remarque Meuble TV, etc.
Installation des enceintes Suspension murale des enceintes Mur/renfort mural Enceinte surround 26 mm Vous pouvez suspendre les enceintes au mur de la façon suivante. 3 mm Minimum 20 mm 2 Enceinte centrale 245 mm Fixez les vis dans un mur solide ou dans un renfort mural résistant, comme illustré ci-contre. Utilisez des vis autotaraudeuses de 3,5 à 4 mm de diamètre. Suspendez chaque enceinte en insérant ses orifices sur les vis protubérantes.
Connexion des enceintes Attention : Assurez-vous que les cordons d’alimentation des éléments de votre système AV sont débranchés des prises secteur avant d’effectuer toute connexion.
Fiche technique ■ Utilisation des bornes d’enceinte 2 3 Visser Positif (+) 4 Tournez la borne d’enceinte dans le sens inverse des aiguilles d’une montre pour la desserrer. Insérez le fil dénudé. Tournez la borne d’enceinte dans le sens des aiguilles d’une montre pour la resserrer. Vérifiez que les câbles sont bien connectés en tirant légèrement dessus. Remarques Négatif (–) • Assurez-vous que la borne serre bien le fil dénudé et non sa gaine.
Precauciones Lea las siguientes precauciones de funcionamiento antes de iniciar el uso del aparato. Yamaha no se responsabilizará de cualquier daño o lesión causada por no seguir las precauciones que aparecen a continuación. 1. Para asegurar el mejor rendimiento posible, lea con atención este manual. Guárdelo en un lugar seguro para consultarlo en el futuro. 2.
Contenido del paquete Gracias por elegir el sistema de altavoces NS-PB120 de Yamaha. Compruebe que el paquete contiene los siguientes elementos.
Instalación de los altavoces Instalación del altavoz central Sitúe el altavoz central en un punto intermedio entre los altavoces delanteros, orientado hacia adelante. Sujeción Retire el plástico. Cuando lo coloque sobre una superficie plana (mueble de TV, etc.), fije las sujeciones que se suministran en la parte inferior del altavoz como se muestra a la izquierda. Cuando lo coloque en la pared, consulte “Instalación de los altavoces en la pared” (página 4). Nota Mueble de TV, etc.
Instalación de los altavoces Instalación de los altavoces en la pared Pared/soporte para la pared Altavoz surround 26 mm Puede instalar los altavoces en una pared de la manera siguiente. 1 3 mm 2 Cuelgue cada altavoz por los orificios en los tornillos que sobresalen. Nota Altavoz central 245 mm • Compruebe que el extremo del tornillo encaja en la parte estrecha del orificio. De lo contrario, el altavoz se puede caer. Advertencias • Cada altavoz pesa 1,8 kg.
Conexión de los altavoces Precaución: Asegúrese de que los cables de alimentación de su componentes de AV están desconectados de las tomas de corriente de la pared antes de efectuar alguna conexión.
Especificaciones ■ Funcionamiento de los terminales para altavoces 1 Aflojar 2 3 Apretar Positivo (+) Inserte el cable pelado. Apriete el terminal del altavoz girándolo hacia la derecha. Compruebe que la conexión es segura tirando con cuidado del cable. Notas Negativo (–) • Asegúrese de que el terminal aprieta el cable pelado y no el aislamiento. • Asegúrese de que los cables pelados no hacen contacto entre sí porque se podría dañar el altavoz o el amplificador.
Меры предосторожности Прочитайте описание следующих мер предосторожности перед использованием аппарата. Yamaha не несет ответственность за любые повреждения и (или) травмы, вызванные несоблюдением приведенных ниже мер предосторожности. 1. Для обеспечения наилучшего результата, пожалуйста, внимательно изучите данную инструкцию. Храните ее в безопасном месте для дальнейшего использования. 2.
Содержимое упаковки Благодарим Вас за выбор акустической системы Yamaha NS-PB120. Убедитесь в том, что в комплект поставки входят указанные ниже предметы. Фронтальные колонки и колонки окружающего звучания (NS-B120) x4 Русский Центральная колонка (NS-C120) x1 Липучка x2 (для центральной колонки) Кабель колонок 24,5 м x1 Противоскользящие прокладки (4 шт.
Установка колонок Установка центральной колонки Поместите центральную колонку посредине между фронтальными колонками, лицевой стороной к слушателю. Липучка Удалите защитную пленку. При установке колонки на плоскую поверхность (подставка под телевизор и т. п.) прикрепите поставляемые липучки к нижней стороне колонки, как показано на рисунке слева. Информация об установке колонки на стену приведена в разделе “Установка колонок на стену” (стр. 4). Подставка под телевизор и т. п.
Установка колонок Установка колонок на стену Стена/опора стены Колонка окружающего 26 мм звучания Вы можете выполнить монтаж колонок на стене, как показано ниже. 1 3 мм Не менее 20 мм 2 245 мм Повесьте каждую колонку пазом на выступающий винт. Примечание Русский Центральная колонка Заверните винты в твердую стену или опору стены, как показано на рисунке слева. Используйте самонарезающие винты диаметром от 3,5 до 4 мм. • Убедитесь в том, что ось винта расположена в узкой части паза.
Подключение колонок Предупреждение: Перед выполнением каких-либо подключений убедитесь в том, что силовые кабели аудиовидеокомпонентов отсоединены от розеток переменного тока.
Технические характеристики ■ Работа с клеммами колонок Ослабьте 1 2 3 Затяните Положител ьный (+) 4 Поверните клемму колонки против часовой стрелки, чтобы ослабить ее. Вставьте оголенную часть провода. Поверните клемму колонки по часовой стрелке, чтобы затянуть ее. Проверьте надежность подключения, слегка потянув кабель. Примечания Отрицатель ный (–) ■ Подключение к усилителю Подключите каждую колонку к соответствующим клеммам колонок на усилителе с помощью подготовленных ранее кабелей.
English Limited Guarantee for European Economic Area (EEA) and Switzerland Thank you for having chosen a Yamaha product. In the unlikely event that your Yamaha product needs guarantee service, please contact the dealer from whom it was purchased. If you experience any difficulty, please contact Yamaha representative office in your country. You can find full details on our website (http://www.yamahahifi.com/ or http://www.yamaha-uk.com/ for U.K. resident).
Español Garantía limitada para el Área Económica Europea (AEE) y Suiza Gracias por haber elegido un producto Yamaha. En el caso poco probable de que su producto Yamaha necesite el servicio que concede la garantía, póngase en contacto por favor con el concesionario a quien adquirió el producto. Si usted tiene alguna dificultad, póngase en contacto por favor con la oficina representativa de Yamaha en su país. Podrá encontrar todos los detalles necesarios en nuestros sitios Web (http://www.yamaha-hifi.
© 2011 Yamaha Corporation Printed in Indonesia WY02030