English URABLH Español Subwoofer NS-SW300 NS-SW200 Owner’s Manual Manual de instrucciones EN ES
IMPORTANT SAFETY INSTRUCTIONS 1. Read these instructions. CAUTION RISK OF ELECTRIC SHOCK DO NOT OPEN CAUTION: TO REDUCE THE RISK OF ELECTRIC SHOCK, DO NOT REMOVE COVER (OR BACK). NO USER-SERVICEABLE PARTS INSIDE. REFER SERVICING TO QUALIFIED SERVICE PERSONNEL. 2. 3. 4. 5. 6. 7. 8.
PLEASE READ CAREFULLY BEFORE USE. BE SURE TO FOLLOW THESE INSTRUCTIONS. The precautions listed below are to prevent risk of harm to the user and others, as well as to prevent property damage, and to help the user use this unit properly and safely. Be sure to follow these instructions. After reading this manual, be sure to keep it in a safe place where it can be referenced at any time.
Installation Handling Connections • Do not place the unit in an unstable position where it might accidentally drop or fall over and cause injuries. • When installing this unit, do not obstruct heat dissipation. – Do not cover it with any cloth. – Do not block this unit’s ventilation holes (cooling slits). – Do not install the unit in other ways than indicated.
Information for users on collection and disposal of old equipment: About functions and data included in the unit This symbol on the products, packaging, and/or accompanying documents means that used electrical and electronic products should not be mixed with general household waste. For proper treatment, recovery and recycling of old products, please take them to applicable collection points, in accordance with your national legislation.
ADVANCED YAMAHA ACTIVE SERVO TECHNOLOGY II In 1988, Yamaha brought to the marketplace speaker systems utilizing YST (Yamaha Active Servo Technology) to give powerful, high quality bass reproduction. This technique uses a direct connection between the amplifier and speaker, allowing accurate signal transmission and precise speaker control.
English FEATURES PLACEMENT • This subwoofer system employs Advanced Yamaha Active Servo Technology II, which Yamaha has developed for the production of higher quality, superbass sound. This super-bass sound adds a more realistic, theater-in-the-home effect to your stereo system. • This subwoofer can easily be added to your existing audio system by connecting to either the speaker terminals or the line output (pin jack) terminals of the amplifier.
CONTROLS AND THEIR FUNCTIONS Check the model number of your subwoofer on the label on the rear panel.
English CONTROLS AND THEIR FUNCTIONS 1 Indicator Green: The subwoofer is turned on. Red: The Automatic power-switching function has activated, and the subwoofer is in standby mode. Off: The subwoofer is turned off. 9 B.A.S.S. (Bass Action Selector System) switch (NS-SW300 only) ( page 11) When this switch is set to MUSIC, the bass sound in audio software is well reproduced. When the switch is set to MOVIE, the bass sound in video software is well reproduced.
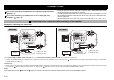
CONNECTIONS Choose one of the following connection methods most suitable for your audio system. 1 Choose this method if your amplifier has line output (pin jack) terminal(s). ( page 5, 6) 2 Choose this method if your amplifier has no line output (pin jack) terminals. ( page 7, 8) 1 NOTICE • Unplug the subwoofer and other audio/video components before making connections, and do not plug them in until all connections are completed.
English Example: Connecting two subwoofers NS-SW200 NS-SW300 Subwoofer Subwoofer Subwoofer Subwoofer 1 Amplifier or receiver 1 1 1 1 Mono pin cable Amplifier or receiver 1 Mono pin cable Connecting to the INPUT3 (LFE) terminal If your amplifier (or receiver) can cut off high frequencies from signals sent to the subwoofer, connect the amplifier to the subwoofer’s INPUT3 (LFE) terminal.
2 Connecting to speaker output terminals of the amplifier ° Example: Connecting the subwoofer to an amplifier that features one set of speaker output terminals Use speaker cables to connect the speaker output terminals of the amplifier to the subwoofer’s INPUT 1 (FROM AMPLIFIER) terminals. Connect the front speakers to the subwoofer’s OUTPUT (TO SPEAKERS) terminals. Although the subwoofer is connected between the front speakers and the amplifier, the sound volume or quality will not be affected.
English Connecting two subwoofers NS-SW200 NS-SW300 Right front speaker Left front speaker Speaker output terminals Amplifier or receiver Speaker output terminals Subwoofer Left front speaker Right front speaker Amplifier or receiver Subwoofer Subwoofer Subwoofer ° Example: Connecting the subwoofer to an amplifier featuring two sets of speaker output terminals (A and B) that can output sound signals simultaneously Set the amplifier so that both sets of speaker output terminals (A and B) will out
Connecting to the INPUT1/OUTPUT terminals of the subwoofer ° How to connect WARNING To avoid accidents resulting from tripping over loose speaker cables, fix them to the floor. Always fix the speaker cable to a wall or similar. If you catch your feet or hands on the cable, the speakers may fall or overturn, causing malfunctions or injuries. NOTICE • Do not let the bare speaker wires touch each other, because this could damage the subwoofer or the amplifier.
AUTOMATIC POWER-SWITCHING FUNCTION If you use the included system control cable to connect a subwoofer to a Yamaha component (that features a system connector jack such as a YSP series component or Yamaha receiver), turning on or off the power to the connected component automatically turns the subwoofer on or off. This function automatically places the subwoofer in standby mode if the subwoofer does not detect a signal from the amplifier for a certain period of time.
ADJUSTING THE BALANCE To achieve natural sound with an effective super-bass component, you must adjust the volume and tone balance between the subwoofer and the front speakers. Follow the procedure described below. If your amplifier or other component connected to the system features subwoofer settings, make the appropriate settings on that component.
2. Turn on the power to the component(s) connected to the subwoofer. If the component is connected to the subwoofer’s SYSTEM CONNECTOR jack, turn on the power to that component. 3. Make sure that the POWER switch is set to the ON position, then set the STANDBY/ English ADJUSTING THE BALANCE 1. Set the VOLUME control to minimum (0). PHASE switch In most situations, set this switch to select the reverse mode.
Subwoofer frequency characteristics The figures below show the optimum adjustment of each control and the frequency characteristics when the subwoofer is combined with a typical front speaker system.
English TROUBLESHOOTING Refer to the chart below if this unit does not function properly. If the instructions given below do not help, or if the problem you are experiencing is not listed below, turn off the power to the unit, disconnect the power cord and contact an authorized Yamaha dealer or service center. Problem Cause What to Do Problem Cause What to Do Power is not supplied even though the STANDBY/ON switch is set the ON position. The power plug is not securely connected.
Problem Cause What to Do The subwoofer does not enter standby mode automatically. Noise generated from external appliances etc., is activating the subwoofer. Move the subwoofer farther away from such appliances, and/or reposition the connected speaker cables. Set the AUTO STANDBY switch to the HIGH or LOW position. The AUTO STANDBY switch is set to the OFF position. Set the AUTO STANDBY switch to the HIGH or LOW position. The subwoofer enters standby mode unexpectedly.
ANTES DE USAR EL PRODUCTO, ASEGÚRESE DE LEER DETENIDAMENTE Y SEGUIR ESTAS INSTRUCCIONES. La finalidad de las precauciones siguientes es evitar lesiones al usuario y otras personas y daños materiales. Además, ayudarán al usuario a utilizar esta unidad de forma correcta y segura. Es importante seguir estas instrucciones. Después de leer este manual, es importante guardarlo en un lugar seguro donde pueda consultarlo en cualquier momento.
Instalación Mantenimiento Instalación • No coloque la unidad sobre superficies inestables, donde pueda caerse o volcarse por accidente y provocar lesiones. • Al instalar esta unidad, no obstruya la disipación de calor. – No tape el dispositivo con ningún tipo de tela. – No bloquee los orificios de ventilación de la unidad (ranuras de refrigeración). – Instale la unidad exclusivamente de la manera indicada. – No utilice el dispositivo en un lugar demasiado pequeño o mal ventilado.
Información para usuarios sobre la recogida y eliminación de equipos viejos: Acerca de las funciones y datos incluidos en la unidad Este símbolo en los productos, embalajes y/o documentación adjunta significa que los productos eléctricos y electrónicos usados no se deben mezclar con los residuos domésticos normales. Para el tratamiento, recuperación y reciclaje de productos viejos, llévelos a un punto de recogida adecuado según la legislación de su país.
ADVANCED YAMAHA ACTIVE SERVO TECHNOLOGY II En 1988, Yamaha comercializó unos sistemas de altavoces que utilizaban la tecnología YST (Yamaha Active Servo Technology, Tecnología avanzada de servo activo de Yamaha) para posibilitar una reproducción de graves potente y de alta calidad. Esta técnica utiliza una conexión directa entre el amplificador y el altavoz, permitiendo una gran precisión en transmisión de señales y control de altavoces.
UBICACIÓN • Este sistema de subwoofers emplea la tecnología avanzada de servo activo de Yamaha (Advanced Yamaha Active Servo Technology II) desarrollada para reproducir sonidos ultragraves de alta calidad. Este sonido de ultragraves añade a su sistema estéreo un efecto más realista de cine en casa. • Este subwoofer se puede agregar fácilmente al sistema de audio existente conectándolo en los terminales de altavoces o en los terminales de salida de línea (con clavija) del amplificador.
CONTROLES Y SUS FUNCIONES Compruebe el número de modelo de su subwoofer en la etiqueta del panel trasero.
1 Indicador Verde: Rojo: Desactivado: El subwoofer está encendido. Se ha activado la función de encendido automático y el subwoofer está en el modo de espera. El subwoofer está apagado. 2 Control VOLUME ( página 11) Ajusta el nivel del volumen. Gire el control hacia la derecha para subir el volumen y a la izquierda para bajarlo. 3 Interruptor STANDBY/ON Con el interruptor POWER en posición ON, pulse este interruptor para encender la alimentación del subwoofer. El indicador se iluminará en verde.
CONEXIONES Elija entre los siguientes el método de conexión que mejor se ajuste a su sistema de audio. 1 Elija este método si su amplificador tiene terminales de salida (con clavija) de línea. ( página 5, 6) 2 Elija este método si su amplificador no tiene terminales de salida (con clavija) de línea. ( página 7, 8) 1 AVISO • Desenchufe el subwoofer y otros componentes de audio y video antes de realizar las conexiones, y no los vuelva a enchufar hasta que se hayan realizado todas las conexiones.
Ejemplo: Conexión de dos subwoofers Español NS-SW200 NS-SW300 Subwoofer Subwoofer Subwoofer Subwoofer 1 Amplificador o receptor 1 1 1 1 Cable monoaural con clavija Amplificador o receptor 1 Cable monoaural con clavija Conexión con el terminal INPUT3 (LFE) Si el amplificador (o el receptor) puede cortar las frecuencias altas de las señales enviadas al subwoofer, conecte el amplificador en el terminal INPUT3 (LFE) del subwoofer.
2 Conexión con los terminales de salida de los altavoces del amplificador ° Ejemplo: Conexión del subwoofer con un amplificador que cuenta con un conjunto de terminales de salida para altavoces Utilice cables para altavoces para conectar los terminales de salida de altavoces del amplificador con los terminales INPUT 1 (FROM AMPLIFIER) del subwoofer. Conecte los altavoces delanteros en los terminales OUTPUT (TO SPEAKERS) del subwoofer.
Conexión de dos subwoofers Altavoz derecho delantero Altavoz izquierdo delantero Español NS-SW200 NS-SW300 Altavoz derecho delantero Altavoz izquierdo delantero Terminales de salida de altavoces Amplificador o receptor Terminales de salida de altavoces Subwoofer Amplificador o receptor Subwoofer Subwoofer Subwoofer ° Ejemplo: Conexión del subwoofer con un amplificador que cuenta con dos conjuntos de terminales de salida para altavoces (A y B) y que puede dar salida simultánea a las señales de s
Conexión con los terminales INPUT1/OUTPUT del subwoofer ° Como conectar: ADVERTENCIA Fije los cables de los altavoces al suelo para evitar tropiezos y accidentes. Fije siempre el cable del altavoz a una pared o similar. Si se enreda los pies o las manos en el cable, los altavoces podrían caerse o volcarse y provocar averías o lesiones. AVISO • No deje que los cables pelados se toquen; si lo hace, se podría averiar el subwoofer o el amplificador.
FUNCIÓN DE ENCENDIDO AUTOMÁTICO Si utiliza el cable de control del sistema incluido para conectar un subwoofer con un componente Yamaha (que cuente con un terminal de conexión del sistema como un componente de la serie YSP o un receptor Yamaha), el subwoofer se encenderá o apagará automáticamente cuando se encienda o se apague el componente conectado.
AJUSTE DEL BALANCE Para conseguir un sonido natural con un componente efectivo de ultragraves, deberá ajustar el balance del volumen y el tono entre el subwoofer y los altavoces principales. Siga el procedimiento que se describe a continuación. Si el amplificador u otro componente conectado al sistema incluye ajustes de subwoofer, realice los ajustes necesarios en ese componente.
2. Encienda el componente o componentes conectados con el subwoofer. Si el componente está conectado en el terminal SYSTEM CONNECTOR del subwoofer, encienda ese componente. 3. Asegúrese de que el interruptor POWER está en la posición ON y ajuste el interruptor STANDBY/ON en la posición ON. * El indicador se enciende en verde. 4.
Características de frecuencias del subwoofer Las cifras que aparecen a continuación muestran el ajuste óptimo de cada control y las características de frecuencia cuando el subwoofer se combina con un sistema de altavoces principales típico. ° Cuando se usa en combinación con un sistema NS-SW300 de altavoces principales de 2 vías de suspensión acústica de 10 cm o 13 cm.
Consulte el siguiente cuadro cuando el aparato no funcione correctamente. Si las instrucciones facilitadas no ayudan a solucionar el problema, o si el problema no es uno de los que aparecen en la siguiente lista, apague la alimentación de la unidad, desenchufe el cable eléctrico y póngase en contacto con un distribuidor o centro de servicio autorizado de Yamaha. Problema Causa Solución Problema Causa Solución No hay corriente aunque el interruptor STANDBY/ON está en la posición ON.
Problema Causa Solución El subwoofer no entra automáticamente en el modo de espera. Existe una influencia de ruido generado por equipos digitales externos, etc. Aleje el subwoofer de dichos aparatos y/o cambie la posición de los cables para altavoz conectados. Ponga el interruptor AUTO STANDBY en la posición HIGH o LOW. El interruptor AUTO STANDBY está en la posición OFF. Ponga el interruptor AUTO STANDBY en la posición HIGH o LOW. El subwoofer entra inesperadamente en el modo de espera.
Yamaha Global Site https://www.yamaha.com/ Yamaha Downloads https://download.yamaha.