@ YSP-4300 [ YSP-CU4300 + NS-WSWI60] YSP-3300 [YSP-CU3300 + NS-WSW160] Digital Sound Projector TM Owner,s Manual English for North America J
What you can do with this unit TV Audio/video device Preparation Connections/Basic Playback 2En settings
p.
Contents PREPARATION Controls and functions ............................................... Center unit front panel (front, top) ........................................... Center unit rear panel (back) .................................................. Subwoofer rear panel (back) ................................................... Front panel display .................................................................. Remote control ........................................................................
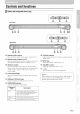
Controlsand functions Centerunit front panel(front, top) I iNPUT -- YSP-CU4300 VOLUME + V I NPUT - VOLUME +_ YSP-CU3300 ilii_i_i_ii _ 1 V ', ,,iiiiii_'_!_i_i II!............ Remote control sensor Receives infrared Remote signals control Receives infrared the TV Remote sensor signals Repeater @ STATUS indicator from the remote control (_'p. 9). of a TV fi'c)m the TV remote function is enabled control when (_ p. 12). O Wireless module Receives signals.
Controls and functions Center unit rear panel (back) @ FM ANTENNA jack (YSP-4300 only) Connect all FM antenna (_ p. 20). satellite INTELLIBEAM MIC jack Connect the supplied [ntelliBeam microphone (_p. 24). Q analog cable to the external components O (_*_p. 19). components a coaxial digital audio cable to the external (_*_p. 19). expansion jacks (_*:p. 18). SEn an HDM[ disc player, console (_p. 18, 19). expansion terminal for commercial use only.
Controls and functions Subw00ler rear panel (back) ilii _i_i_ii _ ', ,,iiiiii_'_!_i_i II!............ Group ID switches When the center unit and subwoofer are connected LINK indicator wirelessly, sound is output from the subwoofer (yAired). For a wireless connection, use the same group ID as the center unit and YIT-WI2TX (r'p. 20). Heat discharge unit Shows wireless Discharges cover O connection heat the heat generated discharge status inside (_p. 21). the subwoofer. Do not unit.
Controls and functions Frontpanel display _) mmmJl li_ml mmmml mmm_m mmlJJ _l|mm gm|ml Playback indicators (YSP-4300 only) Lights while music stored on an iPod or USB device connected to the USB jack is playing (_ p. 48, 54). TARGET (YSP-4300 RX indicator indicators Lights while the connection to the subwoofer is being established (_,:p. 20). Lights while the connection to YIT-WI2TX is being established. For details of YIT-WI2TX, refer to "Safety and Accessory [nformation" (separate booklet).
Controls and functions Remotecontrol @ Infrared signal transmitter BEAM key Switches tile sound beam output lllethod (ir_ p. 37). @ ENHANCER key Turns Compressed Music Enhancer to on or off (_p. 33). @ Input selector keys Select the playback component (_ p. 32). @ CINEMA DSP program keys When playback is ill surround playback mode, select the CINEMA DSP programs (_,: p. 34). @ SURROUND key Switches to surround playback mode (_,:p. 34).
Controls and functions @ MUTE key Mute the sound @ SYSTEM MEMORY keys Saves [ntelliBeam settings @ UNIVOLUME key Turns the UuiVolume function on or off (_ p. 40). @ VOLUME (_: p. 32). measurements, speaker volume, (_: p. 28). @ @ FM key (YSP-4300 only) Switches this tmit's input source to FM radio. @ @ Tuner operation keys (YSP-4300 only) Press to select or register all FM station the volume balance during (_ p. 44). playback ECO key Turns the Eco function on or off (_ p. 41).
Installation To achieve waves, desired referred connect external surround sound to as "sound devices effects, beam(s)" such install this unit where ill this manual there are no objects (_,: p, 14), Depending as a TV first, See "Connections" such as furniture on the location where obstructing the path of sound the unit is installed, it may be easier to (_,: p, 17), f Notes • This unit requires sufficient sp_ce li)r heat discharge.
Installation Enj0ying surround effects regardless of conditions (My Surround) The My Surround "Changing function the audio creates output rich surround method sound for surround effects playback" ill rooms with less than optimal surround sound conditions (,_p. 11 ). See (,_ "p. 36, 37) for more information.
Installation Positioning the subwoofer on its side The subwoofer call be laid on its side when _ositioned on a rack. Turn counterclockwise Removing the legs and sheets Sheet ilii_i_i_ii _ $ ', ,,iiiiii_'_!_i_i II!............
Installation Installing this unit This unit outputs obstructing You may install Parallel sound beam the path of sound this unit ill parallel ill the illustrations Otherwise, below'. Install this unit where the desired surround sound Corner center effects there are no obstacles such of the wall when it is measured the left and right corners, installation [nstall this unit in the corner adjacent at a 40 ° to 50 ° angle walls.
Installation Installing in a non-square room [nstall this unit so that the sound beams call be reflected off the walls. Irregularly shaped rooms with solid walls on all sides Irregularly shaped rooms that are open to a hallway ilii_i_i_ii _ on one side ', ,,iiiiii_'_!_i_i II!............ c: Example for installing • As sound obstacles. sounds. • beams the unit normally And a cupboard In a case of the listening adjusting the position (_: p.
Installation Before installing Information" batteries (separate o1"using the remote control, be sure to read battery Installingthe batteries Pull up on the latch to release the cover and remote control precautions ill "Safety and Accessory booklet).
Connections When external devices such as a TV, Blu-ray disc player, and/or game console are connected, audio and video signals are transmitted as shown below. _ _ Audio connection Video connection _ f_ _; _ Audio and video connection This unit: Plays audio from TV broadcasts, Blu-ray discs, etc. HDMI cable iliiii_iiii_ _ iC, i P Use to connecl a TV that does not support audio return channel (AR() to this unit (*_'p. 18). ', ,,iiiiii_'_!_i_i II!............
Connections _] Do not use connect excessive the power force cable when until inserting all connections the cable For the cable connection, follow the procedure plug, are completed, Doing so may damage the cable ;he digital Of the Blu-ray audi;/video disc player ;ignMs to this unit. J jack. below, HDMI Cable (optional)cable(opti0nal)3 inpu[ plug and/or optical Cable(supplied) The digital player videO ofihe is reflected BiuT;ay disc on TV: back digital soun]ts of TV ;n this unit.
Connections HDMI compatible not HDMI compatible Satellite/cable TV tuner HDMI cable (optional) Game console HDMI cable (optional) Game console HDMI cable (optional) Satellite/cable TV tuner Optical cable (supplied) Composite video cable (optional) Game console RCA stereo cable (optional) Composite video cable (optional) > ilii _i_i_ii _ To AC wall outlet -,\ ', ,,iiiiii_'_!_i_i II!............
Connections Connect the supplied FM antenna via the FM ANTENNA jack. FM antenna \ To connect the subwoofer wirelessly center (yAired), unit and subwoofer. components plugging When must wireless power using the transmitter subwoofer and center the center unit enters indicator turn off. unit and subwoofer. standby outlet. 1}, the same group 2TX is A 1. lights when the subwoofer ID The default is on and the wirelessly.
Initial settings Yamaha's connection proprietary yAired technology enables the wireless of the center unit and subwoofer. Wireless connection of the subwoofer concern allows for cables. iPods or computers stored on these for subwoofer When through of YIT-WI2TX, [nformatiou" (separate When playing center unit transmits When group 2TX) is used, YIT-WI2TX the stored signals for switching _ on an Switch 'snoPuU tce s select this unit.
Initial settings Turn the unit and TV on. Switch the TV's input to display video input from this unit (_,p. 21). J'_ Press and hold the SETUP key until the "OSD LANGUAGE" menu appears on your TV._ At'it OSDLANGUAGE A ENTER B_N SETUP DEUTSCH FRAN_AIS ESPANOL ITALIANO NEDERLAND PYCCKHN SVENSKA Y Selectable item: E_2k_, ENGLISH, DEUTSCH, FRAN(_AIS, ESPANOL, ITALIANO, NEDERLANDS, PYCCKI/II_I, SVENSKA Initial setting: ENGLISH When the Confirm screen the following is not displayed cases.
Initial settings Assembling the supplied cardboard microphone stand Due to differences in room unit, and the lifestyle adjusted in order sizes of users, and shapes, settings positioning for each for this unit to provide channel the optimal of this must be listening experience.
Initial settings Using AUTO SETUP (IntelliBeam) f- • It is normal for loud test tones to be ot/tput dm'ing the AUTO SETUP procedure. Make sure that there are no children around in the listening room while the ALTTOSETUP procedure is in progress. • If there are curtains in ynur listening room, we recnmmend lollowing the procedure below. 1 Open the curtains to improve snund reflectinn. 2 Run "BEAM OPTIMIZE ONLY" (_,p. 26). 3 Close the cm'tains. 4 Run "SOUND OPTIMIZE ONLY" (_p. 26).
Initial settings The screen [ntelliBeam below' is displayed after connecting microphone to the unit. 1) AUTO SETUP (PREPARATION Please connect Please place 1.8m/6tt away Measurement & CHECK) the MIC. the MIC from results are applied to this unit. at [east Sound AUTO Pro- SETUP COMPLETE jector. The MIC should be set at ear level when seated. Measurement After takes [ENTER[ please about Please 3rain. [ENTER]:Start remove the MIC from Sound Prolector and the listening position.
Initial settings AUTO SETUP via setup menu 1 Place the IntelliBeam microphone at you r normal listening position, and press the SETUP key. See "Installing instructions the [ntelliBeam on positioning microphone" (,_xp. 23) for the IntelliBeam microphone. At'it Fiiiiiiiiiiiiiiiiiiiiiiiiiiiill ENTER SETUP RETURN Select Item: "BEAM+SOUND (Beam OPTIMIZE" optimization and sound optimization) Select this optimization feature if you make first time. This menu takes about 3 minutes.
Initial settings If an error message is displayed If all error message messages" Follow' below' is displayed to determine the instructions below' on the TV screen, see "Error the cause and resolve to begin the problem. measurement again. [ERROR E-l] Press the ENTER key to run the AUTO SETUP procedure again. Or press the • key to continue the measurement. [ERROR Press AUTO Remedy The hnelliBeam microphone is not placed in h'ont ol this unit.
Initial settings Savingthisunit'ssettingstosystem memo_ Three sets of settings quick loading environmental changes save [ntelliBeam surround can be saved to this unit's of settings optimized as needed. measurement setting memory, for specific enabling listeners or Refer to the examples results and settings to system memory, settings can be saved below' to such as or to load a pre-defined settings. The following • Surround playback (_ p.
Initial settings Saving settings to system memory Loading settings 7 Hold down the SYSTEM, MEMORY 1,:2, or 3 key until M1Save? ;'M2Save? ;O r ,M3 Save?", corresponding to the button pressed, is displayed, I') Press the same SYSTEM again]) MEMORY key the SYSTEM 1 key is pressed, "M 1 When Saving" is displayed, MEMORY and settings 1 Press theSYSTEM key corresponding loaded. If the SYSTEM Load'?" 9 i.. are saved.
Initial settings What is the HDMI control function? HDMI1 This trait call be operated supports the HDM[ using a TV's control ftmction reruote control if the TV and is connected via HDM[ cable (e.g. REGZA Link; some The following 6 ftmctions are supported)} to this unit TVs excluded). Remote control of TV (Example) 1. Turn on/off Both the TV and this/mit turn on/off at tile same time. 2.
Initial settings Setting the HDMI control function If the HDMI control function Be sure that all components unit, and that settings below'. 2 The TV is connected unit. Enable the HDMI control function of all components connected to this unit via HDMI cable. "HDM[ CONTROL" CONTROL" For external components, with each component. 3) refer to "ON" to the manual are properly connected configured to the HDM[ to this as described OUT (ARC) (_,: p.
Playbackfeatures ENHANCER unit. d_ HDMI1 Turn components disc to player,ongame console, (TV, etc.)Blu-ray connected this unit. In_ keys SURROUND Select by pressing selectora component key corresponding to thethe input connection of external components. STEREO Press the HDMI1 Blu-ray key to play audio/video disc player connected content via the HDM[ from a INI jack. Input source name ) H[:,l"ii; .t UNIVOLUME SUBWOOFER (+/-) MUTE VOLUME (+/-) I Press the SUBWOOFER (+/.
Playback features Playing back digitally compressed formats (MP3, WMA, etc.) with enriched sound (Compressed Music Enhancer) This unit supports the following capabilities to enjoy sound based on your preference.
Playback features Enjoying realistic surround sounds (CINEMA DSP) Playback DSP. surround sounds using Yamaha's exclusive CINEMA 1) Press the SURROUND the surround mode. 2 DSP key to switch to Press the CINEMA DSP (MOVIE, MUSIC, or ENTERTAINMENT) key repeatedly to select the desired program.83_ SURROUND The CINEMA This DSP unit is equipped processing) enhance chip concert containing your playback are precise digital balls, with music a Ymnaha several experience.
Playback features CINEMA DSP options Sports Sci-Fi This program clearly effects of the latest broad and expansive reproduces science dialogs fiction cinematic films and special This program sound and lets you feel a center space, reproduces sports broadcasting, the energetic converging and broadening the overall atmosphere and lets you feel as if you are seated Adventure reproduces latest action excitement the thrilling environment films and lets you feel the dynamic of fast-m
Playback features Changing the audio output methodfor surroundplayback Specify BEAM the sound beam output method for surround sound playback. Press the BEAM key to switch the sound beam output method. With Sound 5.1-channel beams (5 Beam), Sound 5BEAM+2 (Stereo Choose + 3 Beam), from 5BEAM 3BEAM (3 Beam), (My Surround). (or 6.1-channel) 7.1-channel beams input from 5. l channels. ST+3BEAM and MY SUR.
Playback features Sound beam output options and characteristics Number of channels Objective/ possible scenario Beam modes for "5.1ch" 5BEAM For enjoying Sl.lrrOl.1 nd effects (5 Beam) Outputs SOl.1 nd on the movie, etc. to the fullest Beam modes for "7.1ch" 5BEAM+2 sound (5 Beam beams Plus Outputs from the front right and left, center, and surround right and left channels. back right and left channels. Surround mixed sources that output channels.
Playback features Setting thesurrounddecoder When this unit plays back 2-channel or 5.1 -channel sources in the surround mode, surround decoder enables them playback for 7. l-channel. I) You call enjoy a variety of surround sound effects by switching the decoder. To enable a surround select "DSP Oft"'.
Playback features Deliveringsoundto a specifiedlocation (Target playback mode) Target playback mode outputs sound beams channel for optimal listening from a specific Refer to the illustrations below'. from a single Beam angle call be adjusted while audio o1"video content is playing. Press the TARGET key. position. Use the 41/1_key to adjust beam angle. ii ;iii!;;; To limit sound to the immediate area ii ii;i;ilii_;ii • Angle to the left increases pressed: angle key is pressed.
Playback features Automatic volumeleveladjustment (UniVolume) This function automatically compensates ill volume for more comfortable listening of situations. • When • When switching the channel a TV program changed • When one program is finished for extreme differences ill the following types to commercial and another program started Press the UNIVOLUME key to turn the UniVolume function on.l! Press INFO UNIVOLUME ECO YSP=3300 ECO • The defitull selling is "OFF". • We recommend of music.
Playback features Switchinginformationdisplayedin thefront panel display Saving energy with the Eco function When the Eco function is enabled, standby mode as follows. • No operations are performed • No input signal • Playback of content is received stored this unit automatically The input source and surround information is displayed.
Playback features Settingseach inputsource(Optionmenu) Option settings can be specified 4, TV, OPTICAL, configurable items AUX, for each ANALOG, vary depending YIT, input source (HDM[I- FM Q, USB1)). on the input source The selected. InF keys The option menu is not displayed is displayed in the front panel display on the TV screen). ,A/V Fiiiiiiiiiiiiiiiiiiiiiiiiiiiil ENTER "T" r"= r" r"= i !.... i r':. c. c, L..C. OPTION Change setting value by pressing the i/V key.
Playback features Option menu Tile following items menu items are provided for each Audio delay control (AUDIO DELAY) input. TV images function TREBLE, BASS, VOLUME TRIM, AUDIO DELAY, AUDIO ASSIGN HDMI 1 4 video OPTICAL TREBLE. BASS. VOLUME TRIM, AUDIO DELAY AUX Y1T TREBLE, BASS. VOLUME TRIM, AUTO PRESET a . CLEAR PRESET _), FM MODE a) only) TREBLE.
Playback features The FM tuner of this unit provides the following two modes for tuning. Frequency tuning mode You call tulle into a desired FM station by searching its frequency. Preset tuning mode Up to 40 stations Select a preset call be registered number and assigned a preset to tune into the station registered number. with that preset. A/V Hiiiiiiii/lii]iiiiiiiiiiiiiiiiil ENTER djusl file FM antelma connecled lo lhis uni'. htr the besl reception.
Playback features Receivingweak signal If reception improved is poor, making by switching from listening difficult, it may be stereo to monaural sound. Press the OPTION The option Land menu (_'p. RegisteringFM stationsand tuningin (Preset tuning) You call register key. up to 40 FM stations 42) appears. The tuner automatically detects and registers the stations. 1 Press FM stations with strong signals i© key, ,=.° The option Press the A/V iii .
Playback features Registering stations manually You call manually register FM stations. The preset number to which registered is displayed. the selected station will be Blinks A/V Fiiiiiiiiiiiii:iiiiiiiiil ENTER =... ":::', =_ :.. =... MEMORY EMP'rY Preset number RETURN OPTION •:- £!7 _ Proceed to step 4 to register number displayed. the selected station with preset Press the PRESET (/> key to selec t the preset number to which the station will be registered.
Playback features Calling a preset station You can call preset Clearing preset stations stations. You can clear registration of the preset stations. i ;> _ Press the OPTION key' ........... ii;i;ilii_;ii The option menu (r,:'p. 42) appears. • Preset numbers to which no stations are registered are skipped. 74>% Tips • "No Presets" is displayed if no stations are registered. 1 A preset station is displayed. ,-,, ,-., ,; ,. .,'....i::j ..,'.;; ;% ";: -;;;, :2.".," :: .....
Playback features A wireless connection (YIT-WI2TX) or computer through For details of YIT-W [nformation" between this unit and the transmitter call be established to play music stored on all iPod this unit. 12TX, (separated refer to "Safety and Accessory booklet). A/V/_ ENTER RETURN Connect all iPod o1"other USB device ('_ p. 54) to this unit via the USB jack to play music stored on the iPod o1"USB device.
Playback features Operating an iPodvia theTV screen When all iPod is connected supplied screen. to this unit via the USB with the iPod, operation • See "Displaying instructions the menu on displaying can be controlled screen on the TV" the iPod operation cable via the TV (_:p. screen 21) for on the TV. iii!ili;i ! _ii ', ,i_ ' • iPod operation cannot be controlled via the TV screen when an iPod is connected to this unit wirelessly via YIT-WI2TX.
Playback features _ Browse screen [iPod] _Playlists @ List name @ Content ENTER OPTION INFO list Press the A/V key to select content. Press the • key to display a list of songs. Select a song and press the ENTER key to begin playback. @ Content number/totals Press the A/V/'_/• key to perform the following operations. Previous page Hold down the • key to display the previous page. Next page Hold down the • key to display the next page.
Playback features Displaying information on the current song Information panel on the current song call be displayed ill the front Using the SHUFFLE and REPEAT features Settings for the SHUFFLE menu call be specified. front panel display. and REPEAT The option menu features ill the option is displayed only in the display. > Press the INFO key, Information displayed 2 changes as follows each time the INFO key is pressed. m I SONG: Song title =,==, =,==,, ;.
Playback features Using the iPod to control operation Playback 'r can be controlled from tile iPod. Press theiPod The TV screen controlled Press will go blank, directly the iPod browse screen instructions from and operations call be the iPod. CONTROl key again to display the again, See documentation A/V/_ directly provided on operating with the iPod for the iPod.
Playback features Switching information displayed in the front panel display Charging the iPod iPods call be charged The input source and surround information as follows. _ is displayed. Connect the iPod to this unit via the USB cable supplied with the iPod. Display changes as follows each time the INFO key is pressed. Connect Charging --I USB: Name of the input the iPod to this unit while continues when this unit is turned this unit enters standby on. 2) _!;ii') mode.
Playback features Connectinga USBdevice Audio files (WAV, device call be played MP3, WMA, MPEG-4 by connecting AAC) the device stored on the to this unit. This trait supports sampling frequencies up to 48 kHz with layback of content stored on a USB device. J This unit supports USB mass-storage class devices formatted using the FATI6 or FAT32 file system (except USB hard disks). See documentation information.
Playback features Operating a USBdevicevia the TV screen Use controls displayed on the TV screen content stored on a USB device. to select _ Browse screen and play See "Displaying the menu screen on the TV" ff
Playback features Displaying information on the current song Information on the current panel display.l ) Information displayed song call be displayed changes as follows each ill the front time the IN FO key is pressed. m I FILE: File name PLAY TIME: Playback time ENTER REM.
Playback features Using the remote control This unit's navigate remote songs control stored Using the REPEAT feature call be used to control on the USB playback and device. Use the REPEAT feature or not music stored option is displayed menu in the option on the USB device menu to specify repeats whether with playback. only in the front panel The display. Play the selected song. [] II Pause playback. m Stop playback.
Setupmenu A variety of settings from the setup beam output volume method control, • The setup screen for this unit can be specified menu. Among for optimal and HDM[ menu (it cannot the options surround instructions on displaying are the sound effects, on, and operated be displayed the menu sound screen in the front from, the TV panel display). on the TV" (_,: p. 21) for the setup ' F Press the SETUP menu on the TV. key.
Setup menu IntelliBeam BEAM+SOUND OPTIMIZE Optimizes the beam automatically. and sound BEAM ONLY Optimizes the beam Optimizes the sound Front BEAM Front BEAM TRAVEL LENGTH settings automatically, rXp. 26 settings automatically, rXp. 26 il;i;iiiii_;il OPTIMIZE L, Front R, Center, Surround S u rrou nd R ANGLE rXp. 26 OPTIMIZE SOUND ONLY HORIZONTAL settings L, Front L, Adjust horizontal sound beam Adjust sound beam length, Adjust sound beam focal angle. _Xp.
Setup menu BEAM TRAVEL LENGTH2} When "AUTO SETUP" ill the "IntelliBeam" menu (_,:p. 24) is used, recommended beam settings are automatically applied by this unit. "HORIZONTAL ANGLE", "BEAM TRAVEL LENGTH", "FOCAL LENGTH" (except "Center"), and "IMAGE LOCATION" settings, however, call later be fine-tuned. angle of sound Front L, Front R, Center, Surround L, Control range: 0.3 m to 24.0 m (1.0 ft to 80.0 ft) Sub menu: Subwoofer Control range: 0.3 m to 15.0 m (default: 2.5 m) (1.0 ft to 50.
Setup menu Example Front left channel Center channel With positive focal lengths With negative focal lengths The higher the percentage, the louder the output from the center channel.
Setup menu SPEAKER LEVEL BEAM AUX Adjust the volume of each channel to balance output levels. Use test sounds output from each channel to adjust volume for opti mal balance./} Sub menu: Front L, Front Surround R, Subwoofer Adjustable R, Center, Surround k, range: -20 to +20 Adaptive DRC 2) Adjust this tmit's balance. When follows volume "ON" for optimal listening used at night. When the volume Narrow When which range.
Setup menu DYNAMIC RANGE3) Adjust this unit's dynamic range. Selectable items: Max*, Standard, Use to configure the settings related to HDM[ signals and the HDM[ control function. Min/Auto Max: Outputs sound without adjusting the dynamic range of the input signals. @ Standard: The dynamic range recommended ),p_, HDMI CONTROL for regular home use. Min/Auto: Min: Sets dynamic range at a level that supports comfortable listening at low volumes.
Setup menu Configure yAired the wireless function utilizing Yamaha's proprietary technology. iPod INTERLOCK When this function stored on all iPod connected playing. is set to "ON", See "Playing [nformation" Selectable back (separate item: iPod music" booklet) OFF*, this unit turns on when to the unit via YIT-WI2TX ill "Safety content begins and Accessory for more information.
Setup menu Display unit. DIMMER information for the audio and video signal input to this )'s,,_' Adjust the brightness of the front value, the dimmer When the Eco function applied display. The smaller the item: is enabled, the specified brightness is seconds.
Advancedsetup The advanced unit's setup enables function. and the INPUT For exainple, more precise maximum key on the top panel configuring volume of this can be specified call be disabled. No control to turn on the power. AIVI_ ENTER RETURN "ADVANCED" appears in the front panel display. The advanced setup menu is not displayed on the TV screen. Release the INPUT key on the top panel. Press the i/V key to display the desired menu in the front panel display and then press the • key.
Advanced setup !!!!!l!li!!ii! !!! !i!iii i @ liii,!, ! TURN ON VOLUME Sets the vohnne level at pnwer-nn. OFF" (Not set), 1 to 70 MAX VOLUME Sets the maximum 1 to 99, MAX' (Maximum) 1NPUT LOCK EnablesMisables the 1NPUT key nn the front panel. ON (Disabled), OFF" (Enabled) PANEL LOCK EnablesMisables the keys on the flout panel. ON (Disabled), OFF" (Enabled) R.1NPUT POWER Enables/disables power-on by remote control input selector keys when the unit is in the standby mode.
Troubleshooting Refer to the chart below' instruction below' does authorized Yamaha when not dealer help, this unit does set this or service not unit function to the properly, standby ff the mode, disconnect problem you the AC are experiencing is not power supply cable, and the AC power supply cable listed below' contact the or if the nearest center.
Troubleshooting Surround sound effects are insubstantial, When connecting this unit with playback component and TV digitally, the output setting of tile playback component and TV is not valid. Relier to the manual supplied with your component and check tile setting. The playback component is set for constant output from 2 channels (PCM, etc.), Change tile playback component's setting. The listening room is not a regular shape, Relocate the unit or listening position.
Troubleshooting FM tuner (YSP-4300 only) FM stereo reception is The characteristics of FM stereo broadcasts 20 Check the antenna connections. noisy, m:,y cause this problem when tile transmitter is too far away or the antenna input is poor. Try using a high-quality There is distortion, and clear reception cannot be obtained even with a good FM antenna. There is multi-path interference. Adjust the antenna position to eliminate multi-path interlerence.
Messages iPod (when connected via USB jack)/USB device (YSP-4300 only) Unknown iPod The iPod being used is nol supported by this Comm.Err Connect supported iPod to this und. 75 tulil. The USB device cannot be accessed. Apply slaMby mode for this unit and reconnect the The iPod cannol be accessed. USB device. If the message continues lo be displayed, move music files stored on the USB device to a differenl USB device. i! '_;2: :¸ iiii il;i;iiiii_;il 54 Tun] the iPod ofl and then on again.
Glossary Channel (ch) A channel is all audio range and other Ex. 7.1 channel The sound image of the system type that has been divided on the characteristics. • For iYont speakers, Left (lch), • For center (lch) speaker • For surround • For surround Right (lch) speakers, Left (lch), Right (lch) back speakers, Left (lch), Right (lch) • For the subwoofer * based ] (lch × 0.1" = 0.1ch) [n contrast to a full l-channel band, a component enhance low iYequency sound for added effect.
Glossary DTS Digital Samplingfrequency surround provides sound 5.1 channel able to provide system audio. developed by DTS, With all abundance authentic-sounding Inc., which of audio data, The number it is effects. Disc. Selected as all audio audio media standard The Digital for Blu-ray Disc, this technology delivers sound that is virtually indistinguishable from the original, offering a high-definition home theater experience. Supporting bitrates up to 6.
Specifications YSP-CU4300 YSP-CU3300 Amplifier Amplifier section • Rated Output Power Wooler (100 Hz, lC7_THD. 4 f_) .................................................... Tweeter (1 kHz. 1% THD, 4 _) .................................................... • Maximum Eflective Output Power Woollzr (100 Hz, 10(/_ THD, 4 _) .................................................. Tweeter (1 kHz, 11)(/_THD, 4 _) ..................................................... Speaker 90 W 27.
Specifications Supported USB device (YSP-CU4300) iPod/iPhone/iPad • iPod touch • iPod nano • iPhone • iPad (as of June 2012) (1 st, 2nd, (3rd, 4S, (3rd 3M 4th, iPhone 5th and 4th and 6th 4, iPhone generation), generation) 3GS, iPad 2, USB generation) iPhone 3G, memory • Mass • Supported audio data - WAV (SkHz-48kHz, iPhone storage - MP3 iPad class device (SkHz-48kHz, - WMA 5kbps-320kbps) (SkHz-48kHz, - MPEG4-AAC (FATI6/FAT32) format 16bit) 5kbps-384kbps) (
Specifications HDMIsignal compatibility Receivable audio signals Audio signal types Audio signal formats Compatible media 2ch Linear PCM 2ch. 32 192 kHz. 16/20/24 bit CD, DVD-Video. Multi-ch Lineal" PCM 8ch, 32 192 kHz. 16/21)/24 bit DVD-Audio. Blu-ray disc, HD DVD, elc. Bitslream (SD Audio) Dolby Digital, Dolby Digital Surrotmd EX, DTS, DTS-ES DVD-Video. etc. Bitstream (HD Audio) Dolby TrueHD, Dolby Digital Plus, DTS-HD Master Audio, DTS-HD High Resolution Audio Blu-ray disc.
Index Digital Sound Projector .................................................. DISTANCE UNIT ......................................................... Numerics 72 65 Dolby Digital ............................................................ 38, 72 2ch .................................................................................. 38 Dolby Digital 38, 72 3BEAM 37 Dolby PLIIx (3 Beam) .......................................................... 5. lch ..........................................
Index INTELLIBEAM MIC jack .............................................. IntelliBeam microphone ................................................ iPod CONTROL key ..................................................... iPod INTERLOCK ........................................................ iPod playback (USB connection) .................................. iPod playback (wireless connection) ............................. 6 23 52 64 48 48 L Language for menu display ...........................................
Index W Weak signal ................................................................... 45 Wireless connection ................................................. 20, 21 Wireless module .............................................................. 5 WMA ............................................................................. 33 _!iii') X x.v.Color ........................................................................ 73 Y yAired ...................................................................
@ YAMAHA CORPORATION © 2012 Yamaha Corporation YE830BO/EN1
L Owner's Manual
CAUTION RISK OF ELECTRICSHOCK DO NOTOPEN CAUTION: TO REDUCE THE RISK OF 1 Read these instructions. 2 Keep these instructions. 3 Heed all warnings. 4 Follow all instructions. 5 Do not use this apparatus 6 Clean only with dry cloth. 7 Do not block any ventilation openings. the manufacturer's instructions. ELECTRIC SHOCK, DO NOT REMOVE COVER (OR BACK). NO USER-SERVICEABLE PARTS INSIDE. REFER SERVICING TO QUALIFIED SERVICE PERSONNEL.
FCC INFORMATION 1. 1 IMPORTANT NOTICE: DO NOT MODIFY THIS UNIT! This product, when installed as indicated in the instructions contained in this manual, meets FCC requirements. Modifications not expressly approved by Yamaha may void your authority, granted by the FCC, to use the product. 2. IMPORTANT: When connecting this product to accessories and/or another product use only high quality shiekted cables. Cable/s supplied with this product MUST be used. Follow all installation instructions.
To assure the finest performance, please read this manual carefully. Keep it in a safe place for future reference. Install this unit in a cool, dry, clean place - away from windows, heat sources, sources of excessive vibration, dust, moisture and cold. Ax.oid sources of humming (transt_rmers, motors). To prevent fire or electrical shock, do not expose this unit to rain or water. The voltage to be used must be the same as that specified on the rear panel.
Contents Features of the Wireless Subwoofer NS-WSW160 ...... 1 Installing the subwoofer ................................................ 1 Positioning the subwoofer on its side..................................2 Connecting the subwoofer wirelessly ............................ Troubleshooting Specifications 3 ................................................................ 3 The NS-WSW160 Yamaha's signals content is a wireless proprietary yAired subwoofer technology.
I Positioning the subwoofer on its side The subwoofer can be laid on its side when positioned on a rack. Turn counterclockwise To connect devices Removing the legs and sheets devices. Sheet the subwoofer wirelessly, The default The LINK indicator subwoofer and other to other the same group yAired-enabled Yamaha ID must be assigned ID of the subwoofer is AI. lights when is on and the devices the subwoofer are connected wirelessly.
If this product doesn't work as expected, resolve center. reading through it after No sound from the look for a possible these instructions, cause below'. disconnect the power If the issue cable The subwoofer is nol connected wirelessly. is not listed, all authorized Yamaha dealer o1"you cannot o1"service Make sure ll_e power cable is connected properly. subwoofer. The you are experiencing and contact Check it"the LINK indicalor lighls on llae rear ol lhe subwoofer 0_ p. 21.
@ YAMAHA CORPORATION © 2012 Yamaha Corporation Printedin IndonesiaZD86490
.................... _ ConrteCtlng the FM ;anto_n_ (YSp_4300 only) G ,,,, • ............................................... ,............................. i-i i_ _ Connecting aTV and a Blu-ray disc pl_y_ _, P_epnrln_l r_mol_, conlrot J ...... ............:: LL -7.
t..,t.,_ ¥ ....... ;,+,, .A,:G ...... t;?;] j:,+,:_Z1 '_3Z+: _:' :[ :¢*'tm Playing m_s_c s_c:,r od on r_ntPer_ o* USB dovi_e r_ver _ USB connection (Y._P-4300 only} i_,i En_oy[n_i TV in surro_r_d _ound >. ,,.__+,;i, i.::,.._;+t.,. : ¸,_,.,-, __:...
@ YSP-4300/YSP-3300 [ YSP-CU4300 + NS-WSW160 Digital Sound / YSP-CU3300 + NS-WSW160] Projector M Safety and Accessory Information For more detailed information, refer to the Owner's Manual on the CD-ROM. To view the Owner's Manual, click screen displayed automatically when you insert the CD-ROM into your PC. Then follow' the on-screen instructions. displayed automatically, open the "index.html" in the CD-ROM. Caution: Do not attempt to play this CD-ROM on an audio CD player.
FCC INFORMATION (for US customers) 1. 1 IMPORTANT NOTICE: DO NOT MODIFY THIS UNIT! This product, when installed as indicated in the instructions contained in this manual, meets FCC requirements. Modifications not expressly approved by Yamaha may void your authority, granted by the FCC, to use the product. 2. IMPORTANT: When connecting this product to accessories and/or another product use only high quality shielded cables. Cable/s supplied with this product MUST be used.
1 To assure the finest performance, please read this manual carefldly. Keep it in a safe place tUr future reference. 19 When using this unit for a long time, this unit may become Turn the power off. then leave this unit alone for cooling. 2 Install this unit in a well ventilated, cool, dry, clean place away from direct sunlight, heat sources, vibration, dust, moisture, and/ or cold. For proper ventilation, allow the following minimum clearances.
Before connecting, make sure you have received all of the following The YSP-4300 items.
Registering Your New Ya aha Product is Fast and Easy Thank you for purchasing a new product from Yamaha Electronics.We'd like to continue providing you with high quality products and better service. So, we've made it simple to register your new product purchase online. Please take a few minutes to visit our website at www.yamaha.comlYEClregistrationl and complete the information and questions included there.We appreciate your business and we look forward to hearing from you.
r Your Thank you for purchasing providing website Yamaha you with high quality products and complete is committed on our natural manual a new product the product to doing resources, on the enclosed Product from Yamaha Electronics. We would like to continue and better service. Please take a few minutes to visit our registration process at www.yamaha.
@YAMAHA LiMiTED HOME WARRANTY AUDIO ON PRODUCTS Thank you for selecting a YAMAHA product. YAMAHA products are designed and manufactured to provide a high level of defect-free performance. Yamaha Corporation of America (YAMAHA") is proud of the experience and craftsmanship that goes into each and every YAMAHA product.