
Update Manual


NUAGE Firmware Update Guide 5
■ Updating the NUAGE series firmware
Described below are the procedures to update the NUAGE series unit firmware.
Uncompress the compressed file you downloaded in advance.
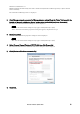
1. Double-click the NUAGE Workgroup Manager icon in the system tray (Windows) or menu bar (Mac) to
open NUAGE Workgroup Manager.
2. Add the device for which you want to update the firmware to the Workgroup area in the upper half of
the window.
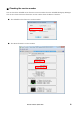
3. After communication has been established, display the property of the updating device.
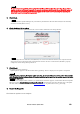
4. Click the “Update.”
The “Select update file” dialog box appears.
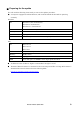
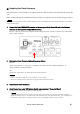
Firmware loading is started. A “updating the image” message will appear during loading the firmware.
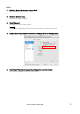
5. Select the firmware data file (***.nuage) in the extracted folder
6. When the firmware has been loaded, an "Update is completed" message flashes and the NUAGE series
automatically restarts.
7. Once you’ve updated the Nuage I/O firmware, manually turn on Nuage I/O again.
・According to your network status, the update may not have been completed correctly.
If the “Firmware Updating” dialog box is not updated for several minutes, execute the following procedures.
Close the “Firmware Updating” dialog box, wait three seconds, and check that the same dialog box opens again.
Turn off Nuage I/O, close the “Firmware Updating” dialog box, close the Properties window, turn on Nuage I/O
again, and update the Nuage I/O firmware from step 1.
When updating Nuage I/O and Dante firmware needs to be updated, execute the following procedures.
■ TCP/IP settings of computer
Before you update the Dante firmware, you must modify your computer’s TCP/IP settings.
After the firmware update procedure is complete, return the TCP/IP settings to their original settings.
Windows
1. Open the Network and Sharing Center as described below.
Windows 7
Select [Start] [Control Panel], then click or double-click [Network and Sharing Center] or [View network status
and tasks].