
User Manual


Keyboard Stand Assembly
34
YDP-164, YDP-144, YDP-S54 Owner’s Manual
The illustrations here are taken from the YDP-144.
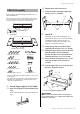
Remove all parts from the package and make sure you
have all of the items.
Remove foamed styrol pads from the package, position them on
the floor, then place A on top of them. Position the pads so that
they will not hide the speaker covers on the bottom of A.
* The adaptor may not be included, or may look different from the
illustration above, depending on your particular area. Please
check with your Yamaha dealer.
1. After untying the bundled pedal
cord on C, attach C to D and E and
fasten the screws (1-3).
1-1 Untie and straighten out the bundled pedal
cord.
1-2 Align D and E with each end of C.
1-3 Attach D and E to C by finger-tightening
the long screws (6 x 20 mm).
2. Attach B.
Depending on the model of digital piano you
purchased, the surface color of one side of B may
be different from the other side. In this case,
position B so that the side of the surface color
similar to D and E faces the player.
2-1
Place the lower side of B on each foot of D
and E, then attach the upper side to D and E.
2-2 Attach the top of B to D and E by finger-
tightening the thin screws (4 x 12 mm).
2-3 While pressing on the lower part of D and E
from the outside, secure the bottom ends of
B using two tapping screws (4 x 20 mm).
YDP-164, YDP-144 Assembly
Bundled pedal cord inside
AC adaptor
(YDP-164)
Power cord
(YDP-164)
AC adaptor
(YDP-144)
Cord holder
Speaker cover Speaker coverFoamed styrol pads
6 x 20 mm long screws x 4
6 x 16 mm short screws x 4
4 x 20 mm tapping screws
x 4
4 x 12 mm thin screws x 2
Caps x 4
Headphone hanger set (YDP-164 only)
4×10 mm thin screws
Headphone hanger
1
-
3
1
-
2
1
-
1
Untie the two vinyl strings.